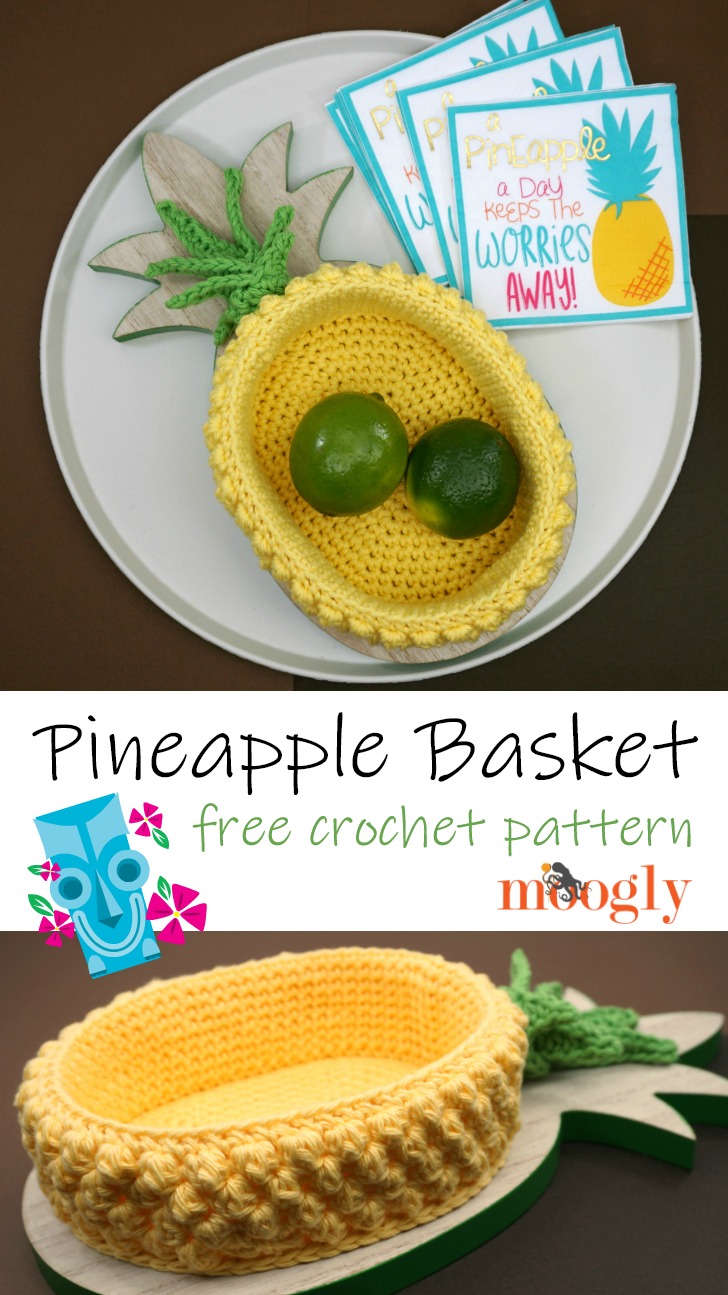
Pineapples have been a home decor staple for generations, and they are having yet another moment in the sun. To celebrate this lucky fruit - and the return of summer - I've designed the Pineapple Basket. And I'm sharing the free crochet pattern right here on Moogly!
Disclaimer: This post includes affiliate links; materials provided by Red Heart Yarn and Brittany Needles.
Prefer an ad-free PDF? You've got options!


Prefer the free blog version? Keep scrolling!
Big Pineapple or Little Pineapple?
The free crochet Pineapple Basket pattern features Red Heart Scrubby Smoothie and a few clever stitches and tricks to create a pineapple shaped bowl you'll love to use and show off.

The Pineapple Basket pattern begins with a simple crochet oval. While I've taken it out to 10 rounds, you can stop increasing at any time if you'd like a smaller crocheted pineapple bowl. Or you can add more rounds in pattern to make it even bigger! As long as you have an even number of stitches, the rest of the pattern works just fine.
After you make the oval, you make the inside sides of the bowl, and then finally the small bobbles that create the outside sides - one quick fold, add the crown, et voila - a crocheted pineapple basket, ready to use!

Pineapple Basket
Add this pattern to your Ravelry Queue and Favorites
US - H, 5.0mm hook - Brittany Needles
150 yds Red Heart Scrubby Smoothie (100% Cotton; "4"/Medium/Worsted/UK: 10-12 ply; 3.5oz/100g; 153 yd/140 m)
Color A: Lime (1 ball)
Color B: Lemony (1 ball)
This yarn is discontinued. Recommended substitutions include Lily Sugar'n Cream, Bernat Handicrafter, and WeCrochet Dishie.
Darice Clear Plastic Canvas - cut 2 pcs, each 1 ⅞" wide and 10.5" long
Gauge: 14 sts x 16 rows = 4"/10 cm in sc
Size: Basket portion is 7 ⅛" long x 5 ¾" wide, excluding crown.
Helpful Links & Tutorials:
Front Loop Only (FLO) and Back Loop Only (BLO)
Special Stitch:
Small Bobble (SMB) - dc3tog in the same st, pushing the "bobble" to the front when making the next st
NOTES:
To make a smaller basket, simply stop increasing between Rnds 1 and 10 when you have the size desired, and skip to Rnd 11.
To make a larger basket, continue to increase in pattern after Rnd 10, before continuing with Rnd 11.
The first rnd is worked into both sides of the foundation chain.
INSTRUCTIONS:
Crown Portion: Use Color A
The leaves of the crown are made in one long strip that is then set aside until assembly. Do not break the yarn between the leaves - just keep crocheting. Crochet into the back/underside of each chain for best results.
Leaf 1: Ch 5, skip the ch closest to the hook, sl st in next ch, sc in next ch, hdc in next st, dc in last ch.
Leaves 2 and 3: Rep Leaf 1.
Leaf 4: Ch 7, skip the ch closest to the hook, sl st in next ch, sc in next ch, hdc in next 2 chs, dc in last 2 chs.
Leaves 5 and 6: Rep Leaf 4.
Leaf 7: Ch 10, skip the ch closest to the hook, sl st in next ch, sc in next ch, hdc in next 3 chs, dc in next 3 chs, tr in last ch.
Leaf 8: Ch 12, skip the ch closest to the hook, sl st in next ch, sc in next 2 chs, hdc in next 3 chs, dc in next 3 chs, tr in last 2 chs.
Leaf 9: Rep Leaf 8.
Finish Crocheting the Leaf Strip: Turn leaves to work across the last st of each leaf, ch 1, hdc 4 along each of the last (tr) sts of Leaves 9, 8, and 7, hdc 3 along each of the last (dc) sts of each rem leaf; break yarn leaving an 18" tail.
Prep the Leaf Strip: Lay Leaf Strip on a clean, non-textured surface. Spray each side lightly with spray starch, and allow to air dry flat and straight.
Basket Portion: Use Color B
Rnd 1: Ch 7, sc in the 2nd ch from the hook, sc in the next 4 chs, 3 sc in the last ch wrapping around to the underside of chs, sc in base of next 4 sts, 2 sc in base of first st; join. (14 sts)
Rnd 2: Ch 1, 2 sc in the first st, sc in the next 4 sts, 2 sc in each of the next 3 sts, sc in the next 4 sts, 2 sc in each of the last 2 sts; join. (20 sts)
Rnd 3: Ch 1, sc in the first st, 2 sc in the next st, sc in the next 4 sts, [sc in the next st, 2 sc in the next st] 3 times, sc in the next 4 sts, [sc in the next st, 2 sc in the next st] twice; join. (26 sts)
Rnd 4: Ch 1, sc in the first st, 2 sc in the next st, sc in the next 6 sts, [2 sc in the next st, sc in the next 2 sts] 3 times, sc in the next 4 sts, 2 sc in the next st, sc in the next 2 sts, 2 sc in the next st, sc in the last st; join. (32 sts)
Rnd 5: Ch 1, sc in the first 2 sts, 2 sc in the next st, sc in the next 7 sts, [2 sc in the next st, sc in the next 3 sts] 3 times, sc in the next 4 sts, 2 sc in the next st, sc in the next 3 sts, 2 sc in the next st, sc in the last st; join. (38 sts)
Rnd 6: Ch 1, sc in the first 2 sts, 2 sc in the next st, sc in the next 8 sts. [2 sc in the next st, sc in the next 4 sts] 3 times, sc in the next 4 sts, 2 sc in the next st, sc in the next 4 sts, 2 sc in the next st, sc in the last 2 sts; join. (44 sts)
Rnd 7: Ch 1, sc in the first 3 sts, 2 sc in the next st, sc in the next 9 sts, [2 sc in the next st, sc in the next 5 sts] 3 times, sc in the next 4 sts, 2 sc in the next st, sc in the next 5 sts, 2 sc in the next st, sc in the last 2 sts; join. (50 sts)
Rnd 8: Ch 1, sc in the first 4 sts, 2 sc in the next st, sc in the next 10 sts, [2 sc in the next st, sc in the next 6 sts] 3 times, sc in the next 4 sts, 2 sc in the next st, sc in the next 6 sts, 2 sc in the next st, sc in the last 2 sts; join. (56 sts)
Rnd 9: Ch 1, sc in the first 5 sts, 2 sc in the next st, sc in the next 11 sts, [2 sc in the next st, sc in the next 7 sts] 3 times, sc in the next 4 sts, 2 sc in the next st, sc in the next 7 sts, 2 sc in the next st, sc in the last 2 sts; join. (62 sts)
Rnd 10: Ch 1, sc in the first 6 sts, 2 sc in the next st, sc in the next 12 sts, [2 sc in the next st, sc in the next 8 sts] 3 times, sc in the next 4 sts, 2 sc in the next st, sc in the next 8 sts, 2 sc in the next st, sc in the last 2 sts; join. (68 sts)
Rnd 11: Ch 1, sc in FLO of each st around; join. (68 sts)
Rnd 12 - 19: Ch 1, sc in each st around; join. (68 sts)
Rnd 20: Ch 1, sc in BLO of each st around; join. (68 sts)
Rnd 21: Ch 1, sc in the first st, SMB in next st, *sc in next st, SMB in next st; rep from * around; join. (68 sts)
Rnd 22: Ch 1, SMB in the first st, sc in the next st, *SMB in next st, sc in next st; rep from * around; join. (68 sts)
Rnd 23 and 24: Rep Rnd 21 and 22.
Rnd 25 and Assembly:
- Insert plastic canvas pieces between the bobble section and the sc sides, with the ends overlapping at the sides of the basket.

- (Rnd 25 beginning): Ch 1, sc through each st AND the unused Back Loop from Rnd 11, directly below, sandwiching the canvas between the layers of crochet until you are about 3-5" from finishing the rnd. Secure loop with a stitch marker.

- Roll the Crown up, RS out, starting with Leaf 9 and ending with Leaf 1 on the outside. Using the long tail left behind, secure the base of the Crown and then sew the Crown to the top of the pineapple, going through the bobble portion and putting a few stitches through the plastic canvas if desired. Finish off.

- (Rnd 25 finishing): Reinsert hook in loop left behind and continue to sc through each remaining stitch and Rnd 11 back loop to end; join and finish off. (68 sts)
I hope you've enjoyed making your own Pineapple Basket! What will you put in yours? There are so many possibilities!

If you make the Pineapple Basket I’d love to see a photo. So if you share it on social media, be sure to tag me @mooglyblog or #mooglyblog – and happy crocheting!
The Fine Print
Written pattern copyright Tamara Kelly 2018, all rights reserved. Please do not reprint or repost this pattern, but please do link to this page to share this pattern with others. If you wish to make items for sale from this pattern or translate it to another language, please visit the About page for details. Thank you to Red Heart Yarn, Brittany Needles, and Clover USA for providing the materials for this pattern.


Rie says
Way cool!. Can't wait for the video.
Tamara Kelly says
Thank you! Hoping to have it up this morning! 😀
Clotilde Menendez/Craftybegonia says
That is so very cute and "summery". Liked it a lot an shared it.
Tamara Kelly says
😀 Thanks so much Clotilde!
Pat Lehnen says
This pineapple basket was just added to my very long list of future projects. Speaking of that list, I saw a crocheted rug on your site some time ago and I forgot to save it. All I can remember is that it was 42 inches in diameter. Does that sound familiar to you? If not, I am mixing my facts about this rug. I want to make one for my bedroom. Any help is greatly appreciated.
Tamara Kelly says
Hi Pat! Thank you! 😀 Was it perhaps this rug? It's my only round one, and it's 42": https://www.mooglyblog.com/shocking-mandala-rug-pattern/
Pat Lehnen says
YES!! Thanks for so much inspiration and information on all things crochet. I can count on you to give me the right stuff each time I open your emails. Thanks again
Tamara Kelly says
Oh I'm so glad! Thank you Pat!
Alka Gudadhe says
Wow!! Looks so pretty. I shall try it some times. Thanks for the pattern.
Tamara Kelly says
You are very welcome - and thank you! 😀
Mary says
Thank you for the pattern AND the much appreciated video tutorials! fun project!
Tamara Kelly says
😀 Thank you!
Debbie says
I've been trying to crochet this beautiful pineapple basket for three days and I just can't get it 😢 I'm sure there's nothing you can do to help me. I've even watched the video. Thank you for such a great basket. I may get someday. 😊
Tamara Kelly says
🙁 I'm happy to try to help if I can answer any questions!
Debbie says
Basket done in two parts I just cannot figure out what's going on here that also everytime I do around it seems like I'm once too short even though even though I joined and chain and I still come up I still short I I guess I just don't understand your directions thanks anyway
Tamara Kelly says
Hi Debbie! Did you watch the video? I'm happy to answer any questions that I can!
debbie says
I did but it didn't get to how you attach the bobbles. I'm sorry to bother you. I just don't understand the pattern. I'm a novice at this. I've tried making the Oval 10 times and that shouldn't be hard to do I know. Thanks for your help.
Tamara Kelly says
The bobbles are demo-ed beginning at minute 26 or so. 🙂
debbie says
Thank you I'll check it again 🙂
Patricia n. says
I have an oval shaped bowl for chips and guacamole. I'm going to try to make it the right size to place the bowl inside the pineapple! Shouldn't be too difficult if I work at it. I'll try to post a pic when it is done. This is just what I have been looking for. Thank you so much!
Tamara Kelly says
Oh that's such a fun idea! 😀 I can't wait to see!!
Jennie G. says
A hint on making ovals in the right proportions for your project - measure how big you want it to be, for example 5" x 8" and make the beginning chain the DIFFERENCE between the length and width. In this case it would be 3" I've had to adjust a couple of oval tablecloths to fit certain tables, and I came realize that "rule of thumb".
Roylyn Alexander says
after round 10... if I wanted to make it bigger how would I go about the increases and how many stitches do I need around to do the bobble stitch? Trying to make this into a Possum bed for a wildlife rehabber that has a baby named Pineapple!!
Tamara Kelly says
Hi Roylyn! When you look at Rnds 8, 9, and 10, do you see how the numbers increase? If you keep that pattern, you should be able to keep growing your oval. 🙂 The bobble stitch portion is just any multiple of 2, so you should be good on that part. 🙂
Laura Hubbell says
Starting in rd 3 you say 4sc, 4th rd you say 6sc. Do you mean 4sc in the next st in rd 3 and in rd 4, does 6sc mean in one st? I'm confused about this cause you usually say in the next stitch but these just say 4sc or 6sc respectfully. I'm fairly new at this so please help me understand what your instructing me to do. Thank you!
Tamara Kelly says
Hi Laura! sc 4 and sc in the next 4 sts are the same instructions. I'm sorry that was unclear, I can see how I could have written that better. I'll update the pattern. 🙂
Nithishri says
Big pineapple how much steches To start beginning
Tamara Kelly says
Hi Nithishri! Please review the pattern and linked tutorial above!
Miss Mahtab says
Nice pattern i like it very much. amazing thoughts and creative design with useful idea.
Tamara Kelly says
Thank you so much!
Lisa says
This is so cute! My sister-in-law is a huge pineapple fan, and a teacher. I’m going to make this for her to put on her desk at school. Do you have dimensions and instructions for the wooden base? I don’t think I can have the basket without the base because my brain says they go perfectly together. Thanks in advance!
Tamara Kelly says
The base was just something I picked up in the Target dollar spot!