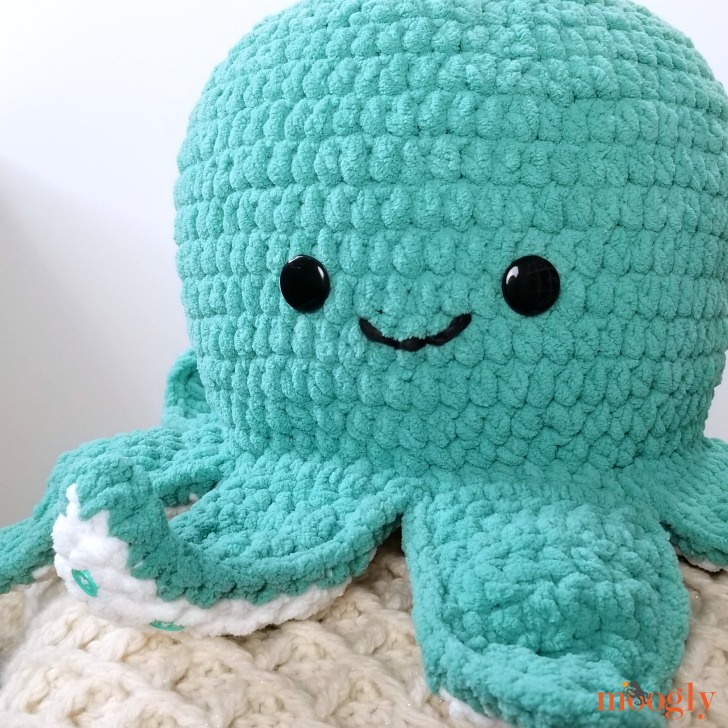
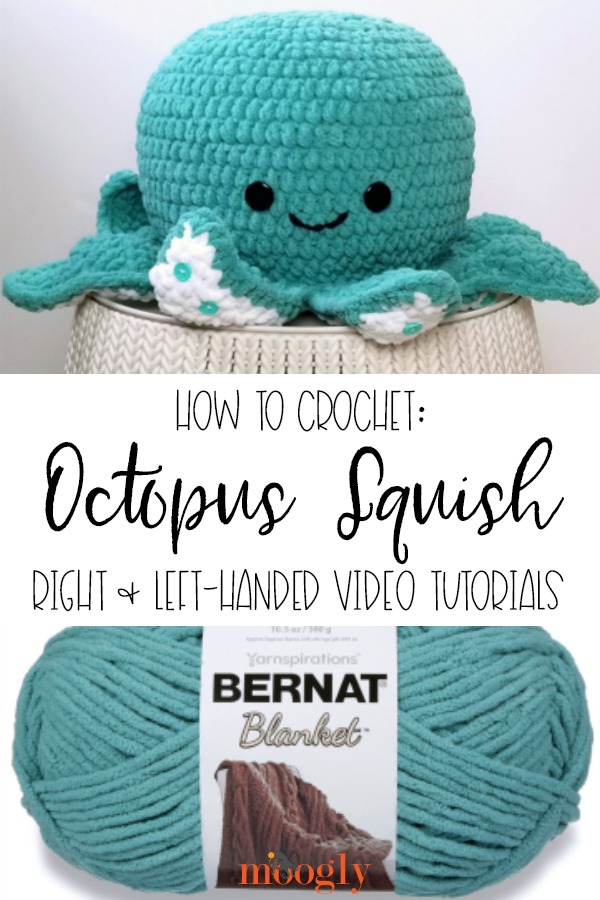
The Octopus Squish Tutorial takes you through the basics of this adorable and huggable free crochet softie pattern - in both right and left-handed videos!
Disclaimer: This post includes affiliate links; materials provided by Yarnspirations and Furls USA.
Octopus Squish Tutorial:
How to Crochet the Octopus Squish - Right Handed
How to Crochet the Octopus Squish - Left Handed
As Seen in This Video (click each for more info!):
Octopus Squish - FREE CROCHET PATTERN
US-L, 7.0 mm hook - Furls
320 yds Bernat Blanket
Coats Sewing Thread - White


And here's a Pin for your Crochet Pinterest Board! Make sure you are following Moogly on Pinterest for all the best knit, crochet and craft pins!
I hope you enjoyed this tutorial for the Octopus Squish! If this video doesn't answer all your questions about this free crochet pillow pattern, please ask in the comments below - I'm always happy to help!
If you make this or any Moogly pattern, be sure to tag me in your photos so I can see them too, @mooglyblog or #mooglyblog! I can't wait to see your wonderful projects! Thanks so much for reading and watching!
Get Moogly on your favorite social media sites: Facebook, Twitter, Pinterest, Instagram & TikTok! And sign up for the free newsletter at the bottom of the page so you don’t miss a thing! Thank you to Yarnspirations and Furls for providing the materials for this video.

Sue Thorp says
Just love this pattern.
Tamara Kelly says
Thank you so much, Sue! ♥
Ariel says
Hi!
How much of the white yarn did you use for the underside of the octopus? I'm wondering if some of my partial skeins would work.
Thanks?
Tamara Kelly says
Only about half! 🙂
Anita Cordova says
I am working on the octopus n want to thank you for sharing this easy pattern
Tamara Kelly says
Thank you so much, Anita! ♥
Anastasia says
where can i find the online instructions?
Tamara Kelly says
The written pattern is at https://www.mooglyblog.com/octopus-squish/ - it's the first link below the videos. 🙂
Anastasia says
is there a PDF for the instructions?
Tamara Kelly says
Yes, you can get a PDF from Ravelry or from LoveCrafts - both are linked in the written pattern: https://www.mooglyblog.com/octopus-squish/
Jess says
hello
i am still confused with octopus squish.
like when the pattern says 2 hdc in the next stitch those that mean 2 inside the same stitch ?
same with this one hdc in the next 3 sts ?
round 16-17 what those it mean by Rnd 16: *Hdc in next 17 sts, hdc2tog; rep from * around. (72 hdc)
Rnd 17: Hdc in next 4 sts, hdc2tog,
sorry for so many questions
Hope to hear back soon 🙂
Tamara Kelly says
Hi Jess! When the number is in front of the st name, that means you work that many of those sts in the next stitch. 2 hdc in the next st means you make 2 half double crochet stitches both in the top of the next stitch.
When the number is after the st name, you work that stitch in that many of the next stitches. Hdc 2 means you work one hdc in each of the next 2 sts.
Hdc2tog is a decrease, where you turn two stitches into one stitch - there is a tutorial here: https://www.mooglyblog.com/half-double-crochet-decreases-hdc2tog/
So "Hdc in the next 17 sts, hdc2tog" means you work half double crochet stitches in the next 17 stitches, then you work a hdc2tog over the next 2 sts.
"Hdc in the next 4 sts, hdc2tog" means you work half double crochet stitches in the next 4 sts, then you hdc2tog over the next 2 sts.
Does that help?
CrochetHurts says
I had seen this pattern earlier this summer but figured it was too complicated for me due to the use of the hdc and the under part bit. However having watched the video whilst recovering from a wrist tendonitis, I am very surprised of how easy it seemed and can't wait to give it a try!
Tamara Kelly says
Yay, I'm glad you gave it a look! And I hope you heal quickly! ♥
celia says
hi im trying to make this what shape should it be by the 10-15 stitches
Tamara Kelly says
Hi Celia! It should be a flat circle until Rnd 7, is that what you're asking?
Lauren Lloyd says
do you only need one skein of the blue? and 1/2 of the white yarn?
Tamara Kelly says
That's what I used, but note that this yarn comes in different sized balls and I had the largest. 🙂
Lauren Lloyd says
also, I meant to ask if there was a way to scale this up to be larger?
Tamara Kelly says
Yes, use a thicker yarn or this yarn held doubled and a larger hook! 🙂
Grace says
How much of the blue yarn did you use? I'm trying to figure out how much I need to get.
Tamara Kelly says
The yarn amounts are listed in the written pattern: https://www.mooglyblog.com/octopus-squish/ 🙂
Amanda says
Hello Tamara! I have a couple balls 8” size
Can u please tell me how can I stitch this adorable octopus to fit an 8” ball? This is so so cute, cannot wait to try it
Thanks a bunch and I look forward to hearing from you soon
Amanda
Tamara Kelly says
Hi Amanda! That's a tough one, as the stitch count is important. I think I'd try using a bulky yarn instead of super bulky! 🙂
Kelly P Masters says
Hello! I ordered the 10 inch ball and have triple checked my body but the ball is way too big for tbe body. The body has a 10 inch diameter. I'm still a beginner so not sure what I did wrong. May just stuff with poly fill. Any thoughts?
Tamara Kelly says
You should be able to stuff it in there, but I'd double check your gauge!
Erica says
Hi,
I have tried making the first tentacle several times and even watched the video to do it along with you. Is the tentacle supposed to be symmetrical (like a triangle) or more like a wave/'S' shaped? If it's supposed to be symmetrical do you have any suggestions on what I might be doing wrong?
Tamara Kelly says
It's supposed to be S shaped - sounds like you're doing it right! 🙂
Elaine says
I seem to have only room for 7 tentacles. Am I supposed to start in the same last stitch of the previous tentacle when starting a new one?
Tamara Kelly says
Hi Elaine! You should have 56 sts in the rnd before you begin the tentacles, and each tentacle is 7 sts wide, so they shouldn't overlap. Be sure to check your Rnd 18 stitch count! 🙂
Poonam says
I followed the pattern exactly like it is on here and purchased all the materials by clicking on the link on your tutorial. For some reason I come to the end to put body and underbelly together and the 10” microbead pillow is too big. Has this happened to anyone else? I just don’t know what I could’ve done wrong.
Tamara Kelly says
Hi Poonam! After I made a few more I found that the manufacturer sometimes overstuffs their balls. So in that case, I open the seam a little bit, let some of the stuffing out, and resew it closed. 🙂 I hope that helps!
Poonam Rani says
This worked wonders. Thank you so much Tamara it looks amazing. I’m about to make another one as we speak.
Tamara Kelly says
I'm so glad to hear it, thank you!
Lori says
Hi, I’ve made the octopus, and the jellyfish.
Thank you so much for the videos. You are amazing!!
Tamara Kelly says
Thank you so much, Lori!
SJ Marasigan says
Hi Tamara,
I recently came across this pattern and have been working on it as a gift for my nephew. I'm new to amigurumi but this has been a great one to learn off of. The only thing I'm having trouble with is how do you connect the two pieces together? I've read the pattern over and over and watched the video a lot but there aren't any details or step-by-step for that part. The video just kinda ends with it already done. I see that it needs a single stitch, but I don't know how to start it or where to put my hook on the edges, etc. (Visual learner here.) Any tips? Also, I ended up using a thinner acrylic yarn for this. How would you recommend I clean it and get the fuzzies off when it's all done?
Thank you for all your hard work!
Tamara Kelly says
Hello, and thank you! You work the sc stitch through both layers, all the way around - here is a seaming tutorial: https://www.mooglyblog.com/slip-stitch-single-crochet-seaming/ 🙂
For getting off fuzzies, I'd start with a lint roller and then maybe even a lint shaver if it's called for!
Kayla says
Hey there! I love the look of this little guy! I’m just having a little trouble getting the body shape correct. It doesn’t seem to be as long as yours and I’m using the same yarn and hook size as you but for some reason it looks more like a like round basket with a flat top instead of spherical. Do you have any suggestions on how to fix that? Thanks so much!
Tamara Kelly says
Double check the gauge, and see if putting the ball in it changes the shape!