
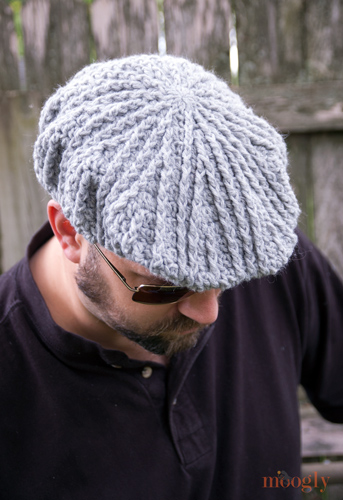
A while ago I debuted the Big Boy's Cabled Golf Cap as a free crochet pattern. And within the hour I had a bunch of requests for upsizing! I played around with different hooks and yarn weights, tried adding and subtracting rows, and now I finally have the details ready on how to make the Men's Cabled Golf Cap, sized up to standard men's size. Of course, women can wear this hat too - and if the brim is a little too big, try making the last couple brim rows with more tension or a smaller hook.
Disclaimer: This post includes affilate links.
Prefer an ad-free PDF? You've got options!


Prefer the free blog version? Keep scrolling!

Men's Cabled Golf Cap
Add this pattern to your Ravelry Queue
US - J, 6.0 mm hook
178 yards worsted weight yarn (Grey Heather)
Shown in
Gauge: 5" across after Round 5
Size: Adult (22-24" head)
Klik hier voor de Nederlandse PDF van dit patroon!
Helpful Links and Video Tutorials

Men's Cabled Golf Cap Instructions:
Rnd 1: Starting with a magic circle, ch 2 (does not count as a st) and work 12 dc in the ring. Join to the first dc with a sl st. (12 sts)
Rnd 2: Ch 2, work a fpdc and then a dc in each st around. Join to first fpdc with a sl st. (24 sts)
Rnd 3: Ch 2, fpdc in the 1st st, 2 dc in the next st. *Fpdc in the next st, 2 dc in the next st. Repeat from * to end. Join to first fpdc with a sl st. (36 sts)
Rnd 4: Ch 2, fpdc in the 1st st, [dc, fpdc] in 2nd st, dc in the next st. *Fpdc in the next st, [dc, fpdc] in the next st, dc in the next st. Repeat from * to end. Join to first fpdc with a sl st. (48 sts)
Rnd 5: Ch 2, fpdc in the 1st st, dc in the next st, 2 fpdc in the next st, dc in the next st. *Fpdc in the next st, dc in the next st, 2 fpdc in the next st, dc in the next st. Repeat from * to end. Join to first fpdc with a sl st. (60 sts) At this point the circle should be approximately 5" across.
Rnd 6: Ch 2, fpdc in the 1st st, dc in the next st, [fpdc, dc] in the next st, fpdc in the next st, dc in the next st. *Fpdc in the next st, dc in the next st, [fpdc, dc] in the next st, fpdc in the next st, dc in the next st. Repeat from * to end. Join to first fpdc with a sl st. (72 sts)
Rnd 7: Ch 2, fpdc in the 1st st, dc in the next st, fpdc in the next st, 2 dc in the next st, fpdc in the next st, dc in the next st. *Fpdc in the next st, dc in the next st, fpdc in the next st, 2 dc in the next st, fpdc in the next st, dc in the next st. Repeat from * to end. Join to first fpdc with a sl st. (84 sts)
Rnd 8: Ch 2, fpdc in the 1st st, dc in the next st, fpdc in the next st, 2 dc in the next st, dc in the next st, fpdc in the next st, dc in the next st. *Fpdc in the next st, dc in the next st, fpdc in the next st, 2 dc in the next st, dc in the next st, fpdc in the next st, dc in the next st. Repeat from * to end. Join to first fpdc with a sl st. (96 sts)
Rnd 9: Ch 2, fpdc in the 1st st, dc in the next st, fpdc in the next st, dc in the next 2 sts, 2 dc in the next st, fpdc in the next st, dc in the next st. *Fpdc in the next st, dc in the next st, fpdc in the next st, dc in the next 2 sts, 2 dc in the next st, fpdc in the next st, dc in the next st.. Repeat from * to end. Join to first fpdc with a sl st. (108 sts)
Rnd 10: Ch 2, fpdc in the 1st st, dc in the next st, fpdc in the next st, dc in the next st, [dc, fpdc] in the next st, dc in the next 2 sts, fpdc in the next st, dc in the next st. *Fpdc in the next st, dc in the next st, fpdc in the next st, dc in the next st, [dc, fpdc] in the next st, dc in the next 2 sts, fpdc in the next st, dc in the next st. Repeat from * to end. Join to first fpdc with a sl st. (120 sts)
Rnd 11 - 13: Ch 2, fpdc in the 1st st, dc in the next st, fpdc in the next st, dc in the next 2 sts, fpdc in the next st, dc in the next 2 sts, fpdc in the next st, dc in the next st. *Fpdc in the next st, dc in the next st, fpdc in the next st, dc in the next 2 sts, fpdc in the next st, dc in the next 2 sts, fpdc in the next st, dc in the next st. Repeat from * to end. Join to first fpdc with a sl st. (120 sts)
Rnd 14: Ch 2, fpdc in the 1st st, skip next st, fpdc in the next st, dc2tog, fpdc in next st, dc2tog, fpdc in next st, skip next st. *Fpdc in the next st, skip next st, fpdc in the next st, dc2tog, fpdc in next st, dc2tog, fpdc in next st, skip next st. Repeat from * to end. Join to first fpdc with a sl st. (72 sts)
Rnd 15: Ch 1, sc in the first 11 sts, skip the next st. *Sc in the next 11 sts, skip the next st. Repeat from * to end. Join to first sc with a sl st. (66 sts)
Rnd 16: Ch 1, sc in the FLO of the 1st st, sc in the BLO of the next st. *Sc in the FLO of the next st, sc in the BLO of the next st. Repeat from * to end. Join to first sc with a sl st. (66 sts)
Rnd 17: Ch 1, sc in the BLO of the 1st st, sc in the FLO of the next st. *Sc in the BLO of the next st, sc in the FLO of the next st. Repeat from * to end. Join to first sc with a sl st. (66 sts)
Rnd 18: Repeat Round 16. Do NOT break yarn, continue with Brim (worked in Rows) below.
START THE BRIM - SWITCH TO ROWS
Row 19: Ch 2, dc2tog, dc in the next 14 sts, dc2tog. Leave remaining sts unworked, turn. (16 sts)
Row 20: Ch 2, dc2tog, *dc in the next 5 sts, dc2tog. Repeat from * once. Turn. (13 sts)
Row 21: Ch 2, dc2tog, dc in the next 3 sts, dc3tog (worked the same as a dc2tog but uses 3 sts), dc in the next 3 sts, dc2tog. Turn. (9 sts)
Row 22: Ch 1, sc in each st across. Turn. (9 sts) (Folding Row)
Row 23: Ch 2, 2 dc in the 1st st, dc in the next 3 sts, 3 dc in the next st, dc in the next 3 sts, 2 dc in the last st. Turn. (13 sts)
Row 24: Ch 2, 2 dc in the 1st st, *dc in the next 5 sts, 2 dc in the next st. Repeat from * once. Turn. (16 sts)
Row 25: Ch 2, 2 dc in the 1st st, dc in the next 14 sts, 2 dc in the last st. (18 sts) Break yarn, leaving a 24" tail for sewing.

Assembly: Fold brim on Row 22, so that Rows 23-25 are on top of Rows 20-22. (See photos below.) Bring front of hat body down to meet brim, and use tail to whip st them together, being sure to sew through both layers of the brim. Finish off and weave in ends.

This cap is great for the full grown golfer or flat cap aficionado - my grandfather-in-law had an extensive collection, I wish I'd had the chance to make one for him. I hope you enjoy making this hat for the ones you love! And I want to give many kudos to my husband Geoff for playing model - he prefers working behind the camera and he was a great sport to model for me!
The Fine Print
Written pattern copyright Tamara Kelly 2013. Please do not reprint or repost this pattern, but please do link to this page to share this pattern with others. If you wish to make items for sale from this pattern, please visit the About page for details.


Susan Jackson says
Many thanks to you Tamara and Geoff for your efforts to make and model this golf hat for men! I know my husband will love it! I will be looking for yarn this weekend! Thanks again to you both!
lisa says
Thanks! Just enough time to whip it up for Father's Day.
Roberta Guzower Jackson says
I just finished row four and it's very curly is that normal? I've double checked I've even taken it apart twice and it's still curly / wavy. Will the other stitches pull it down later on?
Tamara Kelly says
Hi Roberta! A bit of ruffling is normal. Be sure to check your gauge after the next round to make sure. 🙂
Lee Ann says
What a terrific pattern! Thank you very much!
______
Lee Ann H
Posted with Blackberry Z10!
Crochet...Gotta Love It! Blog
Crochet...Gotta Love It! Website (crochet names and rosary patterns)
Evie says
Thank you so much for adapting this pattern to fit an adult head. Looking forward to making it. :o)
CheVon Bell says
Hello, I just finished making your Men's Cabled Golf Cap, and I just wanted to say I absolutely LOVE it! The pattern was so easy to follow and it only took me one day to complete. I wrote a blog post, linking back to your blog. I hope you'll be willing to check it out: http://www.stitchfixer.com/mens-cabled-golf-cap/
Tamara Kelly says
I can't see the blog post (404 error), but I'm so glad you like the pattern! 😀
Jackie says
I am trying to make this golf cap and it seemed to go wonky at row 8 do you have a toutorial for this I would love to follow along with one I think it would help.
Tamara Kelly says
Unfortunately, this pattern is from before I did tutorials. Can you tell me what problem you're having and I'll try to help?
CheVon Bell says
That's interesting. When I click on the link (even in an incognito browser) it took me straight to the blog post. Not sure why it didn't work for you. Thanks for trying though! If you're really curious about seeing it, maybe try typing the url out rather than clicking on the link...
leolaura says
I will be making this hat today for my brother, I know he will love it!
Thank you for making this a free pattern.
As for the blog, it came right up for me
Monique says
I need help. I've made this twice now & both hats are too small for even my head much less my dad's. I used a 6 hook first time and second time I did a 6.5 & still to small. Any advice? Should possibly increase a few rounds?
Tamara Kelly says
Sounds like you've got a much tighter gauge - or it might be a different yarn. Adding a few rounds, or not decreasing as much, would definitely help.
Monique says
I used same yarn. I think my problem is I have tight tension. I made it again, it fit me, but not my dad lol. I'll try again though because he loved it 🙂
Chris says
After row 14 I had a large gap in the slip stitch area. Is that right or did I mess up somewhere? I love this pattern, by the way. It'll be a great gift for my dad.
Tamara Kelly says
Hi Chris! I'm not sure what your referring to as slip stitch area? There aren't any slip stitches in Round 14.
Chris says
At the end of the round when I finished with my slip stitch, I ended up with a large gap (from "skipped/leftover" stitches). If I continued with the pattern (*Fpdc in the next st, skip next st, fpdc in the next st, dc2tog, fpdc in next st, dc2tog, fpdc in next st, skip next st. Repeat from *) I ended up with more than 72 stitches 🙁
Where did I mess up?
Tamara Kelly says
Ah, the sl st at the end, I didn't think of that one. Hm, I'm wondering if you are crocheting in the sts behind the post sts? The ones you made the post st around? It's so hard to "diagnose" these things online.
Chris says
Hmm. I guess I'll have to go back and experiment. Thank you though!
Paige says
So I love this pattern, it's very simple but I'm having an issue. My circle is curling in the wrong way. From the picture, the cables are on the outside, my circle is curling so that the cables are on the inside...any suggestions?
Tamara Kelly says
This is normal with cables - as you work the hat down towards the brim you just turn in right side out. Some blocking will also help. Another thing you can do is to make sure to pull the loops of your post stitches up nice and tall before the last yo and pull through that finishes them off. 🙂
Paige says
Thank you so much!!!! I can't wait to finish it!!!
Laura says
Hi:
Round 4 has a (dc, fpdc) in same stich, which I know how to do but then Round 5 has a (fpdc, dc) in same stitch, and I'm not sure where to put the double crochet after making the fpdc. Thanks for the help.
Tamara Kelly says
Hi Laura! It's the same just in a different order. After working the fpdc around the post, go behind the just made fpdc to work the dc right into the top of that same stitch. Does that help?
Laura says
Yes, it does! Thank you so much! And thank you for such a lovely pattern. I'm only on Round 5 but it already looks great! 😀
V. says
Hi,
I am not sure how to do the (dc, fpdc) in the same stitch in Round 4.
Can you explain this further?
Tamara Kelly says
Sure! I'll try anyway. 🙂 The dc is worked into the stitch just as you normally would. Then, the fpdc is worked around the post of that same stitch. The top V of the post stitch will be a little to the left of the dc stitch. Does that help?
Amy says
I haven't made the hat yet but I'm really excited to make it. I do have a question. My husbands head is slightly larger than most. How would you suggest to add another row to to make it 24" around?
Tamara Kelly says
I think the easiest thing would be to bump up a hook size or use a thicker yarn - or just use a larger hook size for the brim portion! There are decreases before the brim as well, so eliminating some of the decreases would work too.
Amy says
Thank you very much!
Tamara Kelly says
My pleasure!
Marcela says
I loved this pattern. Initially intended for a man but it's the first hat I've liked on me. But, any chance you have more detail on making/sewing the brim? Can't figure out how to make it look remotely like yours. Thanks
Tamara Kelly says
I'm afraid I've shown everything I've done! I know some people have added a bit of plastic canvas or cardboard to help stiffen and shape it - maybe that will help?
feevee says
if i used a RED HEART yarn, what size of yarn will you suggest?.
thank you
Tamara Kelly says
Hi feevee! No matter the brand, I'd recommend a worsted weight yarn. It should have the yarn symbol "4" on the label. 🙂
feevee says
thank you for your response, i'll make one for my partner,sure he will like it,.
Teresa says
Por favor si alguien me lo puede pasar en español se lo agradezco porque es un modelo que siempre busque, gracias
Clare says
Hi. I've tried making this with 2 different wools that match the definition of worsted weight and even using a 8mm needle, and following your pattern exactly, it isn't coming up the right size. Not sure what to do but even using a chunky knit 4ply wool it is not crocheting up. Guess UK wool is not going to fit the bill. :/
Clare says
Sadly it fits my 7 year old child not an adult. Looks like a frisby on an adult
Tamara Kelly says
Hi Clare! Sorry you're having trouble. Are you getting gauge?
Clare says
complete muppet here. Didn't remember that you have different names for your stitches in the USA . Your dc is our treble and single is our DC and so on. Have now saved a converter so can enjoy your patterns without stressing ... My husband loved the hat (once finally and correctly crocheted) and my daughter has the other version 🙂
Tamara Kelly says
😀 Whew! I never think of it myself - we all get so stuck in our ways I think. Glad that's sorted!
John says
Hi Clare, I have only made this hat tonight and it worked up perfectly. I used a chunky yarn and a 6mm hook. I would normally use a 7mm hook for chunky but because the yarn was heavier than worsted weight I went down a hook size to compensate. Hope this helps.
Geri Swift says
My husband would love this but when I try to print it I get all the adds on the right hand side printed over the instructions. What can I do to avoid that? I love the pattern
Tamara Kelly says
If you use the green Print Friendly button at the bottom of the post you can customize your printout - just click on things to take them off the page! 🙂
eli says
Hi,tnx so much for these pattern,im a little confused about round 4. Is it dc and fpdc in one st?
Tamara Kelly says
Hi eli! Yes, they're in the same st. 🙂
eli says
Thank you,but unfortunately i could not make it,could you plz show it with photo?
Tamara Kelly says
I can try to add a photo in a while. But basically instead of skipping the top of the stitch like you normally would when working a post stitch, you also work into the top for the dc st.
eli says
Tnx very much for ur attention. Be success.
Julie says
I did as instructed and I came up with WAY more than 48 stitches ... I had 68. I've pulled this out and done round 4 three times now and I've got the same issue.
Julie says
I reworked it with the thought process that two posts will have coverage and one will end up being skipped ... I ended up with the correct st count. Yay!
Tamara Kelly says
I'm glad it worked out! 🙂
Ray allott says
At last, patterns for men. I have plenty of patterns for the ladies that I think are suitable for converting to male shape and size so this is great.
Tammy says
I was so happy to run across this pattern from you! I've made many of your designs and love them all. This one was particularly satisfying because I am working on making "cool" hats for the cancer center where my dad is getting his treatments. I wanted to make something other than just boring old beanies, and I could find lots for women, but very few quick and fun ones for men. Thanks again for another fabulous pattern!!!
Tamara Kelly says
<3 You're so welcome Tammy! Thank you for all you do!
Liza Faris says
Hi Tamara! I'm trying to crochet the golf cap for my husband but, having trouble with row 7. I get 88 stitches instead of 84. Please, help me!!!!!!!!!! Thanks!!!!!!!!
Tamara Kelly says
Hi Liza! It sounds like you've got a couple extra increases in there. There should only be 12 sts added in that row. I'm afraid it's hard to say where they're popping up though without being there.
Liza faris says
Hi Tamara: I started all over again from row 5, and this time I got it right. Thanks so much! For your help, for sharing your talent and patterns. I'm looking forward to finish the cap for my husband. Thanks again!!!!!!
Tamara Kelly says
😀 I'm so glad to hear it worked out! Thank you Liza!
Deb Y says
Love this hat... Have made three for Xmas present already!
Tks again! <3
Tamara Kelly says
😀 Awesome! Thanks Deb!
oranges says
In the round 11-13 section, it says to "Ch 2, fpdc in the 1st st, dc in the next st, fpdc in the next st, dc in the next 2 sts, fpdc in the next st, dc in the next 2 sts, fpdc in the next st, dc in the next st" After the last fpdc it says to dc in the next stitch when there are two stitches. I know that you meant to dc in the next 2 stitches, but it can be confusing so just letting you know.
This and all of your other patterns I've tried are really great 🙂 Thanks for all of them.
Connie White says
I love this pattern, and I'm glad you made it free. My son wants one for his birthday, which was yesterday! I have frogged this pattern many, many times, and I still can't get it right. My stitch count is ALWAYS off after round 4. My last attempt has 3 extra, should be 48 - I have 51! Please help!! Thank you so much in advance!!
Tamara Kelly says
Hi Connie, sorry to hear you're having trouble! I'll try to break it down.
In Round 3 you end with 36 sts. We're going to increase by 12 for Round 4, so that means you're going to increase by one stitch for every 3 sts. So as you begin Rnd 4, look at the first 3 sts of Rnd 3. In the first one, work a fpdc. In the next one, work both a dc and a fpdc. In the 3rd one, work a dc. Now begin again with the next set of 3 sts - fpdc in the first one, dc and fpdc in the next one, dc in the last one. Continue like that on around. Does that help?
Connie White says
I thought I had that down pat, I'm going to try once more right now. If I have trouble again, is there anyway to maybe send a picture of what I come up with?
Connie White says
I can say I am an intermediate crocheter, but you're never too old to learn something new or a new way of looking at things!! Tamara you are the Queen of crochet forever more!! I was looking at the whole row and the way you broke it down made ALL the difference!! I now have 48 stitches on row 4!! Now onward to row 5.... Thank you so much for the incite!!
Tamara Kelly says
Oh I'm so glad to hear it! 😀 Thank you so much Connie!
julie says
Do you have a tutorial video that shows some of the rows (ie: row 5).?
Tamara Kelly says
Hi Julie! I'm afraid I don't have any videos specifically for this pattern.
Mack K says
If I wanted to make this with a mercerized cotton lighter weight product, like Patons Grace or Aunt Lydia's superfije (1) crochet thread (& obviously a smaller needle), how would I adjust the pattern so the size remains the same for an adult?
Tamara Kelly says
You would either need to hold several strands together or rewrite the pattern to add a lot of rounds!
Tahar/Candice says
I am doing that right now for my husband. I am using 2 strands together and a smaller hook size. It seems to be working well, but I am only half way through so I will try to remember to comment when it is finished. Right now I am using a size H hook and the Aunt Lydia's classic size 10 thread. Hope you can do it too and thank you soooo much Geoff and Tamara for your efforts and commitment.
Tamara Kelly says
🙂 Thank you Tahar/Candice!
Cassie says
Hi Tamara.
Thank you for making such a gorgeous pattern.
Im hoping I can do it some justice, if i can ever work it out.
Was wondering if you have a diagram to go along with the written instructions?
Thanks
Tamara Kelly says
Hi Cassie! Thank you so much, I'm afraid I don't have a chart for this one.
Cassie says
Would it be OK, if i made one up, so that i can get my head around the pattern better? It would be for my purpose only.
Tamara Kelly says
Of course! 🙂
Annick says
I love the pattern and just made it for my husband in less than 2 days. It took me a while to figure out the pattern but once I got it, it worked up really fast. Thank you for sharing.
Tamara Kelly says
😀 Thank you Annick, I'm so glad to hear it!
Annabelle says
Thank you for sharing this pattern. Very easy to follow and works up well in several days.
Tamara Kelly says
Thank you so much Annabelle!
gina says
I'm trying to make this hat. I'm on row 13. It looks like a big ruffle. It would help if u had some "as you go" pictures. I have no idea if I'm doing this right.
Tamara Kelly says
I'm sorry Gina, this is an older pattern. Counting your stitches is the best way to make sure you're on track.
Sandra says
Hello, im trying to make this cap for a christmas present but im not sure which post belongs to each stich, is the post of a stich the one befor the actual stiche, so, to the right? Also, my cap appears to be much more loose, holes seem big compared to the one on your husband which seems a much tighter crochet but mine measures the same at round 5 as you said it should, im using Aran yarn. Any help and advice would be greatly received, wish you had a vidoe for this project like you have for the 60 minute slippers which I have made and added too successfully. Sandra, UK.
Tamara Kelly says
Hi Sandra! If you are right handed, it will be slightly to the right of the top V that you normally work into. Different yarns have a different "halo" so if your yarn is smoother it may make it look looser even at the same gauge.
Brianna says
Hi Tamara!
Thank you so much for all of your free patterns, they're amazing and really fun/challenging!! I'm running into a problem though, that I can't rectify. I'm confused about round 11; I'm working it with the mindset of the 10 stitches being repeated 12 times to get the 120 stitches for the entire round, but there seem to be open stitches from the previous round at the end of my 2nd set of 10. I'll try to give you a visual: Looking at the overall pattern of the hat, it seems like there are 3 prominent posts with a fan-like space of stitches separating them. It looks like the start of round 11 is in between the 1st and 2nd of 3 of the prominent posts that I mentioned, but that allowed me to work the 10 stitches correctly. Since the 2nd set of 10 stitches incorporates all 3 of the prominent posts, the 10 stitches end in the middle of the fan-like shape instead of reaching all the way to the next set of prominent posts.
Would you be able to tell me what it is that I'm doing incorrectly from my description? I would appreciate your help very much! Thank you again for sharing your talent with all of us!
Brianna says
Never mind! I think I just misread the order of the stitches and worked a dc where I shouldn't have; I've got it now ?
Tamara Kelly says
Oh good, I'm glad you were able to figure it out! 😀
MAS says
HAI TAMARA.. I ,LOVE THIS PATTERN.. CAN I USE THIS PATTERN FOR MYSEFT .. TQ
Tamara Kelly says
You can use it for whomever you like! 😀 Thank you!
RONSON says
Thank you so much for this wonderful pattern. I'm a beginner with just 3 months or so experience. I'm determined to do this right so please forgive this basic question which comes after my 5th attempt to go from rows 3 and 4. I've watched your videos and am satisfied I'm doing the fpdc stitches correctly. What I need to know is: when there is a [dc,fpdc] in the same stitch does the dc go in the top of the stitch under the V or in the same large hole as the post stitch? Thank you. 🙂
Tamara Kelly says
hello ronson! congrats on learning to crochet - you are very ambitious to jump into a cabled pattern already, well done! the answer is, you dc under both loops of the indicated st like a normal stitch, then fpdc around the post of the very same stitch.
RONSON says
Thanks for taking the time to reply, Tamara. Regarding being ambitious, the problem with starting a craft late in life is there's no time to waste so into the deep end I go. Anyway, I instantly fell in love with the cap and just have to master it. Cheers.
Tamara Kelly says
then i have full confidence you will do so!
Cecilia says
Dear Tamara, I'm currently at row 17 and found the hat too big... Which row(s) can I omit? Such row 12 and/or 13?
Tamara Kelly says
Yes, 12 and 13 would be good ones to omit for a smaller hat!
Cecilia says
Due to my yarn choice, I changed to 5mm hook and actually repeated rows 11 more times than your pattern instructed, and it worked 🙂
I've made a hat for my dad and posted on my blog (http://swang928.pixnet.net/blog/post/31710023)
Sorry it was in Traditional Chinese, however I don't feel the need to re-write in English again since your description is quite clear!
Thanks for the pattern and hope to work on your other patterns in near future.
Cecilia says
sorry, should be "row 11", not "rows 11"
Tamara Kelly says
It looks great! 😀 Thank you Cecilia!
Vivi says
HI Tamara,
Thank you so much for this pattern, but why not a video?? I´m trying to make it but I´m quite confused...
I will continue trying
Thank you!!
Tamara Kelly says
I can only fit in so many videos a year, I hope to be able to add one for this pattern someday. I know it's an intermediate/advanced level pattern.
Giselle Scull-Monroe says
I agree. I made it once and fussed about with it until it turned out OK. But, I really want to make a couple more for my son in different colors, but getting back into wrestling with it again is daunting. A video would be great, and so helpful!
Donna Myers says
Love this golf hat. My 94 year old father wears golf caps all the time, so I made him a black one by your pattern! Excellent instructions! I've got to the tacking of the brim. Ive folded over and stitched the brim. Am I suppose to tack it to the body of the hat all the way across at the single crochet fold??? Thank you for this free pattern!
Tamara Kelly says
That's up to you - every project is a little different, so I recommend sewing it down until if feels secure. 🙂
Teresa tressler says
Do you have a video to show how to do this? I get confused at round 4.
Tamara Kelly says
No, but it does sound like one is in order! Is there a particular part that is tripping you up? Would a chart help?
Gin says
Could you email me a copy of the instructions for the golf cap? Our printed copy came out with the ads on top of the print. I will have to copy them out by hand if you cannot. Thank you for the free pattern. Can not wait to begin. gin. P.S. My email address is in lower case. The system put it in caps, sorry.
Tamara Kelly says
Hi Gin! I'm afraid I cannot email copies of patterns. Please use copy and paste into a word document if the Print Friendly isn't working for you. 🙂
Lisa says
You wouldn't happen to have a video on this pattern would you? I'm just learning to read the written ones.
Thank you for the pattern
Tamara Kelly says
I'm sorry, not for this one, no. I hope to add one next year, if possible.
Charlene says
Hello, I am very confused on how to assemble the brim. Do you assemble brim with the with wrong side facing you? I'm not exactly sure where to fold for the third time and attach to front. Please help. Other than that the pattern is great and very easy to follow.
Tamara Kelly says
You fold it up towards the hat, as if you were rolling it up into the hat, towards the front of the hat. Does that help? 🙂 (And thank you!)
Charlene says
Yes, thank you. My on my question now is do you assemble with the wrong side still facing out
Thank you
Tamara Kelly says
I'm sorry I'm not sure what you mean by that question. You can turn it right side out?
Charlene Swank says
Yes ma'am. Do you assemble hat right side out?
Tamara Kelly says
I did, yes! 🙂
Charlene Swank says
Thank you so much! That helps a lot
Kelly O'Donnell says
So I probally should have picked an easier first hat but I loved the pattern. So the problem is mine looks like a mushroom and I'm not sure where I went wrong. It was the same 5in in the beginning and I counted every row stitches and those were correct. So I'm going to try it again but any hints might help. Oh I used j hook and lions brand fisherman wool worsted weight.
Thank you
Tamara Kelly says
Hi Kelly! This is indeed probably my most complicated pattern! By mushroom, I'm guessing it's too pointy on top? This might be helped by blocking!
Kelly O'Donnell says
Well i should have define mushroom better thinking about it I'd have to go with shower cap.. The hat is not flat. It round and kind of wavy on the sides I tried blocking but just can't get it to lay flat, and look like yours.
Tamara Kelly says
Aha, okay! Have you started the decreases at all?
Kelly O'Donnell says
we'll it was wavy before and just became more pronounced when I did the decreases. I can't remember when it stopped being flat I just kept going figuring it would flatten out when I was done.
Tamara Kelly says
It sounds like you might benefit from a bigger hook. 🙂
Kelly O'Donnell says
Ok I'll try going up one and see if that works
Thank you
Marion Yeomans says
I absolutely love this hat. I made a similar one watching a youtube video, and came across your pattern. Its the first time I've done anything with cables. I am using RED HEART yarn, worsted weight "4", and the project is curling A LOT! I am on row 11 and cannot flatten it out. I haven't gotten to the gauge yet.
Do you have any suggestions on how to fix this?
Tamara Kelly says
Hi Marion! Lots of blocking and maybe a bigger hook? It should have a little bit of stiffness to retain shape - when you start the decreases, it will pull in at the bottom for that golf cap shaping.
Marion Yeomans says
Ok, thank you. I also had the stitches tight, so that may have been an issue. I'll try loosening the tension and a bigger hook.
Katrina Yeager says
I have frogged row 6 nine times now and cannot come up with 72 sts. I double checked that I had 60 sts at the end of row 5; I just can't get it and I'm ready to quit!
Every 5 stitches should have one increase, correct? Which would equal 72 but no matter how I do it, I come up with 80+
I really want to make this for my husband for our anniversary because he always wore these hats when we met.
Please help!
Tamara Kelly says
Hi Katrina! I'm sorry to hear you're having trouble!
You are correct - every 5 sts should have an increase. I would recommend putting a stitch marker in the 3rd st, and then every 5th st after that around - for a total of 12 stitch markers. These will mark the stitches where you increase, and should help keep you on track! I hope it helps!
Katie says
I'm curious how you would scale up the size of the hat. I'm thinking about making this for Dad for Christmas but his hat size is extra large.
Tamara Kelly says
I would go up a hook size, or use a slightly thicker yarn. 🙂
ELIZABETH says
Hi, I really love this pattern, it's such a beautiful design. I want to make it for my husband for Christmas, and have started. My question is he has slightly larger head 24" head, so this being 23" would be too tight. What do you suggest I do and have it look uniform still? If I had a round, which round should a duplicate?
I any help from you on this! 🙂
Tamara Kelly says
Hi Elizabeth! Thank you! I would either go up one hook size, or reduce the number of decreases in Rnd 14. 🙂
Judith Thornton says
Hello Tamara! I love your pattern but I have a question please. My gauge is good; after round 5 my piece measured approximately 5 inches. But at the end of round 10, it measured 12 inches. Is this correct? It seems rather large to me? I know there is a decrease round upcoming, but I was just wondering, as I have made hats in the round before. :). Many thanks! Judith
Tamara Kelly says
Hi Judith! It does pull in quite a bit, and folds under, so as long as your gauge hasn't changed it should be okay! 🙂 It's been so long I'm afraid I don't have the hat to hand to re-measure.
Yaz says
Good day Tamara! Have a quick question in reference to making a smaller size. I see someone mentioned omitting a round for a smaller head but if I get a 4" or so measurement (Gauge: 5″ across after Round 5) would that mean the hat will be 22" vs the 23"?
Aiming for 22" for my dad's head. Thanks so much!!
Tamara Kelly says
Losing a full inch only 5 rounds in worries me that the hat will be too small. Perhaps somewhere in between?
Yaz says
maybe do the omitting rounds 12 & 13 would be better?
I’ll make it the way you instructed, since my tension tends to be tight and see how that works out. Then if anything maybe, removing a row or two will help if it’s too big. 🤔
I love your patterns btw.
Thanks!
Tamara Kelly says
That, or just adding a tighter round at the end before moving to the brim!
Yaz says
Yes! I like that.
Very cool, thanks again.
Max says
This is the best! I whipped it up for my dad on father's day, and he will love it!
Tamara Kelly says
Yay, so glad! ♥ Thank you!
Flo says
Love the pattern, but being à beginner it was difficult finding out where to put my hook at times. A vidéo or pictures would be soooo helpfull! I manager to finish it, with mistakes I guess, because it is very large 😁 but since it's for a friend with dreadlocks it might be good on him (I hope).
Tamara Kelly says
Thank you! This was designed many many years ago, before we were making videos. 🙂