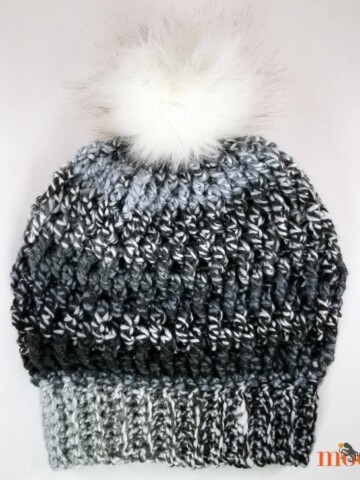
My youngest (just turned 6!) has discovered a new interest in the sport of golf! Not that he's ever played on a real course, but he's pretty sure his Wii Golf experience counts, and who am I to argue with that? So when he spotted a skein of Red Heart Gumdrop and claimed it was for him, I knew exactly what to make - a Big Boy's Cabled Golf Cap!

Red Heart Gumdrop is super easy to work with, so the crochet cables turned out great, and the colors are lots of fun. If you want to substitute yarns, a worsted or aran weight ought to do the trick.

Big Boy's Cabled Golf Cap
Add this pattern to your Ravelry Queue
- US - I, 5.5mm hook
- 150 yards Red Heart Gumdrop (worsted/aran weight yarn; Lime colorway shown)
- Size: 20-22 inch head, age 4+
- Gauge: 4.5" across after Round 5
- Click for video tutorial: magic circle, fpdc, FLO/BLO, dc2tog
Instructions:
Round 1: Starting with a magic circle, ch 2 (does not count as a st) and work 12 dc in the ring. Join to the first dc with a sl st. (12 sts)
Round 2: Ch 2, work a fpdc and then a dc in each st around. Join to first fpdc with a sl st. (24 sts)
Round 3: Ch 2, fpdc in the 1st st, 2 dc in the next st. *Fpdc in the next st, 2 dc in the next st. Repeat from * to end. Join to first fpdc with a sl st. (36 sts)
Round 4: Ch 2, fpdc in the 1st st, [dc, fpdc] in 2nd st, dc in the next st. *Fpdc in the next st, [dc, fpdc] in the next st, dc in the next st. Repeat from * to end. Join to first fpdc with a sl st. (48 sts)
Round 5: Ch 2, fpdc in the 1st st, dc in the next st, 2 fpdc in the next st, dc in the next st. *Fpdc in the next st, dc in the next st, 2 fpdc in the next st, dc in the next st. Repeat from * to end. Join to first fpdc with a sl st. (60 sts) At this point the circle should be approximately 4.5" across.
Round 6: Ch 2, fpdc in the 1st st, dc in the next st, [fpdc, dc] in the next st, fpdc in the next st, dc in the next st. *Fpdc in the next st, dc in the next st, [fpdc, dc] in the next st, fpdc in the next st, dc in the next st. Repeat from * to end. Join to first fpdc with a sl st. (72 sts)
Round 7: Ch 2, fpdc in the 1st st, dc in the next st, fpdc in the next st, 2 dc in the next st, fpdc in the next st, dc in the next st. *Fpdc in the next st, dc in the next st, fpdc in the next st, 2 dc in the next st, fpdc in the next st, dc in the next st. Repeat from * to end. Join to first fpdc with a sl st. (84 sts)
Round 8: Ch 2, fpdc in the 1st st, dc in the next st, fpdc in the next st, 2 dc in the next st, dc in the next st, fpdc in the next st, dc in the next st. *Fpdc in the next st, dc in the next st, fpdc in the next st, 2 dc in the next st, dc in the next st, fpdc in the next st, dc in the next st. Repeat from * to end. Join to first fpdc with a sl st. (96 sts)
Round 9: Ch 2, fpdc in the 1st st, dc in the next st, fpdc in the next st, dc in the next 2 sts, 2 dc in the next st, fpdc in the next st, dc in the next st. *Fpdc in the next st, dc in the next st, fpdc in the next st, dc in the next 2 sts, 2 dc in the next st, fpdc in the next st, dc in the next st.. Repeat from * to end. Join to first fpdc with a sl st. (108 sts)
Round 10: Ch 2, fpdc in the 1st st, dc in the next st, fpdc in the next st, dc in the next st, [dc, fpdc] in the next st, dc in the next 2 sts, fpdc in the next st, dc in the next st. *Fpdc in the next st, dc in the next st, fpdc in the next st, dc in the next st, [dc, fpdc] in the next st, dc in the next 2 sts, fpdc in the next st, dc in the next st. Repeat from * to end. Join to first fpdc with a sl st. (120 sts)
Round 11 - 13: Ch 2, fpdc in the 1st st, dc in the next st, fpdc in the next st, dc in the next 2 sts, fpdc in the next st, dc in the next 2 sts, fpdc in the next st, dc in the next st. *Fpdc in the next st, dc in the next st, fpdc in the next st, dc in the next 2 sts, fpdc in the next st, dc in the next 2 sts, fpdc in the next st, dc in the next st. Repeat from * to end. Join to first fpdc with a sl st. (120 sts)
Round 14: Ch 2, fpdc in the 1st st, skip next st, fpdc in the next st, dc2tog, fpdc in next st, dc2tog, fpdc in next st, skip next st. *Fpdc in the next st, skip next st, fpdc in the next st, dc2tog, fpdc in next st, dc2tog, fpdc in next st, skip next st. Repeat from * to end. Join to first fpdc with a sl st. (72 sts)
Round 15: Ch 1, sc in the first 11 sts, skip the next st. *Sc in the next 11 sts, skip the next st. Repeat from * to end. Join to first sc with a sl st. (66 sts)
Round 16: Ch 1, sc in the FLO of the 1st st, sc in the BLO of the next st. *Sc in the FLO of the next st, sc in the BLO of the next st. Repeat from * to end. Join to first sc with a sl st. (66 sts)
Round 17: Ch 1, sc in the BLO of the 1st st, sc in the FLO of the next st. *Sc in the BLO of the next st, sc in the FLO of the next st. Repeat from * to end. Join to first sc with a sl st. (66 sts)
Round 18: Repeat Round 16. Do NOT break yarn, continue with Brim (worked in Rows) below.

Row 19: (Start brim) Ch 2, dc2tog, dc in the next 14 sts, dc2tog. Leave remaining sts unworked, turn. (16 sts)
Row 20: Ch 2, dc2tog, *dc in the next 5 sts, dc2tog. Repeat from * once. Turn. (13 sts)
Row 21: Ch 2, dc2tog, dc in the next 3 sts, dc3tog (worked the same as a dc2tog but uses 3 sts), dc in the next 3 sts, dc2tog. Turn. (9 sts)
Row 22: Ch 1, sc in each st across. Turn. (9 sts) (Folding Row)
Row 23: Ch 2, 2 dc in the 1st st, dc in the next 3 sts, 3 dc in the next st, dc in the next 3 sts, 2 dc in the last st. Turn. (13 sts)
Row 24: Ch 2, 2 dc in the 1st st, *dc in the next 5 sts, 2 dc in the next st. Repeat from * once. Turn. (16 sts)
Row 25: Ch 2, 2 dc in the 1st st, dc in the next 14 sts, 2 dc in the last st. (18 sts) Break yarn, leaving a 24" tail for sewing.

Assembly: Fold brim on Row 22, so that Rows 23-25 are on top of Rows 20-22. (See photos below.) Bring front of hat body down to meet brim, and use tail to whip st them together, being sure to sew through both layers of the brim. Finish off and weave in ends.

 I loved making the cables for this hat, and I hope you do too! My stylish guy had fun hamming it up for the photos too. Do you have a mini-golfer or flat cap aficionado you crochet for? I look forward to your comments!

Written pattern copyright Tamara Kelly 2013. Please do not reprint or repost this pattern, but please do link to this page to share this pattern with others. If you wish to make items for sale from this pattern, please visit the About page for details.You can contact me via Facebook messages or at TamaraKelly@mooglyblog.com.

Penny
I just love that hat! And you've got a mighty handsome model there 🙂 Thanks for sharing the pattern.
Tamara Kelly
😀 Thanks so much Penny! I think so too.
Mendy McGee
He is best dressed, handsomest golfer ever! He looks so much like my grandson looked at that age. Give him a squeeze from all us moms & grandmas!
Kathleen Bruner
Are there adjustments to make this for an adult? I think my husband would really like one of these! I tried making him a brimmed hat once and it didn't turn out as well as I'd like, but this one looks like it might. 🙂
Tamara Kelly
I don't have them yet, but I've got a couple ideas I hope to try for upsizing soon!
mina
I would love it if u had an adult size 🙂
Shirley Barnes
been looking for this pattern
Annie
Oh, I like this! Don't know about my little boys, but I can totally see making this, maybe in a soft gray, for ME!!
Diane
What a cutie your model is!!!! He makes the hat look great!
Barbara
What a lovely Cap!!! And what an amazing pattern, it is so hard to find something suitable for boys.
Great work!
Cheers,
Barbara
Meme
This is great as I have 2 grandsons and find it difficult to make anything for the eldest especially who is going on 10. The little one is just 2 and loves everything even his sisters pink sequined bag. That's my boy. The girls just love anything I make too but are getting to the age where clothes are what they'll want most too being 10 and 9. Busy Grandma
Jody Myers
Thank you for yet another great pattern. Already on round 4. You are an amazing talent.
Tamara Kelly
Thanks so much Jody! I'm glad you're enjoying it!
Susan Jackson
I, too, would love this pattern for my husband! Would love to hear when you decide to work on your ideas for upsizing this cute cap. Please contact me if and when you get around to the upsizing. Would be willing to pay for your pattern, too!
Thanks.
Tamara Kelly
Thank you Susan - very soon I hope!
DeLane
If I wanted to down size this to make for an infant, what would I need to do? I know to use a smaller hook. Not sure how many rounds to go. Any suggestions.
Tamara Kelly
I think I'd go with a baby weight (2) yarn and the hook on the label - then if you need to drop a few rows do so, then work even for 3 rows, and finally start the Brim as in Round 16.
Katina smith
I need to make this for my nephew he just turned 1 any suggestions he has an 18" head should I just use a smaller hook my sister wants it in Aran fleck from rh super saver it says I hook do u think h or g would work I love this & my sister does too Ty
Tamara Kelly
It's not an exact science, but a smaller hook and/or thinner yarn would be the way to go.
Larraine
Love the cap! For young and old, men and women, alike!
Lee Ann
What a great pattern! He did a terrific job modeling it too!! 🙂
Tamara Kelly
😀 Thank you Lee Ann!
Susan
for both the boys golf cap and the mens...
I got the 36 sts for round 3 but when I do round 4 I'm obviously doing something wrong because I can not come up with 48 sts...just not understanding: fpdc in the 1st st, (dc, fpdc) in the next st, dc in the next st...any help? video would be great!!
Tamara Kelly
The "(dc, fpdc) in the next st" is an increase - you work a dc into the top of the stitch and a fpdc around the post of that same st. Does that help?
Mary M
I'm having trouble getting the hat to lay "flat" on the head, the brim keeps wanting to point up, making it look more like a beanie with a weird flap attached. In essence, it doesn't stay shaped. Any thoughts? I sewed the brim securely to the hat, but am wondering if i should tack it to the inside of the flat part, to force the brim to become more parallel to the flat part?
Tamara Kelly
Tacking it down a bit can definitely help! You can also insert a piece of plastic canvas, cut to shape.
Carol sample
I downsized this pattern down to fit a toddler. It is so cute & now he has a hat that is the same color as his dad's, this one is just crocheted. I left out row 12 & 13, then on the sc row I decreased by 5 . It turned out great! His dad wanted him to have one like his, could not find one in any stores. Thank you!
ashley
Love this hat! Having trouble with round 6... fpcd, dc in the same st?, just a little confused on this. And on round 5 you say the circle should be 4.5" across, mine is 6. Am I doing something wrong? Any help would be great. Thanks again for this pattern!
Tamara Kelly
Hi Ashley! You work a fpdc around the post of the stitch, and then a dc into the top of the same stitch. This is an increase. It sounds like if you keep going your hat is going to be too big, so you might want to try a smaller hook.
MarNella
I'm having difficulty doing the FPDC then dc in same stitch. Once I do the fpdc, I can't seem to find the top loop of the underlying dc stitch! The fpdc covers the loop into which I want to make the d. I can't get my head around this.
HELP! I'm on a deadline to finish this in the next couple of days!!
Thanks!
I LOVE your patterns.
Thank you for them all!!!!
Marnie Cordato
Tamara Kelly
Hi Marnie! I think this will do the trick: Before making the FPDC, put a stitch marker in the top V of the stitch. Then make the FPDC, and then make the dc where the stitch marker is. 🙂
Leonor Murcia
Thank you so much for the Golf Cap. I will make it for Father's Day.
Tamara Kelly
🙂 You're very welcome Leonor!
Samantha
I'm having trouble with the brim it doesn't stick out like the picture. It looks to me more like a beret. Do you have a video on how to do this or can you talk me through it. Other than this its a great pattern. Can't wait till I get it right I have a few people who would like this. Thank you very much for this pattern.
Tamara Kelly
Hi Samantha! I don't have a tutorial other than the photos shown in the pattern. To make it extra stiff, you can cut a piece of plastic canvas to the shape of the brim and fold it in before sewing as well. 🙂
Susan
Do you stitch the brim down the side edges or did you just sew the brim across the front top of hat and leave the sides of the brim open and not attached to the top?? Hope this makes sense?
Tamara Kelly
I sewed the sides together too. 🙂
Ghada
Hi, I loved your pattern and it is easy to follow. Thank you very much for your help as I was looking for this pattern , but I have a problem with the size of the hat. Would u tell me what is the measurement across at the round 13 with cm?
Tamara Kelly
I'm sorry Ghada, this pattern is several years old and I no longer have the original to measure.
Pamela Anne Reinert
Thank you so much for thinking of the boys in our lives. It is nearly impossible to find crochet patterns for toddler and school aged boys. And they are adorable too!
Tamara Kelly
Thank you so much! My boys are big now, alas!
Nilma Soares Da Silva
Olá, vc poderia colocar tradução das siglas que usa? Tipo PC= ponto baixo, porque não estou conseguindo entender quais são os pontos, se pudesse fazer uma lista com a tradução das siglas que usa ficaria muito grata.
Tamara Kelly
Hello Nilma! I have a list at https://www.mooglyblog.com/crochet-abbreviations/ 🙂