After sharing how to work Foundation Single Crochet, Foundation Half Double Crochet, and Foundation Double Crochet, how to Join a Round of Foundation Stitches to Work in the Round, and how to Extend a Row with Foundation Stitches - I thought I had pretty well covered it all when it comes to foundation stitches! But a question on Facebook made me realize there was one topic I hadn't addressed just yet. So here's how to increase and decrease while working foundation stitches!
Disclaimer: This post includes affiliate links.
Right-Handed Increasing and Decreasing Tutorial
Left-Handed Increasing and Decreasing Tutorial
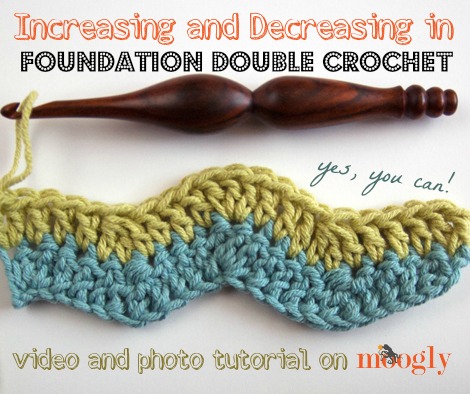
How to Increase and Decrease in Foundation Double Crochet Photo Tutorial
Both the video and photo tutorials were made using worsted weight yarn and a US-I, 5.5mm Furls Fiberarts hook! But of course, these stitches will work with any yarn and the appropriate hook.
Increasing and decreasing can be done with any height of foundation stitches - it's all about keeping it straight in your mind, which loop is the chain and which loop is the start of the stitch. That, and remembering what you'd do if you were working the stitches into a standard starting chain. I'm using FDC here because it's one of the more common versions, and lends itself well to the demonstration. So let's take it step by step.
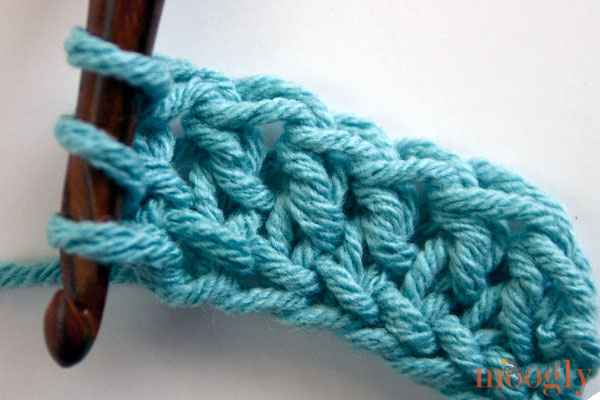
INCREASING:
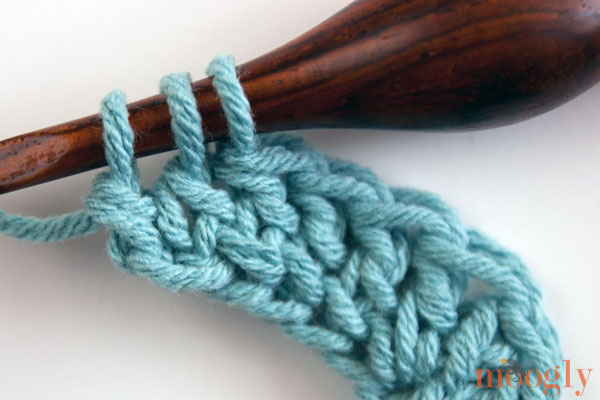
When you are increasing, you're working two or more full stitches into the same chain stitch. So to do this in Foundation Double Crochet, you're going to work the first FDC as usual, and then work the stitches you are increasing by into the same "chain." When you work a normal FDC, you pull up one loop to act as the chain, and a second to act as the first loop of the dc. So the second dc is worked into the same "chain" as the first FDC - skip the first chain loop, and just work the stitch! That's it!

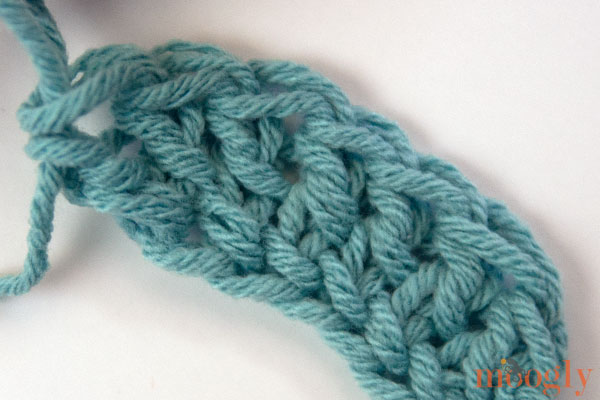
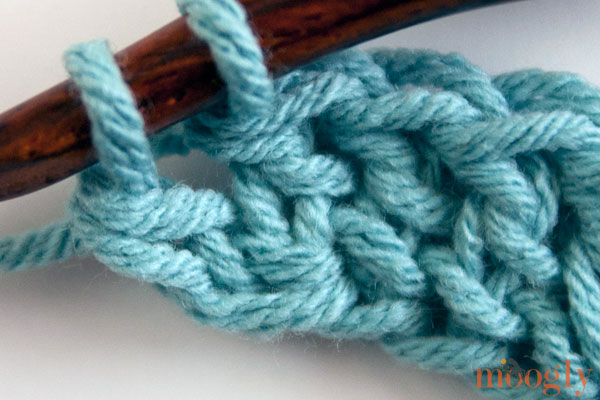
DECREASING:
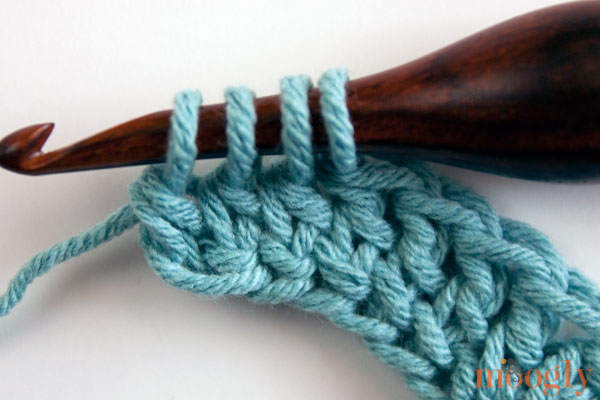
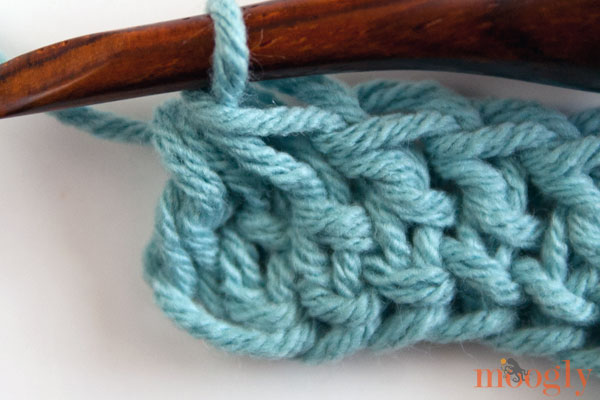
When you are decreasing, you're working two or more partial stitches across the same number of chains, and then finishing them all as one stitch. So to do this in FDC, you're going to pull up the chain loop, then pull up another loop to start the st, then yo and pull through 2 loops, leaving 2 loops on the hook. Then go back into the chain of the stitch just started, pull up another chain loop, pull up another loop to start the second stitch and then yo and pull through 2 loops, leaving 3 loops on the hook. Then if it's a dc3tog, as shown below, you'll do it all again till you have 3 sts started and 4 loops left on the hook... and then yo and pull through all 4 loops!
That's really all there is to it! Using these techniques you can even start a ripple pattern with foundation stitches - a notoriously difficult stitch pattern to get the chains right on.
I love using foundation stitches, because you never have to worry about counting out tiny chains. They won't work for every pattern, but I hope this helps you see how you too can use them more often! Even if you are supposed to chain between stitches, it's possible to use foundation stitches - just make the chains before you yarn over and go back into the "chain" at the bottom of the previous FDC.
If it's something you haven't seen done before, just try it! It's only yarn! And be sure to click on any of the links above for more info!
Like what you see? Let me know! Then check out all the other Moogly goodies on Facebook, Twitter, Pinterest, Tumblr, and in the FREE weekly email newsletter (see the sign up at the top of the page)!
Thank you JORD Watches for sponsoring this tutorial video! To learn more about the watch I'm wearing in this video, click on the ad below!

Purple Unicorn says
Tamara, I just Love, Love, Love your crocheting rythm! I have seen a lot of videos in the past few months since I have discovered crochet blogs and YouTube videos. Yours is the best rythm that I have seen. It's so relaxing to watch you work. I am getting back into crochet after a fairly long hiatus and did not realize how much there is on the internet. I check your blog and a few others every morning to start my day. You have such beautiful patterns and they are so easy to read and follow. Thanks for being there for me!!
Tamara Kelly says
<3 Thank you so much! That made my day! 😀
Paula says
Firstly, allow me to say how helpful I find your tutorials. However, I'm not understanding your comment about how to chain between foundation stitches - I'd love to know as I've rejected patterns on that basis as I hate a tight chain!
Tamara Kelly says
Hi Paula, thank you! I show it at the very end of the video. For instance sometimes in a pattern it'll tell you to make a V st into the starting chain - where you dc, then ch, then dc, all into the same chain. You can do that in foundation sts too - just make the first foudation stitch, make the chains, and then make an increase st in the first foundation stitch. Does that make sense?
paula says
I should have looked at the video too! So that's ok for a V stitch, but what if the pattern calls for 1 dc, 1 ch (repeat) across a foundation chain and missing out every alternate ch or similar? Would that be possible with foundation stitches? I'm thinking specifically of this pattern: http://knittingfever.com/pattern/silk-garden-crochet-sweater/ (I think it's in UK terms)
Tamara Kelly says
I thought afterwards I should have shown that too! Hindsight! Yes, to do that you would just make more chains in the chain section. So let's say you yo as to dc, and go into the bottom of the previous stitch and pull up a loop that counts as the next chain. Then, yo and pull up another loop - but instead of making it the bottom of the dc, call it the chain of the dc, and leave the first loop or chain unworked. So to finish the dc, yo and pull up a third loop, and then finish the dc as normal (pull through two, pull through two.) It'll be a little wobbly, but as you continue working the next st it'll stabilize the dc. Does that help?
Paula says
Yes! It makes sense just to add more chain sts to the chain section. I couldn't see how to do that as I'm still not that experienced with foundation stitches.
Tamara Kelly says
Glad that made sense! I wish I'd thought to include it in the video! 🙂
Carol says
This is brilliant and so very well explained. I look forward to using this very helpful technique really soon. Thanks.
Nancy Roulier says
I am wondering if the instructions are the same when working a regular starting chain. I don't have any trouble using the the starting chain and really don't care to try and change the method I currently use. If they are different could you please give a tutorial using the regular chain ?? Thank you. Nancy
Tamara Kelly says
Hi Nancy! Increasing and decreasing into a regular chain is just like increasing and decreasing over any set of stitches. 🙂
CindyF says
Love, love, LOVE this!!! Thanks so much for this tutorial.
Tamara Kelly says
😀 I'm so glad Cindy, thank you!
Dane says
c' est adorable toutes tes réalisations j' aime ce point merci pour le tuto biz a bientôt
Kandi Heilman says
I'm curious if you think mixing foundation stitches in the foundation row would work well. For example doing 2 fdc then 2 fsc repeatedly?
Tamara Kelly says
I think it would work really well! I don't see why not! 🙂
Rachel Beittenmiller says
I wish I would have seen this tutorial before starting my ripple blanket! Setting up the foundation chain with the devil yarn I was using was horrible. This would have been so much easier.
MaRie says
Hello,
I am working on creating a sharp chevron stitch pattern with many repeats into a baby hat. After 9 hdc in a magic ring I have tried a couple different ideas to no avail. A couple patterns have proven ineffective at creating the hat I want so I am attempting to make my own pattern. I do not want to do regular stitch increases until I have the correct stitch count and then start a chevron, create a cinch hat by crocheting a small blanket of chevrons and then mattress stitching and cinching in the top, or make what looks more like a ripple or ocean waves. Instead, I want to have sharp chevrons with at least 7-8 peaks or more but have not been able to figure out how to effectively add stitches to the round. Do you have ideas or perspective? Thank you!
Tamara Kelly says
My best guess would be to start with something like dc, sc repeating in the first round, to establish the peaks and valleys for the chevron stitch. In my experience, chevrons can be very difficult to shape with.
Jaylee says
Hello 🙂 I am TRYING to work a fsc decrease following your video, I got the increase down okay, but cannot figure the decrease! Please help 🙂
Tamara Kelly says
Hi Jaylee! It helps if you think about the different parts of the stitch - the "chain" portion vs the "stitch" portion.
So to do a fsc2tog, aka a fsc decrease, I would start the first half as usual, and stop when I have those last 2 loops on the hook - the ones that I would yo and pull through to finish the fsc stitch. Then, with both loops still on the hook, start another fsc - insert in the bottom of the st you have the 2 loops from, yo and pull up the loop that works as the chain, then yo and pull up a loop to start the second stitch. At this point, you'll have 3 loops on the hook, so yo and pull through all 3 loops.
This gives you the 2 "chains" at the bottom, and just one "V" at the top - 2 chains, 1 stitch (oh my! 😛 ) - does that make sense?
Jaylee says
It does! Thank you! I had ended up with this eventually, but still couldn't tell if it was correct. Thank you so much for your tutorials and for your super-quick response!
Tamara Kelly says
😀 I'm happy to help, thank you Jaylee!
Grace says
Tamara! Thank you so much! I’ve been wanting to do this forever but could not make my brain figure out how! I’m trying to design an easily sizable skirt and knew that doing it with a chainless foundation would be the easiest way to accomplish this! You broke it down so easily that I am ready to start crocheting now! Thank you thank you thank you!!!
Tamara Kelly says
Oh yay! I'm so glad to hear it, thank you Grace! 😀 Best of luck with your skirt!
Karen Davis says
I try and use the foundation chain whenever I make something. I love it. With that being said, 90% of patterns written DO NOT have instructions for the starting chain using this method. Instead, it's either "Chain 148, SC in 4th chain from hook" or "This pattern is a multiple of 6+3". How do you figure out the stitch count when the instructions are written either one of these ways? Thank you so much.
Tamara Kelly says
Hi Karen!
The easiest thing is to look at the total stitch count for the row and make that many foundation stitches.
So, if it's "Row 1: Ch 148, dc in the 4th ch from the hook (skipped sts count as first dc), dc in each rem ch across; turn. (146 dc)"
Then you would instead do "Row 1: FDC 146; turn. (146 sts)"
If that info is not included, and it just reads "Row 1: Ch 148, dc in the 4th ch from the hook (skipped sts count as first dc), dc in each rem ch across; turn."
Then you need to do the math to figure out that that's 146 sts, and then you can fdc 146.
If it's “This pattern is a multiple of 6+3” then (for the sake of example, we'll say they're all dc sts again), then you can either make a gauge swatch to see how many stitches you need for the width, or just start making fdc sts in a multiple of 6 til you have about the width you want, and then make 3 more.
Does that help?
Monique says
Hi Tamara!
Love your videos! They are very helpful and clear.
I have scoured the internet and cannot find an answer to my issue...I have a question about using an fdcdec stitch followed by a dc2tog (thatbone I understand). The pattern I am following has these two stitches back to back in the middle of a pattern (slippers)... how in the world do I decrease a fdc, newly introduced in row 9 hahaha... help!!!
Thanks for any guidance you can provide 🙂
Monique
Tamara Kelly says
Hi Monique! Thank you so much! I'm not sure I understand the question though. Is there any chance you could link to the pattern so I could take a look?
Drachenbauer says
How do i decrease in foumdation single crochets?
Sometimes someone wants to bend a row of founation-single-crochets towards it's top edge.
If i try to convert the shown decrease direktly into single-crochets, how can i be sure, that i for the seccond half not poke in, where the loop on the hook from the first half of the stitch comes out?
Tamara Kelly says
Hello! I played with some yarn for a bit to come up with the best answer I can for this one! The best solution I can find is this: make an extra chain while making the fsc, and for the next st just work into the bottom of the 2nd one. So it would be as follows:
Insert hook into bottom of previous st, yo and pull up a loop (first ch), ch 2 (2nd and 3rd chs), yo and pull through both loops on hook (3rd ch and active loop), insert hook in bottom of 2nd ch to continue stitching across. Essentially, rather than decreasing, you're skipping a chain. I hope that helps!
Chris says
Thank you so much for this tutorial. This is going to be a game changer for starting afghans. Before seeing this I was only able to use a foundation stitch if the first row of a project is solid row of the same stitch. Now I can easily see how to use it for more complex starting rows.
Tamara Kelly says
I'm so glad to hear that, thank you!
Frances says
I have no problem making the foundation row for a ripple stitch, but when I get to the end of the row and turn to start the second row, I’m lost! For example, let’s say I want to make a straight side with 6 fdc, a 3-stitch increase, 6 fdc, then a 3-stitch decrease. Once I finish my last straight row of six, do I end on a peak or valley? Do I need to add any extra fdc at the end? Once I turn, do I do 3 chains? Where do I start the next dc? What happens when I get to the first peak (or valley)? No many how many times I try to start a second row, I never seem to end up on the right stitch to do an increase or decrease.
I would appreciate any help you can provide. I’ve tried to start a king-size blanket about 5 times and I’m getting so frustrated that I’m thinking I’ll have to go back to using a starting chain—ugh! Now that I see how great a fdc ripple looks, it’s hard to go back to the old way.
Thanks!
Tamara Kelly says
Hi Frances! I hear you, ripples seems so simple yet can be such a challenge - and of course, there are dozens of ripple patterns out there. When subbing in the foundation stitches, it can be really helpful to use a pattern that includes charted instructions, so you can see just how those edges work. So for the example you've given, I would end the first row with 6 fdc after an increase. Then, for Row 2, start with a dc2tog in the first 2 sts, or just ch 2 and skip the first st, and don't count the ch 2 as a st. Then, you'll work your 5 dc sts into the next 4 dc sts and the first of the increase sts. Increase again in that center st. Continue across, and when you get to the end of the row with 2 sts rem, dc2tog in those last 2 sts. I hope that helps!