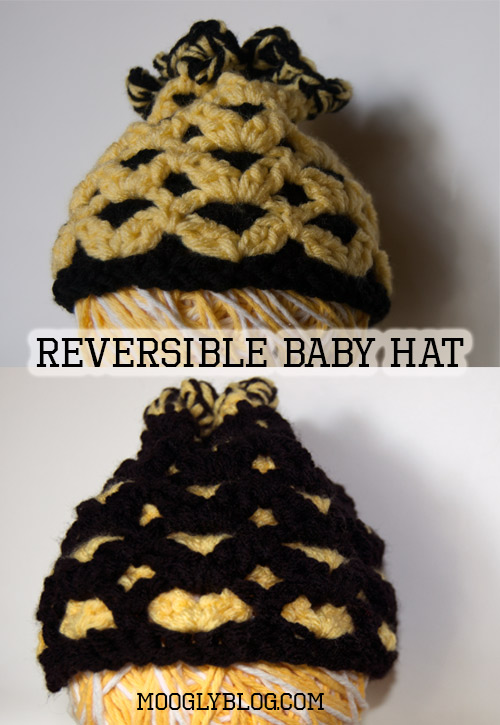
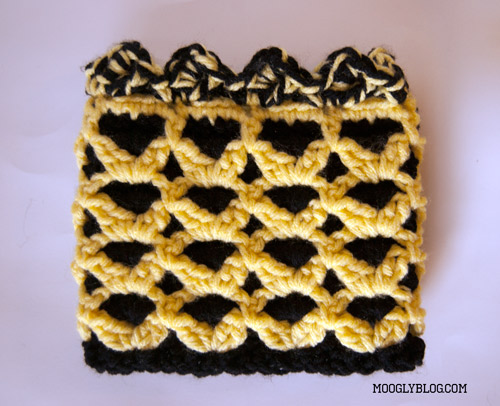
Last week I shared the Go Team Colors Baby Blanket, and this week I'm excited to share the pattern for the matching Go Team Colors Reversible Baby Hat!
If you make the blanket with Red Heart With Love, or with similarly sized skeins of yarn, you'll be left with just a few dozen yards of each when you're done. Just enough to make a matching hat! The Go Team Colors Reversible Baby Hat features the same stitch pattern and edging as the blanket, but working in the round and combined in a new way. It's fast and fun to make, and combined with the blanket it makes a great gift set. Make it in the parent's team colors, to coordinate with the nursery, or to match any outfit! Prefer to make it for bigger kids, teens, or adults? Check the notes for upsizing info!
Go Team Colors Reversible Baby Hat
Add this pattern to your Ravely Queue and Favorites
US-J, 6.0 mm hook
90 yds Aran Weight Yarn, as 45 yds each of 2 colors (Red Heart With Love in Black as Color A and Daffodil as Color B shown)
Finished Size: 0-6 months (fits 14" to 17" head)
Notes:
Though the hat is joined and worked in connected rounds, the work is turned several times to work from the "inside" of the hat - it's a reversible pattern, so there's not really a wrong side or right side, just turn the hat "other side out" when turning to work a row as directed.
To make a larger hat - Increase the first round by multiples of 5 stitches. The gauge for the first round should be approximately 3 sts per inch. Therefore, to find the right size for your recipient, multipy their head measurement in inches by 3, and then find the closest number to that divisible by 5. For example, the average adult headsize is 22-24 inches. So for an adult woman or older teen, I'd start off Round 1 with FSC 65, and for an adult man FSC 70. Remember, FSC stretches! To make the hat "taller," just repeat Rounds 5-8 as many times as needed.
INSTRUCTIONS
Round 1: Using Color A, FSC 45 and join with a sl st to work in the round, being sure not to twist row.
Round 2: Ch 1, sc in the 1st st. [Ch 5, skip 4 sts, sc in the next st] 9 times. Join with a sl st to the first sc of the round. Pull loop up a bit so it won't come out and remove hook.
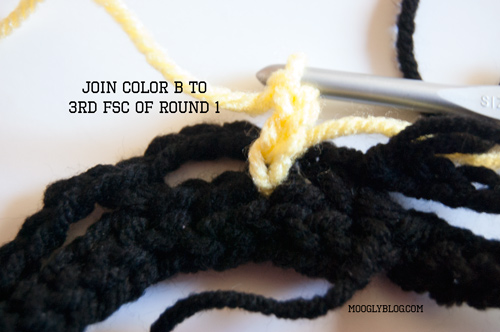
Round 3: Working in front of Round 2, join Color B with a sl st to the 3rd st of Round 1.
Ch 3, [dc, ch 1, dc 2] in the same st as the join. *Skip 4 sts, [dc 2, ch 1, dc 2] in next st. Repeat around for 9 shells total. Join with sl st to top of ch 3. Pull loop up and remove hook.
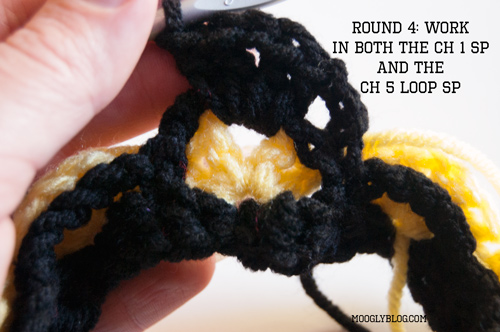
 Round 4: Put hook back in working loop of Color A (and tighten it down a bit for normal tension), ch 1 and turn. Holding work together so that the top of Row 3 is behind the top of Row 2, work [dc 2, ch 1, dc 2] through both the ch sp of Row 3 and ch 5 loop of Row 2. Repeat [dc 2, ch 1, dc 2] in each ch sp and loop to end. Join with a sl st in the top of the ch 3. Pull up loop and remove hook. (9 shells made)
 Round 5: Put hook back in working loop of Color B, but do not turn work. Working behind Row 4, ch 1 and sc in same st. *Ch 5, sc in between the shells of Row 3 (not in the ch sp, but in between the first and last dcs of the two shells). Repeat from * to end, ending with a sl st in the first sc of the round. (9 loops made)
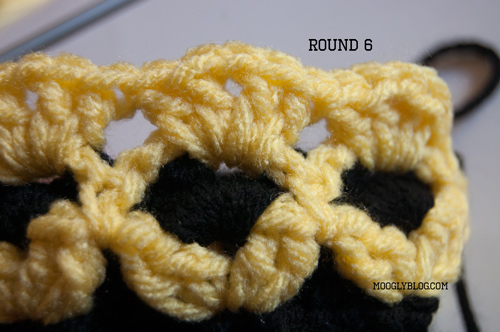
  Round 6: Keeping hook in Color B, ch 1 and turn. *[Dc 2, ch 1, dc 2] through both the ch sp of the shell row and ch 5 loop. Repeat [dc 2, ch 1, dc 2] in each ch sp and loop to end. Join with a sl st to the first dc of the round. Pull up loop and remove hook. (9 shells made)
  Round 7: Put hook back in working loop of Color A, but do not turn work. Working behind Row 4, ch 1 and sc in same st. *Ch 5, sc in between the shells of Row 3 (not in the ch sp, but in between the first and last dcs of the two shells). Repeat from * to end, ending with a sl st in the first sc of the round. (9 loops made)
Round 8: Keeping hook in Color A, ch 1 and turn. *[Dc 2, ch 1, dc 2] through both the ch sp of the shell row and ch 5 loop. Repeat [dc 2, ch 1, dc 2] in each ch sp and loop to end. Join with a sl st to the first dc of the round. Pull up loop and remove hook. (9 shells made)
Rounds 9 - 16: Repeat Rounds 5 - 8 twice. (4 rows of shells of each color made.)
Round 17: Repeat Round 5. (9 loops made)
Round 18: Keeping hook in Color B, ch 1 and turn. Work sc evenly around, joining the last two rounds, making one sc in each dc and ch sp of Round 16 and 5 sc in each ch 5 loop of Round 17. Join with sl st in first sc of round.
Round 19: Work adjusted Triangle Crochet Edging as follows: Put working loop of Color A back on hook along with Color B. Using both yarns, ch 1, sc in first st. *Skip 3 sts, dc 2 in the next st. Ch 1, sc 2 around post of last dc. Sc in the next st. Repeat from * around, finishing last repeat with a sl st in the first sc of the round. (9 triangles made) Break both yarns and weave in ends.
Finishing:
When you have finished crocheting, you will have a tube, as shown above, with the FSC sts at the bottom and the triangles at the top. You can choose at this point to choose a side, or to keep the hat reversible.
- If you choose to pick a permanent "Right Side" to the hat, then using a 12" piece of leftover yarn and a tapestry needle or hook, weave it through the skip 3 sps and under the scs from Round 19. Cinch the top of the hat closed. Tie the ends together tightly and weave in ends.
- If you choose to keep the hat reversible, take the longest piece of leftover yarn remaining and make an 8" to 12" long chain st ribbon. Tie off ends and weave it through the skip 3 sps and under the scs from Round 19. Cinch the top of the hat closed and tie the chained ribbon in a simple bow. When you want to reverse the hat, untie the bow, loosen it up a bit, flip the hat other side out, and re-tighten and tie the bow again. If there isn't enough yarn left to make a chain ribbon, or you don't want to see a bow, do the same with plain yarn and tuck the ends in the "wrong side" so they do not show.
And now you've got a matching set! The blanket and hat make a great pair, but of course you don't have to make one to make the other. This hat is super warm and snuggly, and would look great with any outfit. And the FSC bottom makes it super stretchy, so they won't outgrow it right away! Will you make the Go Team Colors Reversible Baby Hat? What colors will you use? Share your thoughts in the comments, and as always, please let me know if you find any errors in the pattern.
The Fine Print
Be sure to Like the moogly Facebook page for the latest updates and have some fun with us! Written pattern copyright Tamara Kelly 2012. Please do not reprint or repost this pattern, but please feel free to link to this page to share this pattern with others.




Angelita
very nice design, thanks for sharing the pattern!!
moogly
you are very welcome! thank you!
CrazyCrochetLady
Well I don't have a baby, but I could see me easily converting this to a grown up size and making myself one for game day!!!
moogly
Glad to hear it! All the info you need should be in the pattern notes! 😀
Kerrie
Great pattern! I couldn't wait to try it out - so I started it last night. Instead of the hat, I'm making it a ear warmer headband for my 4 year old. He won't wear a traditional hat, but he loves this! I made it in purple and gold to match my older son's football team colors - and now my older son is bugging me for one too!
Thank you for sharing your talents - they are wonderful.
moogly
Oh an ear warmer is perfect! 😀 Thanks for reading and you are very welcome!
roxie
my grand daughter will have one and I think her mother will be happy red for ohio state and blue for the team up north
moogly
😀 Pretty colors!
roxie
funny thing is those were my school colors ex's were black and gold son's were blue and gold and daughterinlaw's were green and white
Dee Williams
Loooove it! Am making it into a flower hat for my youngest daughter. You can see pics of it in the morning on my Facebook page Dee Lessonlearned Williams. Don't know how to tag in photos yet, but I'll figure it out. Gotta give credit where it's due, right!?! Love your patts. You rock!!!
moogly
Thanks so much Dee! 😀
Lynette Lewis
I just wanted to let you know that this pattern of crocheting with two color in this design has been done by my twin sister for over 20 years. Not sure how this affects your copyright but some else has done this in California over 20 years ago and taught my sister how to make an afghan. Sorry but thought you should be informed.
Tamara Kelly
No worries Lynette! The stitch patterns themselves cannot be copywritten, just the words and photos. Otherwise someone would have copywritten the ripple stitch! 🙂 Additionally, there are at least a half dozen overlapping stitch patterns out there - they're just so fun to make!
Aubrey F
Made in Simply Soft pink and off white to match the blanket I made, and for the life of me, I couldn't figure out how I was getting 11 triangles. The counts are right, the stitches are placed in all the right spots, but still, 11 triangles. So I sewed the finishing thread through the top of the triangles to draw them together, and closed it up that way, with a single stitch between dcs to hold them together. It made a nicely cinched close.
Thank you so much for your patterns. They have saved me dozens of times when I can't think of a "next project".
Tamara Kelly
I'm just glad it worked! ♥ Thank you so much!