
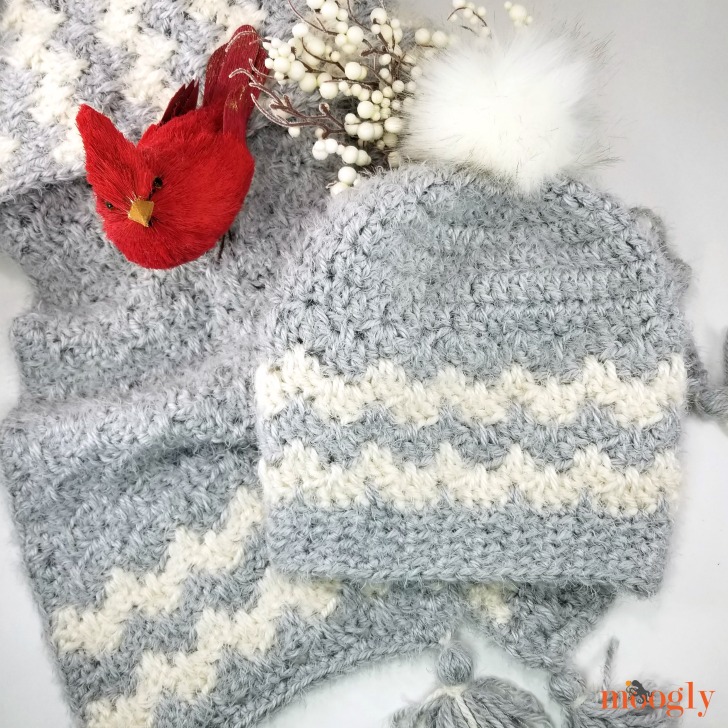
The Alpine Stripe Beanie is the matching hat for the Alpine Pocket Scarf - a reader request! Cozy, stripey, and available in three sizes, it's a free crochet pattern here on Moogly!
Disclaimer: This post includes affiliate links; materials provided by Yarnspirations.
Prefer an ad-free PDF? You've got options!


Prefer the free blog version? Keep scrolling!
Extra Warm and Cozy
The Alpine Stripe Beanie is made with Red Heart Heat Wave, which warms up by up to 12 degrees under UV light – like sunlight! And of course, it’s still a warm and cozy acrylic even when the sun doesn’t come out to play. Check out my review of Red Heart Heat Wave on Yarnspirations.com!
And this hat is a reader request - to match the Alpine Pocket Scarf! Both the hat and scarf are completely unisex, and the fringe on the scarf is totally optional.

Make It Your Own
The Alpine Stripe Beanie features simple stripes to match the pockets on the Alpine Pocket Scarf, but you can omit them - or add more. Add extra row repeats to turn the beanie into a slouch, or add buttons to each side to hold your mask on while keeping your ears warm.

To make this pattern into a ponytail beanie, start by crocheting Rnd 4 around an elastic hairband, and then follow the instructions from there. To pom or not to pom - it's up to you!

Alpine Stripe Beanie
Add this pattern to your Ravelry Queue and Favorites
US-K, 6.5 mm crochet hook - Furls
100-150 yds Red Heart Heat Wave (4-Medium/Worsted; 181 m/198 yds; 100 g/3.5 oz)
Color A: Seaweed (1 ball, all sizes)
Color B: Sandy Shores (less than 1 ball, all sizes)
Snap On Faux Fur Pom Pom (optional)
Gauge: 12 sts x 12 rows = 4" in main st pattern
Sizes: Teen: 21-22″; Small Adult: 22-23″ (shown); Large Adult: 23″-24″
Instructions are written in pattern as Teen (Small Adult, Large Adult)
Helpful Links & Tutorials
CSDC – Chainless Starting Double Crochet
Matching Pattern: Alpine Pocket Scarf
NOTES:
If you would prefer to not use the CSDC, you can ch 3 or use your preferred dc substitute.
Skip the stitch behind the post stitch – it is considered worked into already.
The first 4 or 5 rounds will "ruffle" and not lay flat - that is to be expected, continue as written.
Carry the unused yarn inside the hat to avoid cutting the yarn when switching colors.
INSTRUCTIONS:
Rnd 1: With Color A. make a magic circle, ch 2 (does not count as a st), work 12 (13, 14) dc in the ring; join. (12 (13, 14) dc)
Rnd 2: Ch 1, 2 sc in each st around; join. (24 (26, 28) sc)
Rnd 3: CSDC in first st, *fptr around dc below next st, dc in next st; rep from * around until 1 st rem, fptr around last dc of Rnd 1; join. (24 (26, 28) sc)
Rnd 4: Rep Rnd 2. (48 (52, 56) sc)
Rnd 5: CSDC in first st, *fptr around dc below next st, dc in next st, fptr around fptr below next st,** dc in next st; rep from * finishing last rep at **, join. (48 (52, 56) sc)
Rnd 6: Ch 1, sc in each st around; join.
Rnd 7: Ch 2 (does not count as a st), fptr around dc below first st, *dc in next st, fptr around dc below next st; rep to * until 1 st rem, dc in last st, join with Color B.
Rnd 8: Rep Rnd 6.
Rnd 9: CSDC in first st, *fptr around dc below next st, dc in next st; rep from * until 1 st rem, fptr around dc below last st, join with Color A.
Rnd 10 and 11: Rep Rnds 6 and 7, join at end of Rnd 7 with Color B.
Rnd 12 and 13: Rep Rnds 8 and 9, join at end of Rnd 9 with Color A.
Rnd 14 and 15: Rep Rnds 6 and 7, join at end of Rnd 7 with Color B.
Rnd 16 and 17: Rep Rnds 8 and 9, join at end of Rnd 9 with Color A, break Color B.
Rnd 18: Rep Rnd 6.
Rnd 19: Ch 1, fpdc around dc below first st, sc in next st, *fpdc around dc below next st, sc in next st; rep from * around, join.
BRIM INSTRUCTIONS:
Row 1: Ch 5 (7, 9), blo sc in the 2nd ch from hook and each remaining ch, slst2tog in the next 2 sts of the last rnd; turn. (4 (6, 8) sc)
Row 2: Skipping the slst2tog, blo sc in each remaining st across; turn. (4 (6, 8) sc)
Row 3: Ch 1, sc in blo sc in each st across, slst2tog in the next 2 sts of the last rnd; turn. (4 (6, 8) sc)
Repeat Rows 2 and 3, finishing the last Row 3 rep in the last st of the last rnd.
Repeat Row 2. Break yarn leaving a 10" tail.
Sew the Brim edges together using the whip stitch, joining first and last rows. Be sure to work into the BLO of the last row to maintain the ribbed look.
Optional: Sew Pom snap to top of hat centered on Rnd 1.
LOOKING FOR MORE?
Are you looking for more free crochet pattern sets? Check out this massive list of coordinating patterns here on Moogly!
If the Alpine Stripe Beanie pattern inspires you to make your own project, and you post a photo on social media, be sure to tag me @mooglyblog or #mooglyblog so I can check it out too!
THE FINE PRINT
Follow Moogly on Facebook, Twitter, Pinterest, and Instagram! Thank you to Yarnspirations for providing the materials shown in this post. Written pattern copyright Tamara Kelly 2021, all rights reserved. Please do not reprint or repost this pattern, but please do link to this page to share this pattern with others. If you wish to make items for sale from this pattern or translate it to another language, please visit the About page for details.


Laurie says
Will you do a video for this beanie
Tamara Kelly says
I hadn't planned on it, but if there's a demand I will! 🙂
Marcia says
On which row do you change from green to white?
Tamara Kelly says
Hi Marcia! The color change instructions are included in the written pattern above, starting on Rnd 7 🙂
Paula O'Brien says
Please do, Im rather dependent on video tutorials at the moment. Thanks.
Tamara Kelly says
I've put it on the calendar! 😀
Paula O'Brien says
Thanks. I'll look forward to it.
Pam says
Tamera, Your video for the hat is great! Just watched it on YouTube, it mentions a tutorial for just the brim... Where can I find that please?
Tamara Kelly says
Hi Pam, and thank you! That's at https://www.mooglyblog.com/crochet-ribbing-brims-and-cuffs/ 🙂