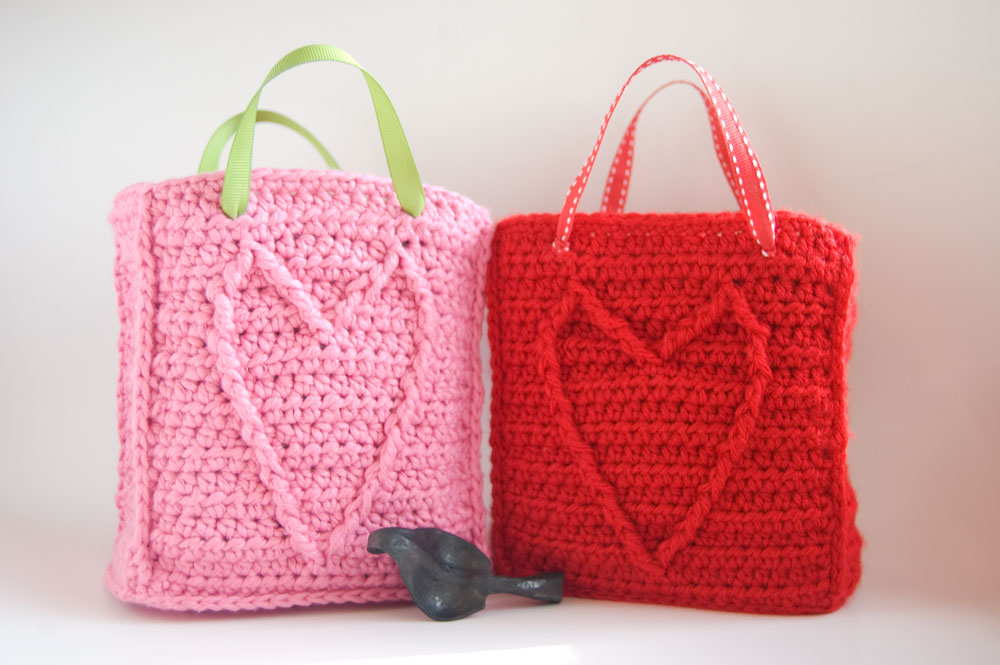
Whether it's Valentine's Day, an anniversary, or just the day to make your love and affection manifest... you're going to need a gift bag! This free pattern has you covered. Creating a crochet gift bag shows you've gone the extra mile, and that you are giving a piece of your heart. Plus, it's reusable - love the earth too!
Prefer an ad-free PDF? You've got options!


Prefer the free blog version? Keep scrolling!

Cable Heart Gift Bag
Add this pattern to your Ravelry Queue and Favorites
*Want a gift bag without the hearts? Skip the front and make two plain backs!*
Yarn: any worsted weight yarn, 130 yds
- Examples in Bernat Satin (red) and Bernat CottonTots (pink - discontinued)
Hook: US-6 G hook, 4.25mm
Notions:
-1 piece of 4 ⅜ in x 1 ⅞ in cardboard or plastic canvas (cut slightly smaller than bottom)
-2 pieces of ribbon, approximately 6-8 inches long
Gauge: 16 st x 9 rows = 4inches in hdc
Abbreviations/stitches used:
-sc: single crochet
-hdc: half double crochet
-fptrc: front post treble crochet
-fptrc2tog: front post treble crochet two together

Instructions
FRONT:
CLICK HERE for a video tutorial for the FRONT of the bag!
Row 1: Ch 20. Hdc in second ch from hook, hdc to end. (19 sts) Ch1, turn.
Row 2-3: Hdc across. Ch1, turn. (19 sts)
Row 4: Hdc in first 7 sts, then fptrc around the center st of Row 2 (stitch #10). Hdc in next 3 sts, then fptrc around same center stitch of Row 2 (making "V"). Hdc in last 7 sts. Ch1, turn.
Row 5: Hdc across. Ch1, turn.
Row 6: Hdc in first 6 sts, fptrc around top of right post from Row 4, hdc in next 5 sts, fptrc around top of left post from Row 4, hdc in last 6 sts. Ch1, turn.
Row 7: Hdc across. Ch1, turn.
Row 8: Hdc 5 sts, fptrc around top of right post, hdc 7, fptrc around top of left post, hdc 5. Ch1, turn.
Row 9: Hdc across. Ch1, turn.
Row 10: Hdc 4 sts, fptrc around top of right post, hdc 9, fptrc around top of left post, hdc 4. Ch1, turn.
Row 11: Hdc across. Ch1, turn.
Row 12: Hdc 3 sts, fptrc around top of right post, hdc 11, fptrc around top of left post, hdc 3. Ch1, turn.
Row 13: Hdc across. Ch1, turn.
Row 14: Hdc 3 sts, fptrc around top of right post, hdc 3, fptrc around middle stitch (#10) of Row 12, hdc 3, fptrc around center of Row 10 again (making "V"), hdc 3, fptrc around top of left post, hdc 3. Ch1, turn.
Row 15: Hdc across. Ch1, turn.
Row 16: Hdc 5, fptrc2tog around the two right posts, hdc 7, fptrc2tog around the two left posts, hdc 5. Ch1, turn.
Row 17: Hdc across. Ch1, turn.
Row 18: Hdc across. Break yarn and weave in ends.
BACK:
Option 1, double sided bag: Make another Front.
Option 2, plain back:
Row 1: Ch 20. Hdc in second ch from hook, hdc to end. (19 sts) Ch1, turn.
Row 2-17: Hdc across. (19 sts) Ch1, turn.
Row 18: Hdc across. Break yarn and weave in ends.
SIDES (make 2):
Row 1: Ch 10. Hdc in second ch from hook to end. Ch1 and turn. (9 sts)
Row 2- 17: Hdc across, ch1 and turn.
Row 18: Hdc across. Break yarn and weave in ends.
BOTTOM (make 2):
Row 1: Ch 10. Hdc in second ch from hook to end. (9 sts) Ch1 and turn.
Row 2-15: Hdc across, (9 sts) ch1 and turn.
Row 16: Hdc across. Break yarn and weave in ends.
ASSEMBLY:
Sandwich the plastic canvas between two bottom pieces, and sc edges together, 60 stitches worked evenly around. (19 sts per long side, 9 sts per end, plus 1 extra in each corner.)

Using sc, attach the front, sides, and back together. (Approximately 22 stitches per edge.) Sc the body to the bottom sandwich. Sc all the way around top of the bag. Weave in all ends.
For the handles, you can use ribbon as shown, or crochet a chain, knit some icord... whatever you like! If you do use ribbon, I recommend tacking them down on the inside with a few stitches in a matching thread or some fabric glue. Now fill it with goodies, and make someone feel loved!
The Fine Print
Be sure to check out and like the moogly facebook page to get all the latest updates, fun links, sneak peeks, and more! Written pattern copyright Tamara Kelly 2012. Please include links to this blog post if sharing this pattern with others, but do not repost or share the written pattern itself. You are welcome to sell items made from Moogly patterns - see the About page for details!


Maria Luisa Luque says
It´s just beautifull
Ericka says
Seriously adorable!!! Thank you so much for sharing your pattern - so cute!
moogly says
You are welcome! I'm so glad you like it!
Judy Grimes says
These bags are so cute, and I never thought of making a gift bag, from now on if I have time I will make them. Thank you so much.
moogly says
You are most welcome Judy!
kaysiebee says
You don't say how big this bag is supposed to be. Would it be about 8 1/2 x 4 1/2?
moogly says
The front/back is about 5 1/2" tall and 5" wide. Sorry I forgot to add that!
wendy says
how cute! Thanks so much for the pattern
Shellie says
This is the most adorable gift bag ever, and certainly one that will be re-used many, many times! Thank you so much for the wonderful pattern and photos.
Donna says
How do you suppose I would go about making the bottom of the heart round, in order to make an owl instead? My daughter is very into owls and i think she'd love that 🙂
moogly says
Great idea Donna! I'd recommend using the cable owl pattern from these mitts - http://www.ravelry.com/patterns/library/owl-mitts-2
Otherwise, you could work the bottom cables from stitches further to the sides.
Sasha says
I love this pattern! I just have one question. On Round 4, it's supposed to make a "V"? When I did it, it made 2 separate frptrc, help me please! 🙂
Tamara Kelly says
Thank you! I'll be happy to help if I can!
When you make the frtrc sts, they should be worked around the post of the same stitch. So rather than going straight down, the first one will work around a stitch that's to the left, then you hdc in the next 3 sts (the second of which is in the top of the st you made the first fptrc around), then you work the second fptrc around the same st, which is now to the right. Does that help?
Daisy says
This is a lovely bad and I've just had to undo twice. I am ok until I get to row 6 and then I either end up with more stitches to the left, ie instead of 19 sts I end up with 21. So I undid it and skip a few stitches but when I got to row 16 and fptrc2tog then it complete confused me. It's shame you can't do a video tutorial on it. Just the heart part. I'd be really grateful. I'm an advance crocheter but this pattern is too hard. Shame my little niece loves the heart part two.
Tamara Kelly says
Hi Daisy! Sorry you're having trouble! I'll add this pattern to my video tutorial to-do list!
Kristina & Millie says
Super adorable!! We added this to our round up of Mom day gifts to crochet/knit! http://2crochethooks.com/mom-day-gifts-to-crochet/
Also we have added a link up on our blog to direct people where to find the best patterns, tutes, diy, crafts, etc. - ok to add your site to our list? 🙂
Tamara Kelly says
That would be great, thank you!
sue brown says
Hi ,can you help me as i do a workshop every week for crochet.I thought that the gift bags would be a great project to do but when i go to print the patten I get lots of adverts over the instuction can you explain why this happens
Tamara Kelly says
Hi Sue! Are you using the green Print Friendly button? There's a tutorial HERE.