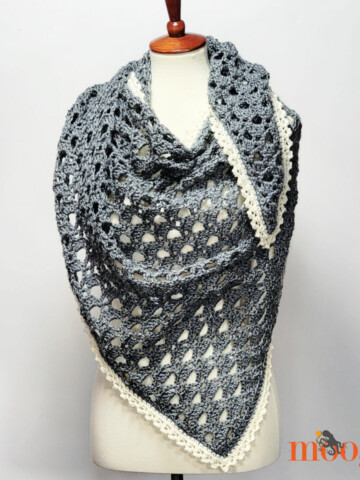
The Winter Sunrise Scarf is light, beautiful, and the perfect accessory for a chilly day. What could be cheerier at this dark and windy time of year? It's great for holiday gift giving, and works up in a flash.
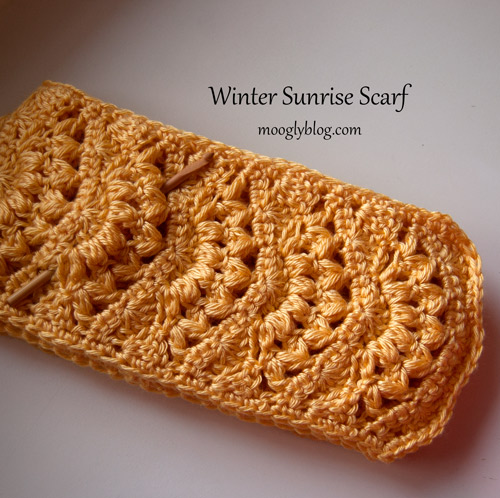
The Winter Sunrise Scarf proves I can't get enough of this cluster stitch pattern! The Autumn Sunset Infinity Scarf featured this basic motif in a long repeating loop worked in the round, but I wanted to play with it in a more classic scarf. Classic, but not boring!
The finished crochet scarf pattern as written is about 6 inches wide and about 6 feet long, but as it's a scarf, gauge isn't terribly important - just work the pattern with the hook and yarn that give you the result you like.
To make it with just one skein of yarn, stop the first half when you're not quite halfway through the skein, then make the second half, leaving enough to work the sc edging.
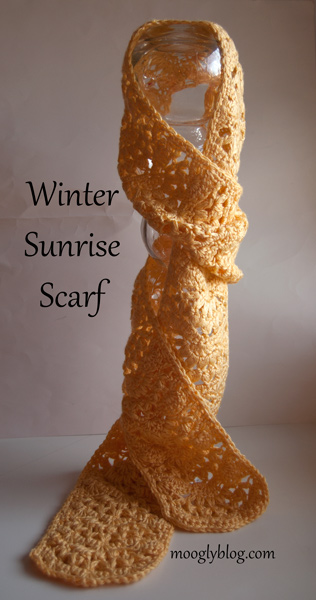
Winter Sunrise Scarf
Add this pattern to your Ravelry Queue and Favorites
US - J, 6 mm hook
365 yds Caron Simply Soft (worsted/"4"/UK 10-12 ply)
Colorway Shown: Sunshine
Gauge swatch: Rows 1-4 = approximately 5.5" wide and 2.75" long
Special Stitches:
Click here for a Video Tutorial
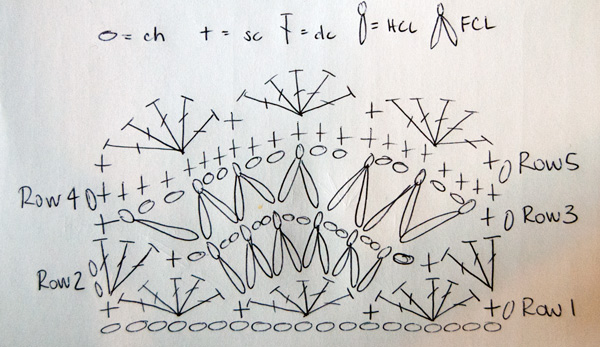
HCL – Half Cluster = [Yo, insert hook in st, yo, pull up loop loosely] twice (5 loops on hook). Yo, pull through 4 loops, yo, pull through last 2 loops.
FCL – Full Cluster = [Yo, insert hook in st, yo, pull up loop loosely] twice (5 loops on hook). In next st indicated [yo, insert hook in st, yo, pull up loosely] twice (9 loops on hook). Yo, pull through 8 loops, yo, pull through last 2 loops.
Note:
This scarf is made from the center out - first make one side, then break the yarn and rejoin at the original chain and make the other half. This creates a symmetrical finished scarf.
Winter Sunrise Scarf Chart Instructions
Winter Sunrise Scarf Written Instructions
First end:
Row 1: Ch 20, turn. Sc in the 2nd ch from hook. [Skip 2 ch, dc 5 in next ch, skip 2 ch, sc in next ch] 3 times. Turn.
Row 2: Ch 2, dc 3 in the 1st st. Skip 2 dc, sc in next dc, ch 1, skip 2 dc and 1 sc, work HCL in next dc. [Ch 2 , FCL in same st as previous CL and next st] 4 times. Ch 2, HCL in same st as second leg of last FCL. Ch 1, skip 1 sc and 2 dc, sc in next dc. Skip 2 dc, dc 3 in the last st. Turn.
Row 3: Ch 1, sc in the 1st st. Skip 3 sts and 1 ch, HCL into top of HCL from previous row. [Ch 2, FCL into same st and next CL, skipping the 2 ch between them] 5 times. Ch 2, HCL in same st as second leg of last FCL. Skip 1 ch and 3 sts, sc in the last st. Turn.
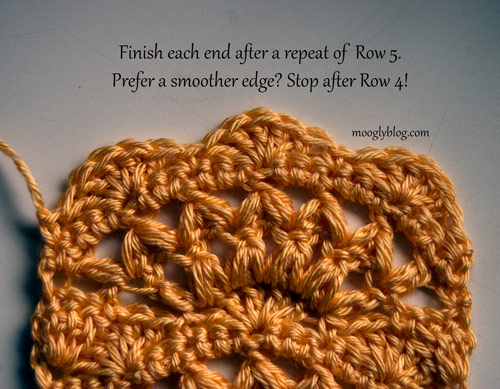
Row 4: Ch 1, sc in the 1st st. Sc 1 in each st and sc 2 in each ch sp across. Turn. (21 sc)
Row 5: Ch 1, sc in the 1st st. Skip 3 sc, dc 5 in next sc. [Skip 2 sc, sc in next sc, skip 2 sc, dc 5 in next sc] twice. Skip 3 sc, sc in the last sc. Turn.
Repeat Rows 2-5 14 times. (15 total motifs plus the scallops of Row 5. Break yarn and finish off.
Second end:
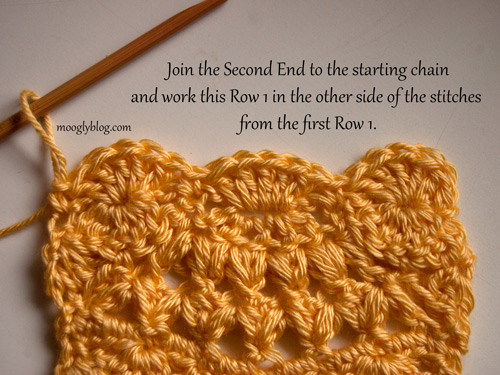
Row 1: Join to the starting chain with a slip st. Ch 1 and sc in the first ch. [Skip 2 ch, dc 5 in next ch (in the same st as the other dc 5), skip 2 ch, sc in next ch] 3 times. Turn.
Repeat Rows 2-5 as written for the first end 15 times (30 total motifs with a scalloped Row 5 on each end. Do not break yarn.
Edging and Finishing:
Ch 1 and turn. Sc in each st of the end and evenly along the sides of the scarf, working 3 sc in each corner. Break yarn and use seamless join to finish off.
Block the scarf into shape using the appropriate method for your choice of yarns. For the Caron Simply Soft shown, I used the wet towel method, with a very gentle touch, giving the iron hardly any weight at all.
I hope you are enjoying the cluster stitches too, and like the Winter Sunrise Scarf as much as I do. The yarn color and the gentle curve of this stitch pattern made me think of sunrises (and sunsets), but I think this pattern is a great one for any color, and definitely for stripes!
As always, please let me know if you find any errors – it’s a free pattern, so you all are my testers. Thanks so much for reading!



Katie
I am stuck on row 2. I apologize I do not understand where to repeat the stuff in the brackets 4 times. Am I supposed to do the repeat in the very next st? So I ch 2 then fcl in the first dc of the second "dc fan"? I tried to look at the pic but I am just having trouble.
moogly
It's okay Katie! Have you watched the video? That might help too. Basically, the FCL is worked over 2 sts - for the first FCL, the first half goes in the same st as the HCL, and the second half goes in the next st. For the second FCL, the first half goes in the same st as the second half of the first FCL, and the second half goes in the next st. So the first half is always worked in the previous worked st, and the second half is always worked in the next (unworked) st. Does that help?
Meagan
I'm having a very hard time with this. In row 2 is says "ch 1 skip 1sc, and 2 cd, sc in next dc" but if I skip 1sc there's 2 sc after that so do I skip those too to make a sc in the next do???
Tamara Kelly
This is a pretty complicated pattern, I would recommend following the charted instructions.
Katie
I think I finally got the pattern down. Sometimes it is hard going from reading a chart diagram to words. It is a very quick pattern and I really like it. I am using red heart worsted and its a little thicker than the Caron. I hope in blocking it, it will flatten.
moogly
I'm so glad! I know one other person is having a bit of trouble too. Do you think a chart would help?
Meagan
I agree, the chart is hard to read, I'm not much of a chart person, I do well with the written, but the written instructions are confusing, When I go back and forth between chart and written it comes out all lopsided. I'm calling it quits! LOL it's giving me a headache trying to figure this out. maybe a video would be more helpful for the first 5 rows.
Katie
I can never say no to a chart lol
moogly
Ok! I'll try to get that worked up and on the pattern asap. Thank you for the feedback! 😀
Sara - My Merry Messy Life
Wow, gorgeous pattern, Tamara! I love how you created it from experimenting. Thanks so much for sharing at Hookin On Hump Day!
mona
YOU ROCK!!!
I learned the wheel stitch from your blog. All other videos and write ups were really muddled. But from your simple explanation and pictures I got it.
Thanks!!
Working on a sampler afghan, will mail the pictures once completed.
- mona
moogly
Can't wait! 😀
Mrs. Micawber
Gorgeous stitch pattern! And thank you for the chart - I love charts. 🙂
moogly
Thank you, and you are very welcome!
Annie Shelton
I just finished this scarf! I did not have any trouble with the pattern, I only went by the written instructions. Great job! It really flattened out after I stitched all around it when finishing. Thanks for the AWESOME patterns! <3
moogly
Fantastic! I'm so glad! 😀 Thanks so much!
Amanda
I'm having a little trouble understanding Row 4. I'm not seeing the chain space in this pattern. Can anyone help?
moogly
Amanda, I think I can help! Sc in the ch sp means to work the sc around the chain, rather than through it like you normally would. Here's a video that should explain: https://www.mooglyblog.com/working-into-the-chain-vs-the-chain-space/
Amanda
I must have been really tired last night. I got it! Thanks!
Nora Carrington
I know how to put a stitch in a chain space, but I'm still not understanding this:
"Sc 1 in each st and sc 2 in each ch sp across"
What is "sc2?" The chart makes it look like straight single crochet stitches across the row, but you clearly intend something different. I read the directions to say "put a single crochet in each stitch, and put sc2 (whatever that is) in each chain space across." Read literally, it sounds like 2 stitches for every chain of the previous row, one in the chain and one sc2 stitch in the space.
So I'm confused.
Tamara Kelly
Hi Nora! Sc 2 means to single crochet 2, or single crochet twice in the chain space. Single crochet once in each cluster or dc stitch of the previous row, and twice in each chain space. Sorry for any confusion!
Nancey
I finished this scarf a couple weeks ago, and I absolutely loved it! However, I tried "blocking" it as suggested. I didn't like the way it looked after blocking it at all. So I through it in the wash-machine with some laundry to "unblock" it. It turned out really fuzzy and gross looking 🙁 So I tried to snip away the fuzz with some scissors and inadvertantly snipped a stitch. It's ruined. I will painstakenly make it again, as it was a gift for a friend.
moogly
Oh no! I'm so sorry Nancey! Always heartbreaking when something like that happens. If you like the look without blocking, you certainly don't have to block it!
Julia
Hi Moogly! 😀
I've recently discovered your website and love it! The 10-pattern posts you did around the holidays helped me out a lot as I made a few for gifts! I was browsing Ravelry, looking for a scarf to make for an older relative of mine and came across this one. It is beautiful, different and quick to make! I'm working on it now and really enjoying it. I just had one note. You say on round 4 that there will be 20 sc at the end and there are actually 21. I got hung up on that a little so I decided to just keep going since it looked right to me. Then I thought to check the chart and noticed that it's 21 there. Just might be something to change in the text portion of the pattern. Thanks so much for the free pattern and the great posts!!!
moogly
Whoops, right you are! Thanks so much for letting me know, Julia - all fixed now! 😀 And thank you so much for your kind comments!
Sylvia
Hi there
You do beautiful work. I love it. It looks so expensive. I hopeine comes out as beautiful as yours.
Thanx
Sylvia
troylynn
i think this pattern is beautiful and would look great as a little bag.
moogly
Thank you troylynn! That's a great idea!
Angela W
Just to let you know I just loved your way of explaining all this crochet stuff! Your videos are wonderfully helpful too! I couldn't get my head round a lot of the alternative explanations so I am hoping you can help.
Just taken up crochet a couple of months ago and I was trying to find a way of increasing within a lacey pattern (only given for working rectangular shapes) so that I could get it looking womanly. The lace is worked in 8 chain blocks. But that's too much to increase all at once. Any clues? Or is this just too ambitious for now?
Would love to have your advice.
Thanks for all the great patterns and tutorials.
lol
Angela
Tamara Kelly
Thank you so much, I'm so glad they've helped you! 😀
Well, it's hard to say exactly without seeing the pattern, but you could try varying the hook sizes! Use a smaller hook when you want to nip in a bit, like around a waist, and a bigger hook if you need more room in the chest. (Or hips, etc). That's a good way to make a subtle but effective change. 🙂
Angela W
Delighted to receive your reply. Thank you for your kindness.
Actually, I have tried varying the hook sizes, but then I have tension issues and the pattern doesn't come out as defined as with the 3.5mm hook I'm using. Also the increase in width with changing hook size is not as large as I'd need. So, I've figured out that increasing stitches is the way forward, but I don't know how to keep continuity with the pattern set in the previous work.
I have cribbed the floral pattern from:
http://www.caron.com/projects/ss/ss_rose_of_sharon_tunic.html
and am working only the floral pattern for a jacket which I need to grow up from waist by a further four inches for the bust, which works out to be another 2 and a half or 3 pattern repeats. But it doesn't look good with block repeats and I wanted to know how to work the increases in more gradually.
This is the pattern which on my work comes to a 4 cm diamond with the flower inset. I have worked with 86 stitches.
Well, it seems to me a tall order but I am hoping to get some help from your clear expertise. My grateful thanks for this being considered so far!
Thanks!
Angela W
Tamara Kelly
Oo, that is tricky! I think it would take me ages to figure that out. :/ What I'd recommend is contacting the designer, Mary E. Nolfi. I found her website and you can contact here here: http://crochetasylum.com/cart/contact_us.html Hopefully she'll be able to lend a hand!
(BTW, I edited out the pattern - the link is fine, but copying and pasting the written pattern segment is a copyright violation).
Angela W
Delighted to receive your reply. Thanks for your kindness and your advice. I will follow it up.
Thanks for saving me. I didn't know that detail about the copyright law!
Blessings,
Angela W
Tamara Kelly
No worries, happy to help! 🙂
Angela W
Hi, it's me again!!
I do hope you wont mind me troubling you again. I am hoping to get one of your clear instructions one way or another.
I wasn't able to get any help, but I wonder if it would be too big an ask to request some guidance/direction on a open diamond mesh-like pattern that I could do on the sides which would facilitate increases and decreases and yet keep some continuity with that pattern?
Thanks for a listening ear and a warm heart!!!
Angela W
Tamara Kelly
Mesh inserts on the sides would be a good solution! I think something like this might help: http://www.hassdesign.com/DeltaCrochetTechniques/
Angela W
Hi there!
Delighted to get your reply. Thanks a million for your help. It's just the thing I needed! I can now crochet on with some confidence I'm on the right track.
So good to have your help and expertise! And you are so generous with it!!
Thanks.
Blessings,
Angela W
Tamara Kelly
You're very welcome! Good luck with your project!
natalie humphrey
I am having problems with row 3 repeating it 5 times. I am only able to repeat it 4 times. Is it supposed to continue over the side and be a round corner instead of flat?
Tamara Kelly
The sides should be straight. If you look at the chart in the pattern, you can see that the clusters of Row 3 are worked into the clusters of Row 2, so it sounds like maybe you're short on Row 2?
bethany
i love this it took me just over 24 hours to complete the only thing is i pressed down when blocking it ( i have never blocked anything before) but now i know for next time and it still looks good and my mum loves it i made it for my mum for mothers day now looking to do this for my mother in law or the wrap, thank you for sharing
Tamara Kelly
😀 I'm glad you liked it bethany!
Molly
I'd love to make this for a very dear friend. I was wondering if you thought I could use Hayfield crushed velvet if I used 2 yarns together. The crushed velvet is pretty thin compared to worsted weight. I've never used this before, would you have any other crochet pattern suggestions for it? It was given to me and I'd like to give it a try but I'm not sure what to compare it with in other fibers. Thanks!
Tamara Kelly
I'm afraid I'm not familiar with that yarn. It sounds amazing though!
Shakeel
Great post! The scarf looks fabulous. I hope to get the stitchings right when I try this. Looks quite tough but won't mind trying it.
Pam Ramoska
Love, love, love this pattern! I've finished this one up today in burgundy ... Beautiful! The pattern went very smoothly ... no problems whatsoever. Thanks so much for sharing, Tamara!
Tamara Kelly
😀 Thank you Pam, I'm so glad you like it!
Sandy
Confused on where it says to "chain 2 and than to 3 dc in the first chain" (total of 4 dc) correct? At the end "3 dc in the last chain". Should it say to do 4 dc. Im wondering because my project does not look even. I love your scraf your work is so beatiful! If you would just clarify with me i would greatly appreciate it! Also the part where it says to complete the first stitch this would not be the same st as the chain one when you turn. Correct?
Tamara Kelly
Hi Sandy! Thank you! The Ch 2 does not count as a st, so it's just 3 "sts" in the first st and last st. The ch 1 also doesn't count as a st.
Nikki
I have just done 2 rounds of this pattern and it is beautiful. Thankyou so much.
Tamara Kelly
🙂 Thank you Nikki!
Jill
Sometimes I feel like a crochet troll on the internet but I thought I'd leave a comment for you after using your FANTASTIC website and left-handed videos to learn how to crochet. You are my go to spot for all things crochet.
You are definitely one of the best online tutors anywhere - regardless of topic. Your videos are awesome and your patterns always make sense. I don't worry when I start making something you've written that there is going to be a pattern line that looks like it is written in another language and stops a project.
Thank you for taking the time to do things left-handed as well; sometimes the written word just doesn't make sense.
I will try to start buying things from you once I manage to get past the beginner level and making something other than a scarf or face cloth (hoping the NZ dollar gets better before this point too.)
Thanks again Tamara.
Jill
Tamara Kelly
Wow, thank you so much Jill! I'm floored! ♥ That made my day. Thank you.
Donna
I just wrote to you a week ago about houw much I loved your designs and that the Autumn Sunset Infinity Scarf was by all time fav! Well I made your Winter Sunrise Scarf and it is exquisite! I used white sparkle I Love This Yarn from Hobby Lobby. I used two strands together and a size 9 mm hook. It turned out so beautiful. I went right by your excellent pattern and ended up doing 20 shells. Their 7 inches wide. Its soft and squishy and I added long fringe. Stunning. This is definitely my go to scarf for Christmas gifts this year. Thx again for you beautiful patterns!!
Tamara Kelly
It sounds lovely - thank you so much Donna! I'm so glad to hear it!
Kate
This is a gorgeous stitch and I'm using a worsted weight 100% Merino yarn, so it's double gorgeous. I'm loving this project. Thank you very much Tamara.
Tamara Kelly
Thank you so much Kate!
Donna M Myers
The Winter Sunrise and Autumn Sunset are still on my short list of fave patterns! I know I've made at least 50! Thank you Tamara!
Tamara Kelly
Thank you so much Donna! 😀
Talitha
Hi Tamara,
I just love the pattern, it's beautiful! I was wondering. I would like the scarf to be a bit wider. Can I just multiply the pattern two or three times, or would that completely ruin it?
Tamara Kelly
Hi Talitha! Thank you! To make it wider, add a multiple of 18 to your foundation chain. So double width start with 38 chains, for triple start with 56 chains. 🙂
Talitha
Alright, thank you for your response! In the following rows, can I just multiply, or are some in between stitches also necessary?
Tamara Kelly
If you start with that foundation chain, you should be set up to continue the pattern for as many repeats as you like. 🙂