You might be reading this on a computer. But is it a desktop? A laptop? Or maybe you're on a tablet, e-reader, or smart phone? There are lots of options (and even more sizes!), and many of them travel with us when we leave the house. In order to keep them safe and sound, I present the Ultimate Universal Electronics Cozy!
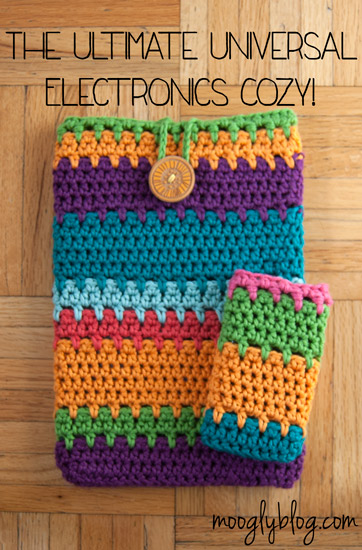
This one cozy pattern can fit any tablet, e-reader, or smart phone, even a laptop! Because it's the easiest pattern to customize. Ever. Really! The only math is counting to two! I made it to fit a Kindle Fire HD, and then again to fit my Android (seen in the tutorial) but you can make it in any size you like - and use up the odds and ends of your favorite yarns while you're at it! And the unique stitch pattern means you'll never mix it up with someone else's device.
Ultimate Universal Electronics Cozy
Add this pattern to your Ravelry Queue
- US - H, 5.0mm hook (main hook used)
- US - G, 4.0mm hook (last two rounds only)
- Worsted weight yarn, not scratchy and non-shedding, several small amounts (Knit Picks Comfy Worsted shown)
- Optional: button(s)
- Tutorials for stitches and techniques used are available on the Video Tutorials Page.
- Because this pattern is designed to fit any electronic device and using odds and ends of yarn, it's written as a tutorial, without exact stitch or row counts.
.
Step 1: Using the H hook and your longest "scrap" of yarn, and leaving a long tale for sewing the bottom closed later, FSC long enough to fit around your electronic device. Make it snug if you wish for a sock-style cozy, or a little looser for a button closure cozy. Be sure that your st count is an EVEN NUMBER (multiple of 2). Join with a sl st to work in the round.
Step 2: Ch 1, hdc in each st around. Join with a sl st. Repeat this step until you have just about enough of this yarn left for one more round, then move to Step 3.
Step 3: Ch 1, hdc in first st, ch 1, skip next st. *Hdc in next st, ch 1, skip next st. Repeat from * to end. Join with a sl st in first hdc, changing to next color or ball of yarn.


Step 4: Ch 2, skip first st, and hdc in the st below the ch sp, enclosing the ch in the st. *Ch 1, skip next st, hdc in the st below the next ch sp. Repeat from * around. Join to the ch 2 st with a sl st.
Step 5: Ch 1, hdc in the ch 2 sp, then hdc in the next st. Hdc in each ch sp and st around. Join to the first hdc with a sl st.

Step 6: Go back to Step 2, and continue working each step in order (skipping to Step 3 for particularly short scraps), until your cozy is just a bit shorter than your electronic device, ending with a Step 3 row. Then go to Step 7.
Step 7: Switch to a G hook. Ch 2, skip first st, and hdc in the st below the ch sp, enclosing the ch in the st. *Ch 1, skip next st, hdc in the st below the next ch sp. Repeat from * around. Join to the ch 2 st with a sl st.
Step 8: If you wish to add a button to your cozy, now is the time to sew it on. Do NOT break the yarn however, as there's one more row to go. Sew the button(s) where/if desired.
Step 9: Ch 1, hdc in the ch 2 sp, then bphdc in the next st. [Hdc in the next ch sp, bphdc in the next st] around to end. If you have added a button, then when you are opposite the button be sure to work a simple chain loop long enough to close up your cozy (put the device in the cozy to check for fit - chain length will vary depending on device, button placement, etc). Continue working in pattern to end of row. Break yarn and finish off with a seamless join. Step 10: Use the long tail to whip stitch the bottom of the cozy closed. Weave in ends.
And that's it - just 10 simple steps to your own custom electronics cozy! If you've still got some yarn left over, try making an initial with surface crochet, or flower or applique, to personalize it even more. I really enjoyed coming up with this stitch pattern, and I hope you enjoyed making it. I can't wait to see what you cover with the Ultimate Universal Electronics Cozy!
 Be sure to Like the moogly Facebook page for the latest updates and have some fun with us! Written pattern copyright Tamara Kelly 2013. Please do not reprint, or repost this pattern, but please feel free to link to this page to share this pattern with others. You may sell items made from this pattern, but please include a link to www.mooglyblog.com on the online listing or sale tag if selling at a craft fair, storefront, or other in person sales.


Brenda says
Thank you for the free pattern. I had bought some Serenity Garden Yarn because it was on sale and I loved the color(mountain heather)! I think this pattern is just the thing to use this yarn for!
Karie {Girl Going Country} says
Love this! And love the colorful choices of yarn you used. What a fun pouch to put your electronic device into your purse to prevent scratching and surprising you with a pop of color when you open your bag. 🙂
Lindsay says
Hi--thanks for this great tutorial! I was wondering if you might be interested in joining a Pinterest link-sharing group I'm starting, specifically for crochet and knitting bloggers. It would be a way to get to know and support like-minded folks. Let me know if you'd like more info!
moogly says
Sure Lindsay, send me the info! 😀 Thanks for thinking of me!
Marcia says
Great pattern...thanx for sharing. I have been looking for something to carry my eReader in and this is just perfect! Cannot wait to get started on it. Blessings!
Jane Ashley says
Hi!
Is it possible to do this with a regular chain stitch in the beginning? I just can not get the hang of the foundation row. It's so confusing to me, and I can not get it down.
Thanks!
moogly says
Absolutely Jane! Just make the chain and first row of sc long enough to go all the way around your device and you'll be all set. 🙂
Alice says
I just finished mine 🙂 Thank you for your free pattern! Iam so happy with it !!!
moogly says
I'm so glad you like it Alice! 😀
Susan says
Such a great idea, thank you. I will make one for my daughter today.
Lynn says
This by far is one of the best patterns I have found for an iPhone/iPad cover !! I been searching for awhile now for the perfect pattern to make a cover for both my iPhone and iPad. Might even make covers for my e-readers. Thanks so much for sharing !!
Lee Ann says
This cozy is terrific! Now I can make one for my Blackberry!!!! Thank you very much for posting this! 🙂
__
Lee Ann
Crochet...Gotta Love It! Blog
Jean says
Thank you for this pattern. I've tried making covers for my phone and they're always too darn big, just don't fit no matter what I do. Now I can actually 'fit' my phone exactly! Will give this a try today...
Tamara Kelly says
😀 You're very welcome Jean!
barbara says
I ABSOLUTELY LOVE T
this is their any way of making a pocket for a charger on it?I always take my charger with.
Tamara Kelly says
Thank you Barbara! For a pocket, just make a square the size you need and whip stitch it on!
Robyn Gerrey says
This pattern is the absolute bomb. I have made one as per the pattern, then made one with double crochet. And also.used cake yarn as well. Love it. My absolute favourite.
Tamara Kelly says
Thank you so much! ♥
Nikki says
I'm near the end, I can't find what bphdc is, and there's not a video for it. Can anyone tell me what it is please?
"Step 9: Ch 1, hdc in the ch 2 sp, then bphdc in the next st. [Hdc in the next ch sp, bphdc in the next st]"
Chain 1, half double crochet in the chain 2 space, BPHDC?
Tamara Kelly says
Hi Nikki! That would be a back post half double crochet. 🙂 Worked like a back post double crochet, but of course as a half double crochet instead.
zarnaz says
Hi there! I made this a year ago and its really holding up well. I added a strap to it so I could wear it cross-body style while I'm listening to my audio books!
I want to make another one, but I'm wondering if we can use your bags bottoms tutorial in combination with this pattern... How will I go about making it that way?
Tamara Kelly says
Hi Zarnaz! Thank you! I can't rewrite the pattern right now to change the bottom, but if you make a bottom like the tutorial in the size desired, and then switch to the stitch pattern of the cozy, that's the basic idea. 🙂
Zarnaz says
Thank you! I'll try it tonight... 🙂
Amanda Gratrix says
Hi Tamara I was wondering do you have a youtube tutorial for this tablet case or do you just have this pattern ?
Tamara Kelly says
Ah, this was from before I started making pattern tutorials, so I'm afraid not. But I'm happy to try to help if you're stuck!
Amanda Gratrix says
Ok thank you I'm not very good at changing colours how can I do this or can I change colours by putting a slip stitch on my book I'm struggling to see in the pictures how you've done it ?
Anna says
Thank you for the cute pattern! Was fun colorful, but I got lost somewhere at the bottom and didn't wanna frog so I just did my best~ I like it!
Tamara Kelly says
I'm so glad you like it - that's the important part! ♥