The Solid Shell Stitch pattern is one of the simplest shell stitch patterns there are. (Though not an easy one to say on camera! Five times fast, go!) You can work it back and forth in rows, in the round, or work just one row of it to make a beautiful blanket edging! Here's the basics of how it's done.
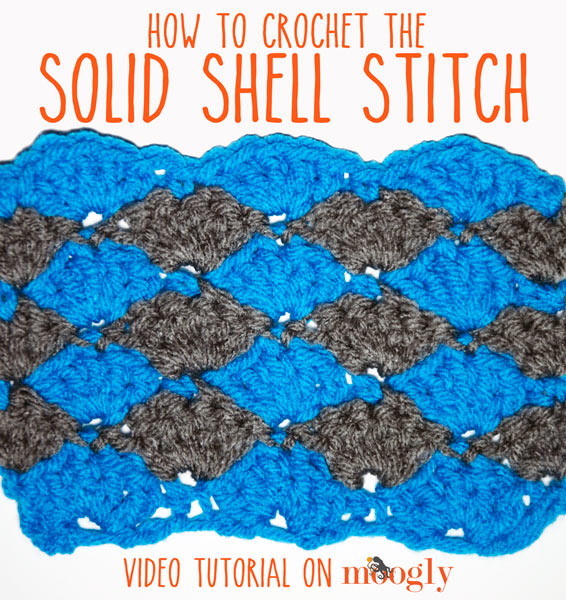
Video Tutorial for the Solid Shell Stitch
Written Instructions for the Solid Shell Stitch
Working the Solid Shell Stitch back and forth in rows (as seen in the video):
This stitch is worked over a multiple of 6 plus 1, plus 1 for the base chain.
Row 1: Ch to desired length. Sc in the 2nd ch from the hook. *Skip 2 ch, work 5 dc in the next ch, skip 2 ch, sc in the next ch. Repeat from * to end. Turn.
Row 2: Ch 3 (counts as first dc), work 2 dc in the same (1st) st. *Skip 2 sts, sc in the next st, skip 2 sts, 5 dc in the next st. Repeat from * working 3 dc in the last st. Turn.
Row 3: Ch 1, sc in the 1st st. *Skip 2 sts, work 5 dc in the next st, skip 2 sts, sc in the next st. Repeat from * to end. Turn.
Repeat Rows 2 and 3 as desired.
Working the Solid Shell Stitch in the round:
When worked in the round, ch a multiple of 6.
Round 1: Ch to desired length, join to work in the round without twisting ch. Ch 1, sc in the 1st ch. *Skip 2 ch, work 5 dc in the next ch, skip 2 ch, sc in the next ch. Repeat from * until 2 ch remain. Skip 2 ch, join with a sl st in the first sc of the round.
Round 2: Ch 3 (counts as first dc), work 2 dc in the same (1st) st. *Skip 2 sts, sc in the next st, skip 2 sts, 5 dc in the next st. Repeat from * working 2 dc in the same st you started the round with. Join with a sl st to the top of the ch 3.
Round 3: Ch 1, sc in the 1st st. *Skip 2 sts, work 5 dc in the next st, skip 2 sts, sc in the next st. Repeat from * until 2 sts remain. Skip 2 ch, join with a sl st in the first sc of the round.
Repeat Rounds 2 and 3 as desired.
Working the Solid Shell Stitch as a Border or Edging:
Ideally, your edge will have a multiple of 6 st count, but don't be afraid to fudge it a bit, particularly if you're working into the sides of sts as in a blanket. This edging hides it really well!
Row 1: Join to a st of your piece, or if continuing with working yarn, ch 1. Sc in the 1st st. *Skip 2 sts, work 5 dc in the next st, skip 2 sts, sc in the next st. Repeat from * until 2 sts remain. Skip 2 ch, join with a sl st in the first sc of the round. Finish off.
The Solid Shell Stitch is a great, easy to use stitch pattern, and while it's hard to get it to show up on video sometimes, it's got great texture. I love it as the edging on girl's bucket hats too. Work it all in one color or work each row in a new color - it would make a fantastic crochet stash buster afghan!
Be sure to check out and like the moogly Facebook page to get the latest updates, links, and sneak peeks. Moogly is also on Pinterest, Twitter, Tumblr, Sulia, and Google+ – come join the fun! TamaraKelly@mooglyblog.com.


Kitty
Hi! I'm a beginner an I am wondering if it is possible to make increases (and how)if I make shell stitches in the round. Can you please help me?
Thanks!
Tamara Kelly
Hi Kitty! There's no one standard way, it would be part of an actual design. You could try adding ch stitches in between, and then adding new shells in the chain space!
JO
I am working a similar pattern, it called for a 7dc shell worked in the round, the problem is it is ruffling after 8 shell rounds. I thinking of either increasing my hook size to make the gauge looser(the pattern didn't specify a gauge so I am using the hook called for on the yarn) or decreasing the number of stitches in the shell to 5 dc and shortening the accompanying chain that is worked over the shell. Do you have an opinion as to which would be more likely to reduce the ruffling effect the best? The less frogging the better.
Tamara Kelly
You might experiment with increasing the space between the shells as is? Or gradually move from 7dcs to 6 to 5? Hard to say without being there!
Jess
Hi I'm wondering if you can decrease with this stitch thank you
Tamara Kelly
Hi Jess! Yes, though it will be different in every pattern - there's no one way to do so. In general though, it's going to happen by shrinking one shell in one row, then shrinking the shells on either side in the next row, until one of the shells can be skipped completely.