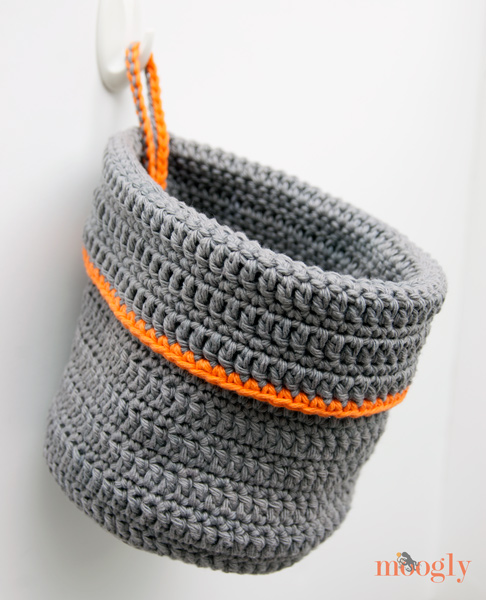
Say it with me - Organization NOW! In the ongoing and never-ending battle towards organizing my home, I came up with this week's free crochet basket pattern. A fun and easy hanging basket that I've dubbed Organization Now!

A Constant Battle!
Organization is one of those things I think I'm a master of... until suddenly I look around and realize things have gotten out of hand (again).
Stuff everywhere it isn't supposed to be, odds and ends piled up - you know how it goes, right? Suddenly the chaos builds up til you want to shout "Serenity NOW!" And then it's time to take action!
Inspiration Strikes!
Organizing can look good with the Organization Now! hanging crochet basket. Which you don't have to hang - it looks great just sitting there too!
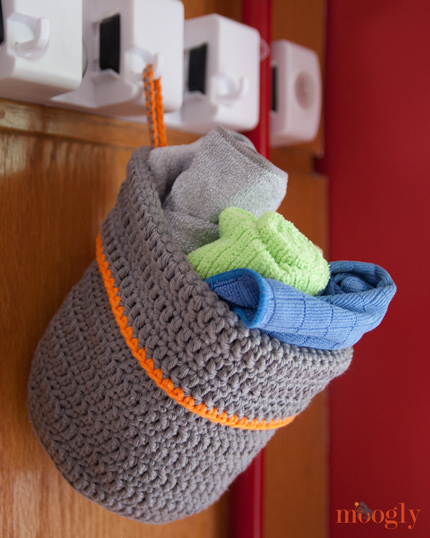
And as written it's just the right size for my stash of microfiber cleaning cloths, or a dog leash and waste bag dispenser, or a collection of crochet hooks, or... well, you get the idea.
It's easy to upsize or downsize as needed, and paired with one of those stick anywhere hooks you'll be on your way to a relaxed, photo ready home! At least for a few hours.
Organization Now! Crochet Hanging Basket Pattern
Add this pattern to your Ravelry Queue and Favorites
- US - G, 4.00mm hook
- 150 yards Bernat Handicrafter
(3.3 oz) worsted weight yarn in Color A, plus 3 yards of Color B - Click for video tutorials: magic circle; bpsc in a sc row; seamless join
Make the Bottom/Base: (using Color A)
Round 1: Starting with a magic circle, ch 1 and work 6 sc in the ring. Join to first sc with a sl st. (6 sts)
Round 2: Ch 1, work 2 sc in each st around. Join to first sc of the round with a sl st. (12 sts)
Round 3: Ch1, sc in the first st, 2 sc in the next st. *Sc in the next st, 2 sc in the next st. Repeat from * to end. Join to first sc of the round with a sl st. (18 sts)
Round 4: Ch1, sc in the first st, sc in the next st, 2 sc in the next st. *Sc in the next 2 sts, 2 sc in the next st. Repeat from * to end. Join to first sc of the round with a sl st. (24 sts)
Round 5: Ch1, sc in the first st, sc in the next 2 sts, 2 sc in the next st. *Sc in the next 3 sts, 2 sc in the next st. Repeat from * to end. Join to first sc of the round with a sl st. (30 sts)
Round 6: Ch1, sc in the first st, sc in the next st, 2 sc in the next st. *Sc in the next 4 sts, 2 sc in the next st. Repeat from * until 2 sts remain. Sc in the last 2 sts. Join to first sc of the round with a sl st. (36 sts)
Round 7: Ch1, sc in the first st, sc in the next 4 sts, 2 sc in the next st. *Sc in the next 5 sts, 2 sc in the next st. Repeat from * to end. Join to first sc of the round with a sl st. (42 sts)
Round 8: Ch1, sc in the first st, sc in the next 5 sts, 2 sc in the next st. *Sc in the next 6 sts, 2 sc in the next st. Repeat from * to end. Join to first sc of the round with a sl st. (48 sts)
Round 9: Ch1, sc in the first st, sc in the next 6 sts, 2 sc in the next st. *Sc in the next 7 sts, 2 sc in the next st. Repeat from * to end. Join to first sc of the round with a sl st. (54 sts)
Round 10: Ch1, sc in the first st, sc in the next 3 sts, 2 sc in the next st. *Sc in the next 8 sts, 2 sc in the next st. Repeat from * until 4 sts remain. Sc in the last 4 sts. Join to first sc of the round with a sl st. (60 sts)
Round 11: Ch1, sc in the first st, sc in the next 8 sts, 2 sc in the next st. *Sc in the next 9 sts, 2 sc in the next st. Repeat from * to end. Join to first sc of the round with a sl st. (66 sts)
Make the Sides:
Round 12: Ch 1, bpsc in each st around. Join to first st of the round with a sl st. (66 sts)
Round 13: Ch 2 (does not count as first st), dc in each st around. Join to first dc of the round with a sl st. (66 sts)
Round 14: Ch 1, sc in each st around. Join to first sc of the round with a sl st. (66 sts)
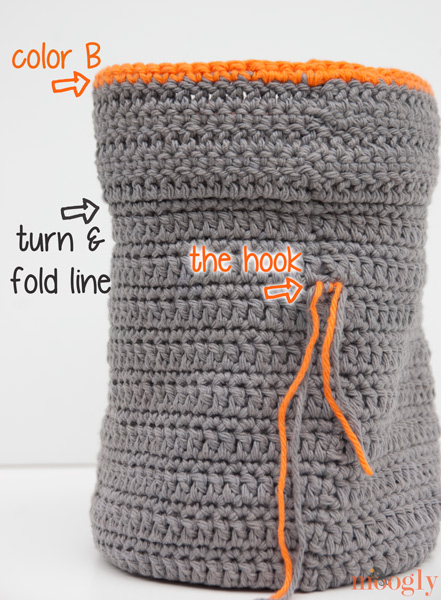
Rounds 15 - 30: Repeat Rounds 13 - 14 eight times. Turn (this is the ONLY turn in this pattern, and for the remainder of the pattern you'll be working from the inside of the basket).
Round 31 - 34: (Working from the inside of the basket) Repeat Rounds 13 - 14 twice.
Round 35: Repeat Round 13. Break yarn and seamless join to 2nd st of the round.
Round 36: Using Color B, and continuing to work from inside the basket, join to last round with a sl st. Ch 1 and sc in each st around. Break yarn and seamless join.
Make the Hanging Loop (optional):
Using Color A and leaving a 6 inch tail for sewing, ch to desired length (25 ch shown), break yarn and finish off. If desired, add a row of Color B sl sts to loop. Sew both ends of the loop through Round 26, so that loop is on inside of the basket. Weave in ends on outside of the basket. If desired, retain one end to sew down fold, as described below.
Fold It Now!
Fold over the top of the basket at Round 31, where you turned, so that Rows 31-36 are now right side out, and the fold hides where you sewed on the loop. If desired, use the remaining end from the loop to sew down the fold and add some extra security to the loop.
The Fine Print
Tah-dah! Now everything in your house is organized and in its place, right? Well, maybe a couple more things than before. Better leave that yarn out to make a couple more baskets...
Written pattern copyright Tamara Kelly 2013. Please do not share copies of or repost this pattern, but please do link to this page to share this pattern with others. You can use the green Print Friendly button below to print a copy for personal use. If you wish to make items for sale from this pattern, please visit the About page for details.


Romy Williams says
Oh man, do I need this! We're moving to a new home and storage space is at a premium. This is so easy and will make a huge impact. Thank you!
Tamara Kelly says
😀 SO glad you like it Romy! Congrats on the move!
julie says
What would happen if I tried making this with a super bulky yarn?
Tamara Kelly says
You'd get a bigger basket! 🙂
Ody says
Ohhhh.... I'm an organization nut and I'm always looking for a way to keep my countertops and spaces tidy. This is (as usual) perfect. Thank you for sharing all of your amazing patterns/ideas.
Tamara Kelly says
😀 Thanks Ody! I used to think I was an organization nut, but lately my house seems to disagree lol!
Jane @ Handiworking says
You cannot beat the combination of cute and functional ... I saved it in my Ravelry favorites. Thanks!
Tamara Kelly says
😀 Thanks Jane!
Rebecca says
LOVE LOVE LOVE this idea - of course kicking myself for not thinking of it myself!!!! Can't wait to start making one, two or twenty!! Great Christmas present ideas!
Tamara Kelly says
😀 Thanks!
Monica says
I just made this today. It is SO CUTE! Thanks for the awesome pattern...and all of your other wonderful patterns!
Ps...I thought there was a typo on Round 10 (I was on a roll and didn't read the whole line), so I just did sc 8 times then 2sc around..what would have been the difference there if I followed the directions?
Thanks!
Tamara Kelly says
Hi Monica, and thank you! The shifting of the increases is done to keep it more rounded, and a little less like a hexagon. When the increases are all in the same spot every line it can get a little pointy. It's not a problem though, and shouldn't affect the end result too much overall, it's just one of those little detail things. 🙂
Fyre Dunlop says
I use my plastic grocery bags and other plastic bags to make 'plarn' and then use this type of pattern to make everything from baskets to containers with lids. The plastic is free and stiff enough for standing alone. Plarn instructions are elsewhere on this site, but careful, it becomes addictive!
Beth says
This is also great for those needing a purse to hang from a "walker"
for a third or fourth "hand".
Tamara Kelly says
Love that idea Beth! <3
Cindy Katsikas says
I think there a type in Round 10? When I *sc in the next 4 sts, 2 sc i the next st* I get a total of 64 sts. Should it be *sc in next 8 sts...?
Tamara Kelly says
Yes, that should read 8! I'll go fix it now, thank you for letting me know!
Linda says
Hi Tamara,
I am new to crochet and I do not know how to make the basket bigger. Some of the rows increase at times in different ways. I like this pattern. I just need bigger.
Thank you so much for your help.
Linda
Tamara Kelly says
Hi Linda! The increases move around a little bit to keep the bottom of the basket circular, so it doesn't become a hexagon - but if you look at the part after the asterisk, it is a consistent progression: 7 sts then an increase, 8 sts then an increase, 9 sts then an increase, etc. So for round 12 you'd have 10 sts then an increase, and round 13 would be 11 sts then an increase, etc. The moving around is done by shifting the increase stitch a little bit, and dividing the sts worked even between the first and last increase to opposite ends of the round (so they end up together when you join). I hope that makes sense!
Joann says
Hello Tamara,
New to this may I ask the dimensions, I'm making this for a special project and need it to be about the size of a roll of toilet paper
Thank Joann
Tamara Kelly says
Mine turned out just shy of 5" across on the bottom - big enough for a standard roll, but probably too small for the big rolls. To upsize it, just add another row or two of increases on the bottom before you work up the sides. 😀
Adriana says
What do I need to do, in order to make the bottom of the basket bigger than 5" diameter? Where do I increase for it to measure at least 10-15 inches in diameter. And isn't nr 4 for crochet hook too small?
Thank you
Tamara Kelly says
Hi Adriana! I used a smaller than normal hook for this yarn in order to make a stiffer fabric. In order to make the basket bigger around, continue increasing by 6 sts every round until you have the size you want. 🙂
Dot Carroll says
Hi, I would like to make this basket, but after looking over the pattern I do not know what a bpsc is as you start round 12 when making the sides....Please explain... Thank You, Dot Carroll
Tamara Kelly says
Hi Dot! That is a back post single crochet - it's a kind of post stitch. 🙂 Worked like the more common back post double crochet, but without the yarn over!
Jo says
I need an easy crochet pattern to store my makeup mirror. The size is 8-1/2 x 8-1/2. I'd like to have drawstring at the top. Can you help me with this.
Jo says
Oh, I forgot the width of the mirror is about 3" wide. It's one of those travel light up makeup mirrors.
Tamara Kelly says
Hi Jo! I'd recommend you take a look at the Pampering Massage Soap Saver pattern (CLICK HERE). Leave out the puff stitches and I think it sounds like it's just what you're looking for!
Jo says
Thanks for your response but the mirror is 8-1/2"H x 8-1/2"L x 3"W. The soap saver looks great but how do I make it large enough to store my make-up mirror in? I'm not a very experienced crocheter.
Robyn says
Hi there..,love this pattern and design. I'm also new to crochet, can you telle how you would work from the inside of the basket on rows 15. Thanks!'
Tamara Kelly says
Hi Robyn! Up until then, you're working from the outside of the basket - with the side you're not working on further away. When you turn, you are crocheting as if you were inside the basket, so the side you're not working on is closer to you - as if you were actually inside the basket. If that's confusing, just turn the whole thing wrong side out to crochet the remaining rows - that might be easier anyway! 🙂
RoByn says
Thanks soo much I understand now.
Molly says
Hi! I love the patterns on your blog. 🙂
I would like to make a much smaller version of this for hanging in my car to hold my cell phone. What's the best way to do this (or do you have another pattern you recommend)? Thanks!
Tamara Kelly says
Hi Molly! Thank you! I would recommend just stopping the circle when you feel it's big enough, and then start working up the sides as directed. 🙂
Molly says
Awesome, thank you! I wondered if that would work but wasn't sure. 🙂
Kristen says
This is a great pattern. I'll have to try it. Can you tell me the name of the color you used? I looked up bernat handicrafter on their website, but did not see such color. In your photo it looks a little gray-ish. I would love to use the same color. Thanks for your help!
Tamara Kelly says
Thank you Kristen! When I bought it, it was called Overcast and was part of the seasonal Harvest Home Collection. However, I noticed the new collection in stores has a Nautical theme and also has a gray!
Kristen says
Thanks for your reply Tamara. I can't seem to find it on the bernat (yarnspirations) website, but I'm sure I can find a similar color. The gray is so pretty and a great neutral color.
Kyla says
Okay so somehow I messed up. I'm on row 12 and I realized I'm already working on the inside of the basket. The bpsc made the bottom of it be on the right side out. So the "ugly side" of the circle is now on the outside of the basket since the bpsc makes the crease fold with that part on the outside. Does that mean I did the bpsc wrong? I watched your video but I don't know! I don't want the ugly side to be on the outside would you have a clue what I did wrong?
Kyla says
Okay I did the front post... guess I should have watched it with the sound on 🙂 thank you for a great pattern!
Tamara Kelly says
Ah, glad that worked out. 😀 You're welcome!
Marrie... says
thats clever, you put small sc so that it would look like the same st. is repeated!.. Welldun and thanks alot!
April says
High. I love the look of this and I have been looking for a basket that is easily sizeable. My question is this I am a very tight crocheter. I normally go up a hook size or 2 so that it looks right. Should I do that for this basket?
Tamara Kelly says
Well, with baskets you want them to be firm (generally speaking) so if it's not too tight to work comfortably, then you're fine as is!
Cheryl M says
Thanks for this hanging basket pattern! I've been looking for something to be able to hang my stash on the wall in my craft room to make room for everything else! I'm going to try this with some t-shirt yarn and make them bigger, to hold several skeins of yarn!
Tamara Kelly says
😀 Thanks Cheryl!
lina says
Lovely pattern, Tamara. As always. More grease...
Tamara Kelly says
😀 Thank you so much Lina!
Carol A. Kruse says
Where can I buy bernat handicrafter cotton or can I us Lilly sugar and cream this is only cotton I find at Walmart and JoAnns.
Tamara Kelly says
The various kitchen cottons are pretty interchangeable - sugar 'n cream, peaches 'n creme, and bernat handicrafter all mix and match really well. 🙂
Jennifer says
Hello!! I came across, and pinned, this a while ago, but am finally getting around to trying it out. I'm VERY new to crochet and have only really mastered the solid granny square. I thought I'd take a break from a big project I'm working on and make one of these for hubby! I'm using a different yarn than recommended since I have it on hand, so we'll see how it turns out!
The question I have though, is what do you do with the chain stitch once you come back around to it? I see at the end of a row, you slip stitch to the first single crochet to close the loop and then chain one to go up to the next. ...what happens with the initial chain stitch in each row when you get back around to it? Do you skip over it? or am I missing a stitch each time?
I appreciate your help! Looking forward to trying out many more different projects! I've really only used videos before, so I'm also new to reading patterns!
Thank you so much 🙂
Tamara Kelly says
Hi Jennifer!
The ch at the beginning of each round is just for height - it doesn't count as a stitch, and you don't work into it. 🙂 Thank you!
Shelley kelsey says
I just finished this basket and it is sweet. Going to be used in a tall, narrow school locker! I was given this basket as my challenge thru group on Ravelry. I also made your Artfully Angled Scarf, think I have the name right!?! I I've enjoyed both patterns and help on your website and know I'll come back for more!
Tamara Kelly says
😀 Thank you so much Shelley! I love the idea of using the basket in a school locker - so smart!
Kelsie says
Hello, I am new to crocheting. I just finished my basket and LOVE IT. However, I would like to make more but be more sturdy. Any ideas to make it a tad more stand alone for the new ones and tips on how to make my current one sturdier? Any tips would be great! 🙂 thank you in advance.
Tamara Kelly says
Hi Kelsie! Thank you! There are a couple tricks you can use. One is to take a piece of cardboard or plastic canvas and cut it to the same size as the bottom, and slip that in there! Another trick is to hold the yarn doubled without going up in hook size any more than needed - that creates a much stiffer fabric! 😀
Karlijn says
Hi! What a lovely pattern. I really would like to make one. One problem, the yarn is not available in Holland. Do you think Drops you #5 is a good alternative?
http://www.garnstudio.com/dropslovesyou.php?id=5&cid=17
Thanks!
Tamara Kelly says
Hi Karlijn! The great thing about this pattern is that really any yarn will work, just use the hook that best fits the yarn! 🙂 I've never seen DROPS yarns in person, myself.
Karlijn says
Hi Tamara, Thank you for your answer! I'll give it a try.
SUZANNA says
hi I just made this pattern and love it .
I did the turn but I think i did not fully understand the work on inside of the basket, Couse my part after the turn that needs to fold over doesn't look like it's popping out like your.
It did make the fold automatically
Tamara Kelly says
Hi Suzanna! It might just be a matter of zhooshing it a bit, or that it was filled when I took the photo. 🙂 I'm glad you enjoyed the pattern!
Hooked Goodies says
A very useful one Our favourite from al the Free Crochet Patterns that we listed on our website.