There are several great methods for adding beads to your crochet, and they all have their advantages and disadvantages. Here's one method many people like - adding beads with a crochet hook!
 Disclaimer: This post includes affiliate links.
How to Add Beads with a Crochet Hook (Right Handed)
How to Add Beads with a Crochet Hook (Left Handed)
As Seen in this Video (Click for more info!)
- US-J, 6.0mm Furls Fiberarts Hook
- Clover Amour 0.90mm Hook
- Lion Brand Shawl in a Ball
- Bead Biz Silver Lined Crystal Beads 6/0
And for your Pinterest Board:
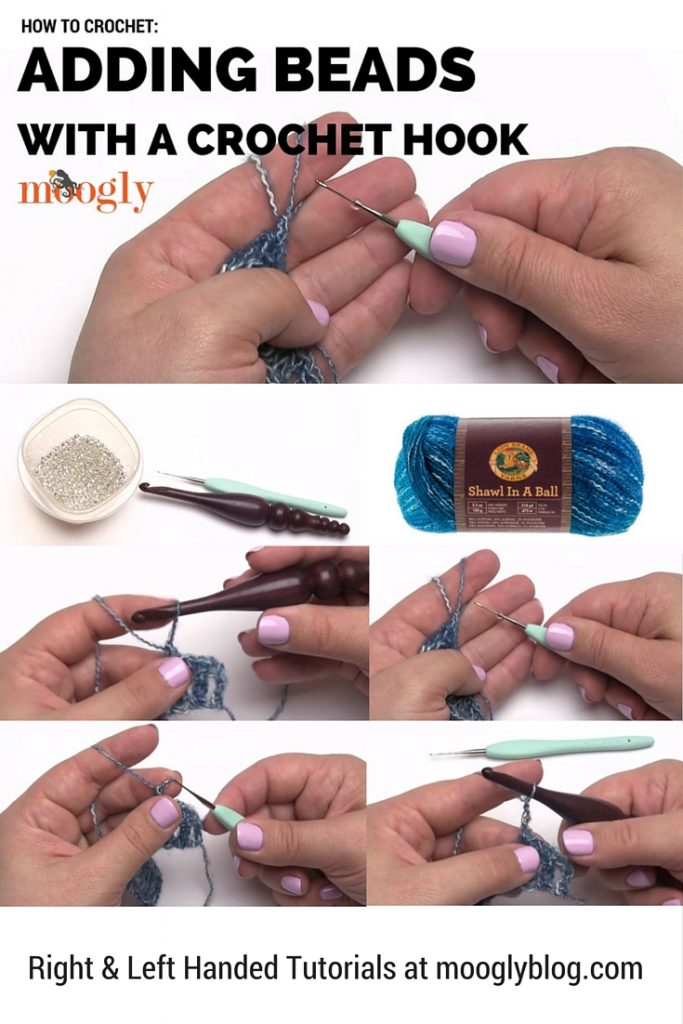
Here are the basic steps, whenever you are ready to add a bead to your work:
- Pull up the active loop of the yarn a little bit, and remove the crochet hook.
- Put a bead on the small thread hook.
- Insert the thread hook into the active loop of the yarn.
- Pull the yarn through the bead using the thread hook.
- Remove the thread hook from the active loop and reinsert the crochet hook.
- Continue crocheting in pattern.
This method of adding beads has some advantages and disadvantages. The advantages: you don't have to have an exact bead count before you begin; you don't run as much risk of fraying or wearing the yarn with running beads up and down it; no tedious pre-stringing (and risk of miscounting!); you can put a bead right where you want it, when you want it; the bead will show best on the right side of the fabric (facing you when you add the bead).
The disadvantages: there is yarn on the outside of the bead, making for a definite right side/wrong side to the fabric; if the beads are very small it can be difficult to find a small enough hook/yarn; you may have to juggle two hooks at once.
Adding beads with a crochet hook is one of my favorite methods - but of course it all depends on the project! I do love the flexibility of this method - I can just jump into the project and figure out bead placement/number as I go.
Have you added beads to your crochet or knitting before? If not, I encourage you to give it a try! It's so fun to add a little sparkle and bling - and add a little something extra special to your next project!


Rebeckah says
Loved this tutorial! Can't wait to try this method. 😀
Tamara Kelly says
🙂 Thank you Rebeckah!
Ren C says
This technique sure beats having to string all the beads on the yarn/thread in advance! Thank you for the reminder.
Tamara Kelly says
🙂 Glad you liked it Ren! Thank you!
Annie says
I'm laughing out loud right now--at myself! It's funny you posted this when you did. I just learned about using a hook to bead about a week ago...and at that point I was on the last couple pattern repeats of a big project, too late to save me the grief of the weight of all those beads pulling my working yarn in the opposite direction because I used the OTHER method. Joke's on me!!
Tamara Kelly says
Ah, that's always the way! 😛 Next time! 😉
Haley says
Excellent timing! I was just thinking I wanted to try working with some beads.
Tamara Kelly says
😀 I'm glad to hear it Haley!
Sharon says
Pure genius! I am bookmarking this one. 😀
Tamara Kelly says
😀 Thank you so much Sharon!
Alicia robberts says
Love it made the tutorial look easy will definitely be trying this idea.?
Tamara Kelly says
🙂 Thank you Alicia!
Pamela Thomas says
I haven't used this technique yet but had tried to make a beaded bracelet once with the beads strung on crochet thread and became extremely frustrated. I gave up. I saw Drew Emborsky demonstrate this technique before and I love it! I definitely will be trying it out on this beautiful pattern! Thank you for another of your lovely patterns!
P.S.- Drew suggests if you have a pretty top or shawl you've crocheted, to go back and add an extra row to the right side of the project in whatever stitch you were using and as long as you have two loops on the hook you can drop one and add a bead to give some bling to your project. (I saw this on a free class on Craftsy)
Tamara Kelly says
great idea, thank you!
Sandy B. says
Easy peasy, thank you.
I do haa question though on adding beads on the Amara shawl....I can't quite understand the directions for that part. Mine don't look right. I have ripped a dozen times. Can tou maybe give me a close up pic how you did it? Thanks
Tamara Kelly says
Hi Sandy! I'm glad you liked the video!
This is exactly the method I used for the Amara shawl - it's even the same yarn, hook, and beads! I don't think I can get any closer than the photos at the end of that pattern.
Karen says
I laughed when I saw that post about "bonafide". You? Bonafide, INDEED! You never fail to amaze me. Lots of people know how to do something and make it look easy. Few know how to really teach someone else to do it! Using beads in crochet always seemed like a ton of trouble and something I'd never tackle, but I loved the look. I'm ready! Thanks, Ms. T.!
Tamara Kelly says
Oh yay! That "I'm ready" is what I love to hear! ♥ Thank you so much Karen!
Teena says
Thank you so much for the left handed version also!
Tamara Kelly says
🙂 Thank you!
Barbara says
Can you do a tutorial for beading when knitting/purling? I love the crochet video, very helpful! I have a ton of size 6 and 8 beads and didn't know how to work with them. Now I do!
Tamara Kelly says
I'll add it to my list, thank you Barbara! 🙂
Sarah says
I love, LOVE all your gorgeous patterns and tutorials! Just started the Amara shawl and kind of excited about trying the beads. This video was perfect!
Tamara Kelly says
😀 Thank you so much Sarah! I hope you enjoy it!
Leda Woodruff says
enjoyed the video. Was very helpful. I was wondering where I can find info on adding a bead to the end of a drawstring cord, can you help me?
Tamara Kelly says
Thank you! Maybe this will help? http://www.clearlyhelena.com/bag-mochila-wayuu-drawstring-cord-stop-bead/
Kim quinn says
Discovered this just in time!!! I made a virus shawl using Lion brand Homespun in Bryce Canyon color. I want to apply smoky topaz Czech Precious bicones in the edging. For that yarn is 3mm beads appropriate? I called both LB and Fire Mountain Gems customer service numbers and was told "I don't know."?
Can anyone tell me? Ordering beads in the morning. So appreciate advice.
Tamara Kelly says
Hi Kim! I found this chart very helpful: https://www.beadaholique.com/beading-resources/techniques-guides/charts-diagrams/seed-bead-size-chart
I was using 4mm beads in this video, so the ones you are looking at would be a bit smaller. Lion Brand Homespun is a bulky yarn, so I'm worried that 3mm might be on the small side.
Jennifer says
This tutorial was great! I’m working on the Alpaca your Wrap as a Christmas present and it just needed a little extra bling. This definitely is the solution!
Tamara Kelly says
Yay, I'm so glad you like them both! ♥ Thank you!
Ali Tee says
Hi! Not sure if this is the place to ask but since I don’t know anywhere else…I did a dragonfly scary, but I’d like the dragonflies to “show up” better. Was thinking if I could add small yarn, floss, idk, to enhance the wings etc? Just don’t know what stitch or how I might accent the openings w/o being too bulky of closing it off? Any ideas? Not really a beadperson.
Ali T
Tamara Kelly says
Hello Ali! Hm, that's a good question! You might be able to add a bit of sparkly carry along thread! These add color (and sparkle if desired) but are thin enough not to mess with the gauge. Kreinik is my favorite brand: https://www.kreinik.com/store/