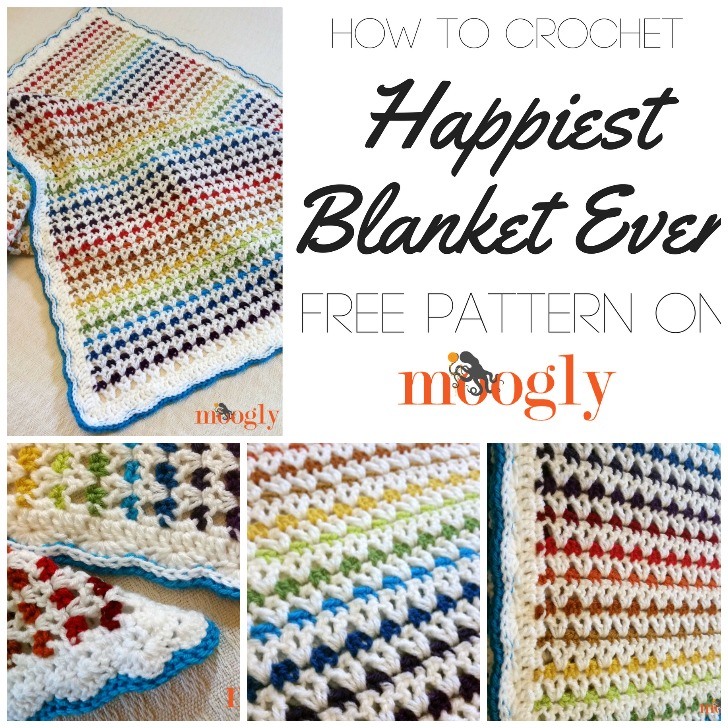
The Happiest Blanket Ever is just that - cheerful, fun, relaxing, bright, and bold! And it's really just a simple 2 row repeat - here's how to crochet the Happiest Blanket Ever!
Happiest Blanket Ever Tutorial - Right Handed
Happiest Blanket Ever Tutorial - Left Handed
As Seen in this Video (click links for more info)
- Happiest Blanket Ever - free crochet pattern
- US – J, 6.0 mm Furls Odyssey hook
- Lion Brand Vanna's Choice
The stitch pattern for the Happiest Blanket Ever is a multiple of 3 stitches, plus 4. And the stitch pattern itself is basically a row of V stitches, followed by a row of single crochets in the dc sts, and chains over the chains. If you've watched the video - that should make sense! The biggest trick to remember is that you only turn after the odd numbered, V stitch, main color rows.
The V stitches are all your main color, and then what you do for the single crochets is what really pops - use your favorite colors, do a rainbow as show, or do some stash-busting! Pick your size, grab your yarn and get creative - it's up to you!
I hope this video helps you crochet your Happiest Blanket Ever, and that you enjoy it! Thanks for watching!

Get Moogly on your favorite social media sites: Facebook, Twitter, G+, Pinterest, Instagram and Tumblr, and sign up for the free Newsletter so you don’t miss a thing! Thank you to Lion Brand Yarn and Furls Fiberarts for providing the supplies for this tutorial.


Margaret Garland
Love this pattern. So quick & easy but looks complicated. I chose to use black rather than white as the MC and 4 rows of the same color. The throw has a lovely stained glass look going for it.
I am a bit confused about the last row before doing the edge. The pattern says to do Row 2 as the last row. But that is an accent row and would leave that end of the blanket looking lop-sided. I'm thinking I should do another V Stitch row and then start the edging.
I've re-read that part several times and it still seems off balance to me. What am I missing? I suppose it doesn't really matter as long as the completed project looks good. LOL But it's bothering me that I can figure it out.
I was hoping you would show that part in your video,
BTW, thank you for having a left handed version on a lot of your projects. We lefties are very adept at working from RH instructions but it's nice to have anyway.
Tamara Kelly
Oh my gosh, right you are! My apologies! I can't believe I overlooked that, I'm sorry. I'll change the pattern now!
And thank you! 😀
nancy
What is the best way to join one White's Kean to the next one?
nancy
That should say one white sklen to the next
Tamara Kelly
Hi Nancy! I typically just finish the last stitch of the old skein with the yarn from the new skein, and then just keep crocheting from there. Then, I weave in those ends. 🙂
Karen
Margaret - Can you post a pic of your black MC blanket? I have a TON of black and I was thinking of using it as my MC as well, I'd love to see how it'll look.
Thanks!