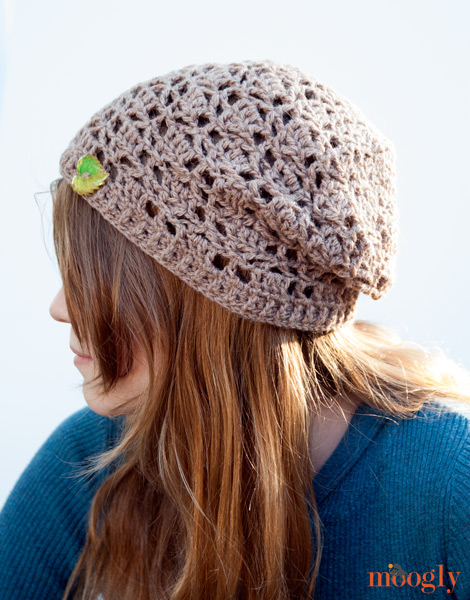
The Fallen Leaves Slouch Hat was inspired by a gorgeous skein of LB Collection Baby Alpaca I received from Lion Brand Yarn. It was so soft and it just cried out to be made into a fall hat pattern. Paired with a stitch pattern of lacework diamonds that remind me of falling leaves, the Fallen Leaves Slouch Hat is the perfect hat for apple picking and pumpkin patches and all things Autumn. 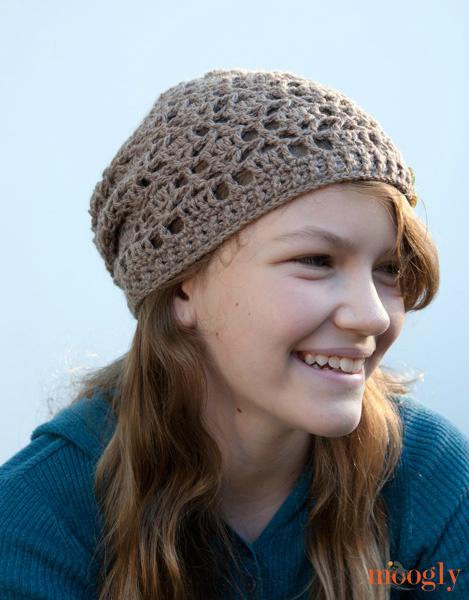
Disclaimer: This post includes affiliate links. 
The Fallen Leaves Slouch Hat free crochet pattern is a one skein project, so you can indulge in a luxury yarn like baby alpaca, or do some stash busting with that lonely skein that's been lingering on the shelf.
It's designed to fit pre-teens/teens/adults with 22-24" heads (it fits me and my 11 year old equally well), and the button is just for decoration - but I think it's a pretty touch. It's only slightly slouchy as written (to keep it a one skein project), but if you want it super slouchy just work more repeats of Rounds 8-11 - easy peasy!


Fallen Leaves Slouch Hat
Add this pattern to your Ravelry Queue and Favorites
- US - H, 5.00 mm hook
- US - F, 3.75 mm hook
- 145 yds DK weight yarn, yarn symbol "3" (Lion Brand LB Collection Baby Alpaca shown)
- Button (optional)
- Gauge: 14 sts x 8 rows = 4" in dc with 5mm hook
- Definitions/tutorials: Magic Circle; CSDC - Chainless Starting Double Crochet; Fpdc - front post double crochet; Bpdc - back post double crochet; Seamless join
- For the matching Alapaca Your Wrap, Click HERE!
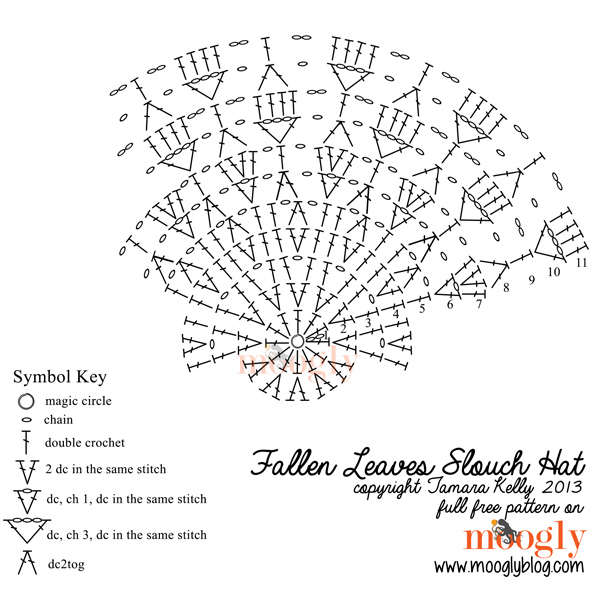
- NOTE! This is an intermediate difficulty pattern - it is very helpful to have chart reading skills for this one!
With US - H, 5.00mm hook
Round 1: Starting with a magic circle, ch 2 (does not count as st), dc 12 into the circle. Join to the first dc of the round with a sl st. (12 sts)
Round 2: CSDC, dc in the 1st st, then work 2 dc in each remaining st to end. Join to CSDC with a sl st. (24 sts)
Round 3: CSDC, ch 1, dc in the next st. *Dc in the next st, ch 1, dc in the next st. Repeat from * to end. Join to CSDC with a sl st. (36 sts, including chs)
Round 4: CSDC, 2 dc in the ch sp, dc in the next st. *Dc in the next st, 2 dc in the ch sp, dc in the next st. Repeat from * to end. Join to CSDC with a sl st. (48 sts)
Round 5: CSDC, ch 1, dc2tog over next 2 sts, ch 1, dc in the next st. *Dc, ch 1, dc2tog over next 2 sts, ch 1, dc in next st. Repeat from * to end. Join to CSDC with a sl st. (60 sts, including chs)
Round 6: CSDC, ch 1, dc in the 1st st, ch 1, dc2tog over the next st and the following dc, skipping the ch in between, ch 1. *[Dc, ch 1, dc] in the next st, ch 1, dc2tog over the next st and the following dc, skipping the ch in between, ch 1. Repeat from * to end. Join to CSDC with a sl st. (72 sts, including chs)
Round 7: CSDC, 2dc in the ch sp, dc in the next st, ch 1, dc in the next st, ch 1. *Dc in the next st, 2 dc in the ch sp, dc in the next st, ch 1, dc in the next st, ch 1. Repeat from * to end. Join to CSDC with a sl st. (84 sts, including chs) NOTE: At this point the circle should measure approximately 6 ¾" across at the widest point.
 Round 8: CSDC and dc 2tog (CSDC as first leg of dc2tog) over the 1st and 4th sts of the round, skipping the sts in between, ch 1, [dc, ch 3, dc] in the next st, ch 1. *Dc2tog, working the first half in the next st, then skip 2 sts, then working the second half in the next st. Ch 1, [dc, ch 3, dc] in the next st, ch 1. Repeat from * to end. Join to CSDC with a sl st. (96 sts, including chs)
Round 9: CSDC, ch 2, skip ch sp, dc in the next st, 2 dc in the ch sp, dc in the next st, ch 2. *Dc in the next st, ch 2, skip the ch sp, dc in the next st, 2 dc in the ch sp, dc in the next st, ch 2. Repeat from * to end. Join to CSDC with a sl st. (108 sts, including chs)
Round 10: CSDC, ch 3, dc in the 1st st, ch 1, skip the ch sp, dc2tog, working the first half in the next st, then skip 2 sts, then working the second half in the next st, ch 1. *[Dc, ch 3, dc] in the next st, ch 1, dc2tog, working the first half in the next st, then skip 2 sts, then working the second half in the next st, ch 1. Repeat from * to end. Join to CSDC with a sl st. (96 sts, including chs)
Round 11: CSDC, 2 dc in the ch sp, dc in the next st, ch 2, skip the ch sp, dc in the next st, ch 2, skip the ch sp. *Dc in the next st, 2 dc in the ch sp, dc in the next st, ch 2, skip the ch sp, dc in the next st, ch 2, skip the ch sp. Repeat from * to end. Join to CSDC with a sl st. (108 sts, including chs)
Rounds 12 - 19: Repeat Rounds 8 - 11 twice.
Round 20: Ch 1, sc in each st and 2 sc in each ch sp to end. Join to 1st sc with a sl st. (108 sts)
Switch to US - F, 3.75mm hook
Round 21: Ch 2, fpdc in 1st st, bpdc in next st. *Fpdc in next st, bpdc in next st. Repeat from * to end. Join to 1st fpdc with a sl st. (108 sts)
Round 22: Repeat Round 21. Round 23: Slip stitch loosely in each st to end. Break yarn and seamless join. Weave in ends.

 I hope you enjoy making the Fallen Leaves Slouch Hat! If you get a chance to use the LB Collection Baby Alpaca I do recommend it - so soft and a joy to crochet with! And thank you to my oldest, Riley, for modeling! (When your kid steals the hat, it's a compliment!) Shared on the Oombawka Designs Link Party.

Written pattern copyright Tamara Kelly 2013 - share this pattern via links only please! You can use the green Print Friendly button below to print a copy for personal use. Seller’s policy is detailed on the About page. Thank you to Lion Brand Yarn for sponsoring the yarn for this pattern.
Come join the Moogly fun on your favorite social media sites: Facebook, Twitter, Pinterest and Tumblr, and sign up for the Newsletter at the top of the page so you don’t miss a thing!


Jackie says
Please could you indicate where the starting * should be in round 5. Many thanks 🙂
Tamara Kelly says
Ack! Sorry Jackie, I'll go fix that now! Thanks for letting me know!
Bonita Maxon says
I need help in printing this pattern, I het the green print button and it tried to print 100 pages of everyone's comments.
Tamara Kelly says
Hi Bonita! You can take a look at this tutorial: https://www.mooglyblog.com/print-pattern-use-print-friendly-button-moogly/ Or you can go to PrintFriendly.com, or you can highlight and right click to print, or you can copy and paste the pattern into a word document and print from there.
Sara says
Haven't tried it yet, but had to say that it is gorgeous!
Tamara Kelly says
😀 Thank you Sara!
Wendy Geoghan says
Looks like a great hat pattern! Can't wait to try it. Thanks for making your pattern available!
Wendy
Tamara Kelly says
Thanks Wendy!
Patricia Maciel says
Making the Falling Leaves Slouch Hat right now and I am stuck at round 5. Where is the asterisk to repeat? I tried it on my own but come up with 63 stitches :/
Patricia Maciel says
okay I just saw I wasn't the only one....waiting for the correction 🙂
Tamara Kelly says
It should be up now, sorry about that! 🙂 If it isn't showing up for you it's because the page is cached on your browser. Hit CTRL-SHIFT-R and you'll get the updated page. Hope that helps!
Kat says
Can I make this in worsted weight wool & G hook? Or would it come out too big? I have a 21 inch head. Thank you
Tamara Kelly says
I haven't tried it, but it sounds like it could work! Just be sure to drop down a bit in hook size for the brim. 🙂
Heidi Clymer says
I guess I get loads of compliments because almost every project I do is stolen by the girls... This has already been chosen by the older one and I must get started....Berroco ultra fine alpaca!
I will post the pic when I am done...
Heidi
Tammy says
I'm a bit confused on Round 8. The CSDC seems to become an extra stitch. Is it actually supposed to be the first half of the dc2tog? When worked as written, I get 97 stitches (each pattern repeat is 8 stitches, x 12 = 96, + CSDC = 97)
Tamara Kelly says
Yes, the CSDC is the first half of the first dc2tog, I need to correct that in the pattern! Sorry for the confusion!
Marrie says
Is that you Tamara?..if not..so then who?
Tamara Kelly says
😀 That is my daughter Riley! She turns 12 this weekend.
Marrie says
oh!..GREETINGS!..*** 🙂
an' happy Halloween too!...***
Tamara Kelly says
😀 Thank you Marrie, you too!
Clara says
Hi Tamara, I just love your patterns!!! However I am slightly confused here: in round 5 the repeat pattern results in repeats of 5 stitches (Dc [1], ch 1[2], dc2tog over next 2 sts[3], ch 1[4], dc in next st[5]) whereas in round 6 the pattern repeats are on top of repeats of 4 stitches: [Dc, ch 1, dc] in the next st[1], ch 1, dc2tog over the next st and the following dc[2&3], skipping the ch in between[4], ch 1. I think the pattern misses a stitch or I do not read it correctly. Please help!
Tamara Kelly says
Hi Clara! I think I can help. There are 5 sts in each repeat of round 5, and 6 sts in each repeat of round 6 (dc, ch 1, dc, ch 1, dc2tog, ch 1). Both of the ch 1s from Round 5 are skipped over, and the dc sts from Round 6 are all worked into the dc sts of Round 5.
Bobbi says
I love this hat, but I have difficulty following the written patterns. I am hoping that someday you will do a video for this project. I can visualize and understand the pattern better when I have someone explaining it and showing it as they go. Still going to try it though. Thank you
Tamara Kelly says
Sorry for confusion Bobbi! I'm going to make a chart for it, I hope it will help!
ChunkyFunk and the Insatiable Hook says
A chart would be wonderful- I'm currently stuck on Round 6 but working my way through it, I hope.. this is gorgeous, and I already have several people I'm hoping to make it for!
Tamara Kelly says
Hi! There is a chart now, at the bottom of the pattern - you might have scrolled past, or you might have a cached version of the page. Hit CTRL-SHIFT-R to refresh the page and you should be able to see it! 🙂
Chunky Funk and the Insatiable Hook says
YES! Thank you!!
Tamara Kelly says
😀 You're welcome!
Marrie says
You are welcome... 🙂
Donna says
The printer friendly button does not work for me, i moved it to the net & my email & still no luck. My printer works with everything else.
Tamara Kelly says
Usually when it doesn't work it's because you have a pop-up blocker installed. If that's not the case the best option is to cut and paste onto a .doc file.
Clara says
Hi Tamara, got it now! Thanks also for the chart: it makes getting it so much easier!!! I am one happy fan 🙂
Faith says
I'm trying to understand how to do a CSDC in the round? You show on the video that you turn the work and then do the CSDC. How do you do a CSDC without turning the work?
Faith says
Ok, just figured out the CSDC and finished my first fallen leaves hat. Thank you for this very creative pattern.
Tamara Kelly says
😀 Thank you Faith! So glad you enjoyed the pattern. Hope you enjoy using the CSDC too! It's a handy trick!
Desiree says
Hi there, just started a hat but I'm confused about row 9 the pattern says 2dc in chain space but chart shows 4dc, also, pattern says to go right into a dc after 2 dc in chain but chart shows 2 chains after each set of 4dc in chain space.
Tamara Kelly says
Hi Desiree! For each set of 4 dc sts in Round 9, the first is worked in the dc st right below it (to the right of the ch 2 sp), the next 2 are worked in the ch 2 sp, and the last is worked in the next dc (to the left of the ch 2 sp). Then you ch 2 after each set of 4 dc sts. Does that help?
Laura says
Hi Tamara
I’m still confused on round 9. There are three ch sp in between the dc st. Are you skipping the middle ch sp when you put in the middle two dc st?
Tamara Kelly says
You work the middle two dc right into the chain space - no need to work into the chains themselves. 🙂
Desiree says
Awesome! Thank you for the quick response! 🙂
Rhondda Mol says
Hi Tamara,
Thank you for linking up at Link & Share Wednesday 🙂 I love this design and your daughter is beautiful 🙂
Rhondda
Tamara Kelly says
😀 Thank you so much Rhondda!
Anita says
I'll be selling this slouchy with a selection of about a dozen colour selections! Check the Maker page - Sparkle & Doom Designs!
Tamara Kelly says
Awesome!
Alice Olmsted says
I have tried to print from your print button, but it freezes my computer each time. I went ahead and made a selection to print, but I am not happy with it, because the print is so small. My daughter really wants this hat, so I am going to make it, even if I have to use a magnifying glass.
Tamara Kelly says
The green Print Friendly button? I'm not a computer expert, and this is just a plugin we use, but I'm wondering if you have a pop up blocker installed?
Anita says
also, you can choose to save it as a pdf and keep it on your computer and zoom it up to what you need.
hilda says
HI, I don't know how to make the magic circle?
Tamara Kelly says
Hi Hilda! There's a video tutorial linked in the pattern, but if you don't want to use the magic circle (also known as the adjustable ring, magic ring, etc), you can just start with a ch 4 and crocheting into the circle.
Jayne says
This is a beautiful looking toque BUT a terribly written pattern! I have been crocheting for over 30 years and each row is a struggle! Please look at how other patterns are written and redo this thing. I would but am desperately trying to finish it for Christmas!
Tamara Kelly says
I'm sorry you feel that way Jayne. I have done my best to write it to industry standard. Perhaps the chart would be more help? It's right below the pattern, using international symbols.
Ame says
Jayne. A little kindness would be helpful. Tamara is working at being an accomplished crocheter like yourself - hopefully, with a little more patience and choice of words in criticism.
Tamara Kelly says
Thank you Ame, I appreciate that.
MiChelle says
I am about half way done and I had to stop and say thank you! I love this pattern! I feel as if my brain has to work a little:) not a horrible amount but just enough where I have to focus. This is great! Sometimes I feel like I just zone and boom my project is done and i am disappointed since I didn't even really have to do much. But this makes me feel like I am working a puzzle . I like it and I hope everyone else does as well!
Tamara Kelly says
😀 Thank you MiChelle, so glad you like it!
Renee says
Thank you very much for the pattern! I made it in a soft lavender yarn for a friend for Christmas, seen here: https://scontent-b-iad.xx.fbcdn.net/hphotos-prn2/1509904_10202108028655634_442076035_n.jpg
Tamara Kelly says
Beautiful Renee! <3
Kim says
Hi, beautiful hat! Thanks for sharing your pattern. However, I cannot figure out how you're getting 36 stitches in round 3... I'm still getting 24. Are some of the DC suppose to be done in the same stitch? It keeps saying "in the next stitch."
Thanks!
Tamara Kelly says
Are you counting the chs? There should be 24 dc sts and 12 ch, for 36 total. 🙂
Tiffany says
Do you skip stitches in round 3 I'm stuck. Please help. This is a cute hat. Would love to figure it out.
Tamara Kelly says
In Round 3 you don't skip any stitches. 🙂
Cheri says
Would love a video of this....tried making it on my own (new to crocheting...) I was way off...lol, would love to make this correctly, very much a visual learner....
Anita says
I love this pattern I'm in the middle of my 4th and 5th one. I'm not sure what other people's problem with it are, maybe the standing chain start? I have subbed in a 2 chain start for each round that I like better. It's very easy to memorize as the rows {once you get out to the body} are repeats of two rows.
hamoyen says
hi! love ur lovely patterns! i'm working on this nice hat but i'm stuck on round 8... i got way more than 96! :s help!…
Tamara Kelly says
Thank you! It sounds like you're not skipping enough stitches. Have you taken a look at the chart? It might help you visualize where the sts go.
Robyn says
Thanks for the beautiful pattern! I really appreciated the stitch diagram - made all the difference for me.
Tamara Kelly says
I'm so glad to hear it Robyn! 😀 Thank you!
Krista says
Every time I try to make this hat, rows 8-11 turn out soooo huge! I do not know what I'm doing wrong, but this is the second time I have had to pull it all out, and I'm so disappointed. I will try to use the chart, but I don't get how when I continue with the repeats in 8-11 how it's supposed to be getting smaller.......
Tamara Kelly says
In rounds 8-11 it should not be getting smaller. Rounds 12 - 20 will give it a more hat-like shape, and then Rounds 21-23 bring it in for the brim.
Mary Kay says
I'm having the same problem. I stitchstitched the brim and the hat di not come in snug it stayed loose and wide. My stitch count was correct. How do I get it to come back in for the brim? I used the smaller hook too!
Tamara Kelly says
It sounds like we have different gauges. 🙂 You can try adding a few decreases or an even smaller hook.
Katie Foreman says
I had that happen also, using Lion Brand Ice Cream. The brim was actually wider than the hat! I ended up switching to the F hook in round 20 and skipping all the dc's (to decrease without having to post-stitch around any sc2tog's). It worked for me so maybe it'll help someone else.
Katie Foreman says
D'oh. Not ALL the dc's, just the single ones with the ch-2 on either side. So the instructions for the round would be:
Switch to F hook. Ch 1, (sc in each of 4 dc, 2 sc in ch sp, skip next dc, 2 sc in ch sp) to end. Join to 1st sc with a sl st. (96 sts)
Zarnaz says
I think I've made a terrible mistake...
At the end of round 7, my work measures 8"... 🙁
Perhaps I'm using a thicker yarn... although it looks similar to the yarn used in other projects posted here, for example, the Loopy Love Blanket. I've made things with it before and the measurement has never been an issue...
Amanda says
Hey, can u explain what "dc2tog over the next st and the following dc, skipping the ch in between" means? Thanks 🙂
Tamara Kelly says
Hi Amanda! I can try! 🙂 I believe you're in Round 6?
When you're looking at the next few stitches, getting ready to make the dc2tog (dc 2 together decrease), you'll see in the previous row a dc2tog, followed by a chain, and then a dc stitch. You want to work this new dc2tog with the first (right) leg in the top of the dc2tog in the previous round, and the second (left) leg in the top of the dc stitch - skipping the ch-1 in between.
Does that help?
Nancy says
This pattern is very confusing to me, I never have the same amount of stitches you say I should have. I have ripped it out numerous times. I love the looks of the hat but I am about to give up on making it.
Tamara Kelly says
This is not a beginner pattern, I'm sorry you're having trouble. Have you taken a look at the crochet symbol chart?
Katrina says
I love this pattern! Thank you for sharing it. I struggled with rows 6 & 7 and had to redo them several times but once I got past that and with following the chart I finally got it!
I am going to make another one but making it a bit smaller as this one was a bit too big for me.. still love it though!
Tamara Kelly says
😀 Thank you Katrina! I'm glad the chart helped!
Chloe says
Hey love this hat, want to make one for my daughter who is only 4, how would I go about making it smaller?
Tamara Kelly says
Hi Chloe! Because of the lace pattern, using thinner yarn and a smaller hook would be the easiest way. 🙂
Ilona says
Very enjoyable project! Took me one night.
Only downside is the hat is on the small side. Not for the bigger headed people without little pattern modifying.
Hafsah says
am really found of ur patterns so beautiful am stuck in round 4 i dont get 48 stitches i get 32 :/
can u please help u thank you!!!
Tamara Kelly says
Thank you Hafsah! In Round 3, you should have 24 dc sts and 12 chs - or put another way, 12 sets of (dc, ch 1, dc). In each of those sets you'll be working 4 sts - one in each of the dc sts, and 2 in the ch sp. So to put it another way, in Round 4, dc in each dc and work 2 dc in each ch sp. Does that help?
Hafsah says
Thank you so much Tamara Kelly, Yes it really helped me am so happy about it .
thank you ones again 🙂
Dian says
Hi! May I ask permission to sell finished products? I sometimes sell at weekend flea markets and im also planning to set up an online shop. I do all the crocheting so i am able to sell only a few pieces at a time, i'll make sure to put a link to your website on my product tag.
Tamara Kelly says
That would be great! Thanks so much Dian, good luck with your sales!
Alejandra says
Hi, i have finished this hat. It's easy and beautiful. I love it. Thanks for share the pattern.
Bye 🙂
Tamara Kelly says
Thank you so much Alejandra, I'm so glad you like it!
Katerina says
Thanks so much! I am a beginner but I will try it so...good luck to me!!!
Tamara Kelly says
😀 Thank you Katerina! If you can take a peek at the chart it's a bit help!
Tina says
What is magic circle and CSDC,I understand other stitches,but never saw this before,love the hat,really wanna make it 🙂
Tamara Kelly says
Thank you Tina! Tutorials and definitions for both are linked at the top of the pattern. 🙂
Judy Phelps says
First I would like to wish Riley a very Happy 13th Birthday this week. Second, I must say this slouchy hat and scarf make a very neat combination, that I will have to make for my granddaughter. She loves the slouchy hats, and she loves cats, which I have seen the shawl pins for sale online. I think these together would be a great Christmas gift for her.
Tamara Kelly says
😀 Thank you so much Judy! It's a busy weekend coming up here for us for sure. I'm so glad you like the patterns, and I hope your granddaughter does too!
Stine says
I don't get how round 5 is supposed to increase to 60 stitches, i only get 46 at the end of round 5.
Isn't dc2tog a decrease? (And therefor not giving me enough stitches at the end?)
Hope you can help, I'd love to finish this!!
Tamara Kelly says
The stitch count includes chains - are you counting those as well?
Stine says
I believe so, I'm counting all the little V's. Still I only get 46 🙁
Tamara Kelly says
Have you checked it against the chart at the bottom? That can be easier to see.
Vivian Carlson says
Yay!!! I did it after much crocheting and taking apart and reading and looking over the diagram, I got it!!!!!!
Now maybe I can follow your gorgeous Chevron Lace Fingerless Mitts. I hope I hope I hope.
Thanks my friend for sharing your gift.
Best,
Vivian Carlson
Zippety d says
Hi Tamara! Love this slouchy hat... However I keep ending up with too many stitches after round 4. Would be helpful if there was a pic of the crocheted round (at the back of the hat) i'm sure mine doesn't look the way it should! Iv been making and unpicking for a week now! Want to start again and finish this weekend so I can line with fleece! Btw, I too have used the chain 2 at beginning as opposed to csdc... I find it gives a less visible appearance to the start of the round.. Unless you have have used this stitch for a specific reason?
Zippety d says
Thankyou!
Tamara Kelly says
I find the csdc to be less visible, but each person's crocheting is different. 🙂 I'm sorry I don't have a picture of each part of the hat as such. Did you check out the chart though?
Anita says
I've made a few of this hat. Perhaps I'll make another after the Christmas rush and take photos while I do it. I found the pattern to be of medium skill, but once you get it, it's super easy.
Tamara Kelly says
🙂 Thank you Anita! I'm so glad it was successful for you!
Daphne del valle says
Thank you for your beautiful patterns. I made the alpaca wrap then found this hat and was lucky enough to have bought an extra skein of the yarn, so now I have a set!!!!
Tamara Kelly says
😀 I'm so glad you enjoyed them Daphne!
Brigette says
I did the same thing! Came across the pattern for the wrap, then the link for the hat. Made the wrap using Willow Daily DK 100% superwash wool yarn in Violet, and I literally JUST finished the hat. Can't wait to wear them! Thank you! 😀
Tamara Kelly says
😀 Thank you Brigette!
Amy says
What a beautiful hat! (And what gorgeous models!) Sitting down to make this right now. Thank you for sharing your pattern. 🙂
Tamara Kelly says
😀 Thank you so much Amy!
Hannah says
Hello...
I am kinda stuck on Row 3...as I continue to keep doing over again and thinking to myself it might be me not reading the pattern right, but on my Row 3 I keep getting a count of 24 just like Row 2, but on the pattern it says you should have a count of 36 but I keep coming up with 24. I need HELP, lol...can someone please let me know what I need to do!
Thanks 🙂
Tamara Kelly says
The chains are included in the stitch count. 🙂
Audrey says
I made this for my daughter so cute. I had a little trouble with the pattern but I wasn't reading close enough. Once I figured out my error went really quickly. I can't wait to make the scarf.
Tamara Kelly says
I'm so glad you were able to figure it out! Thank you Audrey!
Karin says
I accidentally came upon this crochet pattern after seeing a friend wearing one made by another friend as a gift - i loved it and decided to try for myself. Very new to crochet this would have been my hardest pattern to tackle yet but after persevering - NAILED IT!! - i love it and have now just finished my third. I also learnt so many more things while doing it - thank you for taking the time to share your lovely pattern 🙂
Tamara Kelly says
Yay! Congrats Karin! And thank you!
Agata says
Hi! I just stumbled upon your blog via All About Ami. And, while browsing, I found this cute pattern! My hat is alomost done (in fact it would be already done, but the yarn ended too soon - one day I will remember to check the lenght before I start working). Anyway - thank you for sharing, it's lovely! And I learned so many new things! ^-^ Wonderful adventure this hat turned out to be!
Tamara Kelly says
Thank you so much Agata!! I am so happy to read your comment, and so glad you enjoyed the pattern! 😀
Bmeier says
Loved this pattern! I just finished and still had some yarn left over, but not enough for another hat. I adapted your pattern to make some boot cuffs. Can't wait for it to cool down a lil bit more and wear my new hat and cuffs. Thank you for making this a free pattern.
IMG_2003.jpg
Tamara Kelly says
😀 Thank you so much! I'm so glad you enjoyed it!
Katie Crumb says
Hello from the UK - beautiful pattern Tamara, thanks for sharing so generously! I don't know if this will help others, but I struggled a bit with round 6 (totally due to not reading the pattern properly), after a bit of head scratching I worked out that it was because where it says at the beginning CSDC, chain1, DC in 1st stitch, I was putting the DC into the next stitch rather than the base of the CSDC. Rookie error, I'm fairly new to crochet so it's probably just me, but I thought I'd post this in case anyone else hits the same problem.
Thanks again. xxx
Tamara Kelly says
🙂 Thank you Katie!
Candice says
I made this the other day. I used a wasted yard 4. It came out pretty big. I'm a still learning. Came out great though Wish I could post a pic of how it turned out. Thank you!!
Tamara Kelly says
🙂 I'm glad you enjoyed it!
Brittan says
I think I found my next project! The Print-friendly button seems to have disappeared, though.
Tamara Kelly says
It's still there, at the bottom. 🙂
Brittan says
The Print-friendly button isn't showing up on mobile; I had to switch to Desktop view for it to show up.
Tamara Kelly says
Ah, it's an external plugin, it may not be designed to work on mobile.
Mara Weatherford says
I just whipped this up with some old bright red yarn I've had sitting around forever. As I was crocheting the first few rows I was a little irritated that I was finally trying this pattern with such ugly yarn, but it turned out amazing! It crochets up pretty quickly for how pretty it is, and would look great in any color. Next I'll try a yarn that's a little more subdued, though :p
Tamara Kelly says
😀 Can't think of a better endorsement, thank you Mara!
Eric says
This hat looks amazing, but I'm having trouble with the pattern. I've had to tear out hours of work several times... I keep adding tons of stitches -- I just finished round 9 and I have about 130! (I forgot to count after round 8.)
By no means am I an expert crocheter and I don't even understand where I'm messing up--obviously I am not skipping the right stitches, but I've pored over the chart without seeing my mistake this time.... any help??
Tamara Kelly says
I'm sorry Eric, without seeing what you've done it's hard to say! 🙁
Eric says
I actually figured it out! Thanks for replying!
For future/others' reference, you just have to be really careful about when "st" means "stitch" and when it means "non-chain stitch." Once I really figured out how to read the pattern it got a lot easier.
Nancy mcquade says
Tamara, I know this is not a beginner pattern but I really want to make this hat, so I will ask my first dumb question. At the end of the second row when I am joining my last stitch to the first CSDC, does the slip stitch join at the base of the CSDC or at the top? Is there a way I can attach a photo of my work?
Nancy mcquade says
Tamara, I had a question but I figured it out for myself! I am so excited! I have done the first two rows and it looks perfect and I have 24 stitches! WooHoo!
Tamara Kelly says
😀 That's great, thank you Nancy!
Tamara Kelly says
Hi Nancy! It's at the top, you treat a CSDC as you would any other dc. 🙂 Unfortunately I can't host photos here, but you can email me if needed: tkelly75 at gmail dot com.
Nancy mcquad says
Me AGAIN!
I am about to start Round 9. The last stitch in Round 8 was a dc2tog which Is what shows in the diagram and the one before that is a dc1 ch3 dc in the same stitch ch1. The pattern says to dc in the first stitch for round 9, which has the dc2tog and Then dc 2 in the chain space then dc in the next stitch. If I am reading the diagram correctly, it doesn't look like that. To me it looks like a dc in the dc2tog, then chain 2, then get in to the dc, 2dc in the chain space, dc in the next stitch. Where am I going wrong here?
Nancy
Tamara Kelly says
Hi Nancy! When in doubt, follow the chart. 🙂
Nancy mcquade says
Dear Tamara,
Just wondering whether you received my message from Friday. You are usually so prompt at replying that I thought perhaps it hasn't reached. Being the weekend though, you may be taking some time for yourself for a change!
Vicky says
Thanks for the pattern. Found the graph easy to follow. This is the first thing I have crocheted for quite a while, and I'm very happy with it. Thanks again!
Tamara Kelly says
🙂 Thank you so much!
Nancy mcquade says
Hello again,
I am up to Round 21 having done the front and back post double crochet in Round 20. I am writing to confirm that the posting in Round 20 was around the double crochets in Round 18? If that is correct, do the post stitches in Round 21 also go around the double crochets of Round 18?
Nancy mcquade says
Sorry. That should have read the double crochets in Round 19, not Round 18
Nancy mcquade says
And Round 20 and 21 should have read 21 and 22
Tamara Kelly says
Hi Nancy! Each round is worked into (or in the case of post stitches, around) the round previous. So Round 22's post stitches are worked around Round 21's stitches. Does that help?
Nancy mcquade says
Tamara, thank you. I have now finished my hat and it turned out well. I have learned many things, most important the importance of counting stitches and the correct way to do that. I have just started a sweater vest which is going to be a challenge I can see already but again, a new learning experience.
Tamara Kelly says
😀 I'm so glad to hear it! Thank you Nancy!
Josie says
I just finished round 10. I'm really liking this pattern and can't wait to get the hat finished! Thank you! And thank you for including the chart. It makes it so much easier to follow!
Tamara Kelly says
🙂 Thank you so much Josie!
Liz says
Thanks for a very nice pattern. This is my first slouchy hat. Can anyone give me an idea of the length of their hats. I am using a thinner yarn and smaller needle and have had to modify the pattern here and there, but I need to know how long/deep to do it. Hope I make sense.
Tamara Kelly says
usually 10 inches deep is recommended, but if you like it very slouchy you can make it longer!
Liz says
Many thanks for your prompt reply. ?
Cindy Arnold says
Woo! Lots of comments. Hope you're still helping. I'm confused on row 8. itvwants me to use the CSDC as the first leg of the dc2tog but I'm not sure how as well as how to do it 1st and 4th stitch of the round skipping the others. Please help me. TIA. It's a lovely hat. I just hope I can get past this.
Thank you for the video on the CSDC. Very ingenious stitch.
Tamara Kelly says
Hi Cindy, and thank you! Ok, it sounds like you've got a good handle on the CSDC stitch by itself. So to make it a decrease, you start it as you normally to, and then stop right before the last yo and pull through (keeping that finger on top of the "loops" on the hook!). Then yo and go into the next st, start a regular dc there, and when you have one loop from the 2nd half and the loops still under your finger all on the hook, you yo and pull through all the loops to finish the stitch.
This move is pretty tricky and fiddly - if it's a bit of a pain, you can always ch 2 and dc in the next stitch as a dc2tog substitute at the beginning of the row.
Cindy Arnold says
Thank you
Tyler says
What program do you use to make your crochet charts?
Tamara Kelly says
Crochet Charts by Stitch Works. 🙂 http://stitchworkssoftware.com/
Tyler says
Thanks so much
Olivia says
I have a question about row 21. I got to the end and have 108 stitches but there appears to be a stitch in row 20 that doesn't have another stitch worked into it. Does the first fpdc go in the stitch right under the ch 2 or in the one right after?
Tamara Kelly says
Hi Olivia! It would be the one right after - ignore the ch 2, it does not count as a st.
Olivia says
Ok. Thank you.
Lauren says
Awesome pattern - thanks soooo much. I used a 4mm hook and 3mm for brim to make it slightly smaller for my goddaughter. Yet to fit it on her head but the measurements seem to work based on what her mum sent me.
It is such a simple and lovely design, finished in one day. Great job Tamara. thanks.
Tamara Kelly says
Thank you so much Lauren! 😀
Joy says
My co-worker friend chose THIS hat as her summer chemo hat. I made it using a baby cotton yarn and a smaller hook. It turned out great! Thank you so much for the pattern. She's going to love it. 🙂
Tamara Kelly says
Thank you Joy!
Orchid says
This pattern is so terrific! The design is impeccable. I tried it out back in 2015 using pine green yarn and sky blue for trim. Needless to say, the hat (fondly dubbed a beanie by my friends) has lasted all this time and I've worn it just about everywhere. It's my #1 for going out on any occasion, even in the hot summer, haha! I've made several of these for my friends, and they absolutely adore the pattern. Thank you ever so much for sharing such an ingenious creation! Here's to many more years of crocheting! ~Orchid
Tamara Kelly says
Thank you so much for saying so, Orchid! You are so kind, and I'm very glad to hear you still love it! Thank you!
Ela says
Omg so i finished this pattern in a day and a half! Loved it! I cant figure out how to upload a picture here... i'd love to share it with you:) let me know if theres a way
Tamara Kelly says
Yay, thank you, Ela! Unfortunately, I don't have the ability to host photos in the comments, but if you share it on Ravelry or social media I'd love to see it! 😀
Michelle says
Hi, Tamara.
First off, I just want to say that your site is one of my crochet go-to sotes for patterns & tutorials & is one of my all-time favourites. I love to come & even just peruse to see what's here. Thank-you for having such great ideas & for being so clear & concise in both your written & your video tutorials.
Secondly, thank-you for this pattern. I'm currently working on it. I did struggle on Round Seven because I was ending up with way too many stitches, but then I double checked with the diagram at the bottom. I don't usually use diagrams, but I'm finding it helpful here. I shall use diagrams a lot more after this.
I look forward to finishing off this hat today or tomorrow, & I'll share a picture with you via Twitter or Instagram.
Thanks again!!
Tamara Kelly says
Hi Michelle! Thank you so much! And I'm so glad to hear that the chart helped! 😀 Thank you!
Michelle says
You're very welcome. 😊
Tara says
Thank you for this lovely pattern! And thank you for both the written instructions and chart!! I have already made three of these!
Tamara Kelly says
😀 You are very welcome! Thank you, I'm so glad you like it!
Sevdat aydin says
Hello Tamara! Thank you for this wonderful pattern. I have a lot of fun to chrochet the wrap and now i want to crochet the hat. But can I begin the hat at the brim o have I begin with the magic ring? Thank you for your help and have a nice day!
Tamara Kelly says
Thank you! You could make it bottom up instead of top down, but you'll need to rewrite the pattern quite a bit!
Sevdat Aydin says
Oh, I thought that I could just read the pattern upside down (from the bottom up)☺️ How can I rewrite this pattern? I don't know how can I do this because I'm a beginner in crochet 🤭. Do you also have a pattern for mittens? Thank you for your help!
Sevdat Aydin says
Hi Tamara, I'm still waiting how I can rewrite this wonderful pattern to make it from the bottom up. I hope you can help me, thank you! :-/
Tamara Kelly says
That would be pretty much a whole new pattern, I'm not sure if or when I'd be able to do that.
Sevdat Aydin says
Ok, thank you! 🙁
ER says
Hi Sevdat Aydin, I have been following comments on this amazing pattern. I made it and love it.
I wonder why you want to do it brim up? (If I understand you correctly.).
I have tried to write really easy patterns for myself, and it is unbelievably difficult and time consuming. In the end I gave up.
Have a go at doing the pattern as it is. I attend a craft group where people sometimes come asking for help with a project.
Maybe you can consider looking for such a group in your area?
Just a thought ...
Nancy says
Hi. Love this fallen leaf slouchy hat pattern I have a question about row 21. Where do you place the FPDC in the chain space on the row? I appreciate help very much.
Tamara Kelly says
Hi Nancy! Thank you! In Rnd 21, you aren't working into any ch sps, just around the stitches in Rnd 20. 🙂
Charis says
Hello! I love this pattern -- thank you so much for sharing it!
Do you have any suggestions for how to increase the diameter of the hat? I'm using a slightly thinner yarn and it doesn't quite work up to be wide enough for my head. i played around with some options and tried 3 round increases but it became way too big. I'm thinking of experimenting with 1 or 2 round increases but am not sure how to go about that. What would you advise?
Thank you so much
Tamara Kelly says
Thank you, Charis! ♥ That's a tough one and I had to give it some thought. I would try adding one stitch to Round 1. Then follow the pattern as written (although the stitch counts will change). I think that might just work - it will increase the final stitch count every row, culminating in 8 more sts from Rnd 8 on.
Viv says
Im currently stuck on round 4 ive done it several time and am a stitch short. 47 instead of 48. I feel like i must be missing something obvious since the pattern of stitches (2 dc and 2 in the chain space) is consistent after i slip stitch to finish the round but Im still one short.
Tamara Kelly says
It's always so hard to deduce issues online from short descriptions. My best advice would be to make sure you get V sts in all the ch sps and dc sts in all the dcs.
Susan says
I hesitated on making this pattern for the longest time, and I have no idea why. I made the whole thing in a day. It's fabulous. I used a super flowy cotton/rayon blend, and it's a great summer hat (necessary, since I cover my head and live in Oklahoma). Now to dig through my stash and make another!
So grateful for the stitch chart, btw. My eyes aren't great and I have a much easier time following charts (or straight up deciphering finished pieces) than following written instructions.
Tamara Kelly says
♥ Thank you so much!
Melissa Woodruff says
Love this hat. Super cute. Can you help me understand on the chart starting at row 5 the first 4 stitches are not indicated. I thought maybe it was a repeat from the previous row but the written instructions are different.
Thanks for sharing your beautiful patterns.
Tamara Kelly says
Thank you! Rnd 5 starts with CSDC, ch 1, dc2tog over next 2 sts, ch 1, dc in the next st. That's also shown in the chart. 🙂