
Adulting is hard. You gotta go to the bank, the post office, the grocery store, the school, work, it never ends! But the Every Day Crossbody Bag is ready to go with you on every adventure, leaving your hands free to deal with everything else life throws at you. And it's quick enough to make one for every day! Here's the Every Day Crossbody Bag free crochet pattern!
Disclaimer: This post includes affiliate links.
Prefer an ad-free PDF? You've got options!


Prefer the free blog version? Keep scrolling!
Double the Fun
The stitches used in the Every Day Crossbody Bag are very simple, and easy enough for Beginners. However, there are a couple of unique things to be aware of!
First, this pattern is worked in turned rounds, or joined rows - this means that at the end of each round (unless otherwise instructed!), you join with a sl st to the first st of the round as is usual for rounds, and then turn to work the other direction, as if you are working in rows.
Secondly, this pattern is worked with the yarn held doubled. Since it calls for less than a ball of each color, you can pull both ends of the yarn - from inside the skein as well as outside. I found that using the Yarn Valet Yarn Dispenser was a big help here - I could hold the inner end up out of the way as I pulled the other end to spin the skein! I even Instagrammed about it!
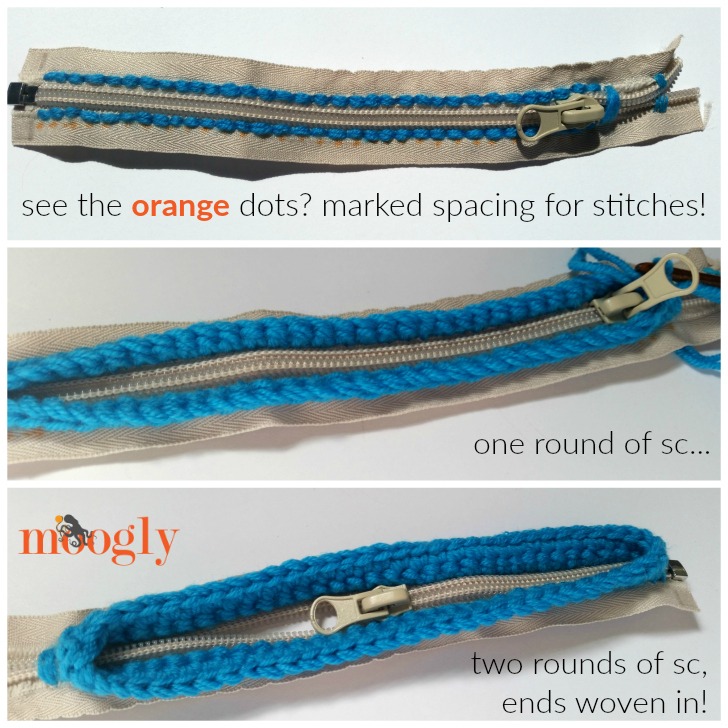
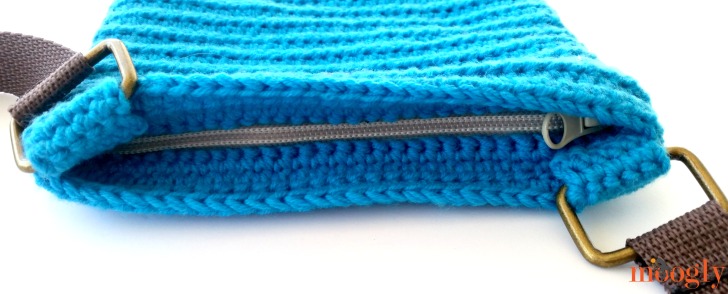
Lastly, this bag features a fab new zipper by Dritz, which has special channels for you to crochet or knit into - right along the zipper, on each side, there's a loose weave you can stick your hook right though! I've linked it in the bullet points below. If preferred, you can first stitch around the zipper with a yarn needle and crochet into the sewn stitches. Or you can just skip the zipper part altogether and add a button or leave it open - it's up to you, and a great way to customize your own Every Day Crossbody Bag!
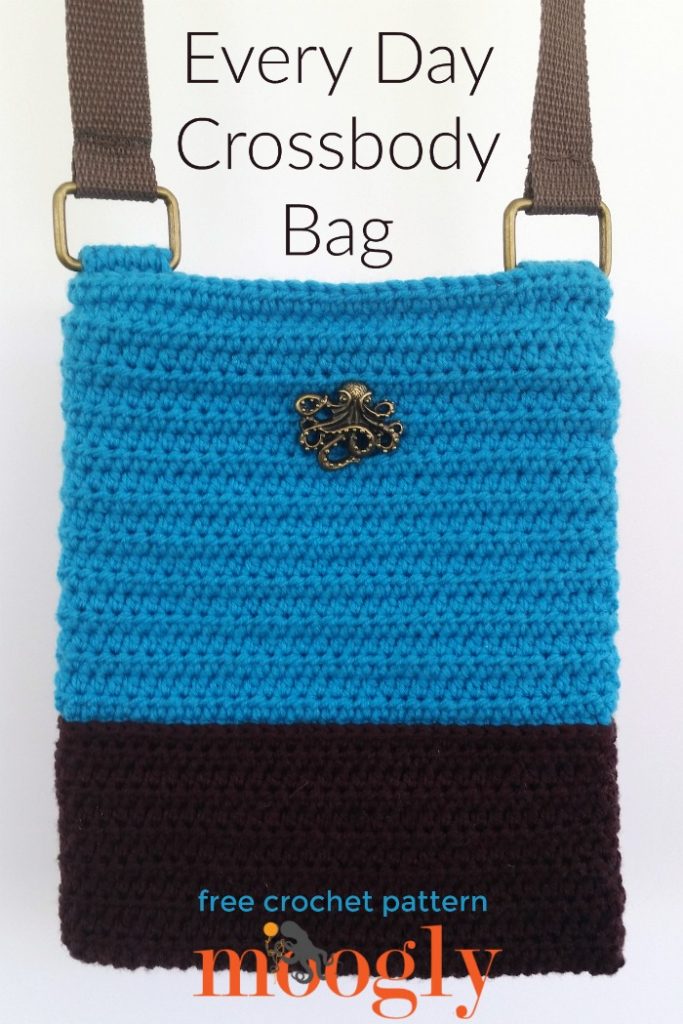
Every Day Crossbody Bag
Add this pattern to your Ravelry Queue and Favorites
US - G, 4.0mm hook - Furls Crochet
400 yds Lion Brand LB Collection Superwash Merino (100% merino; DK/8 ply; yarn symbol "3"; 306 yds /280 m; 3.53 oz)
Color A: Mahogany (1 ball, or 150 yds)
Color B: Aqua (1 ball, or 250 yds)
Zipper - Dritz Loran Knitwear Zip Fastener 10" Oatmeal
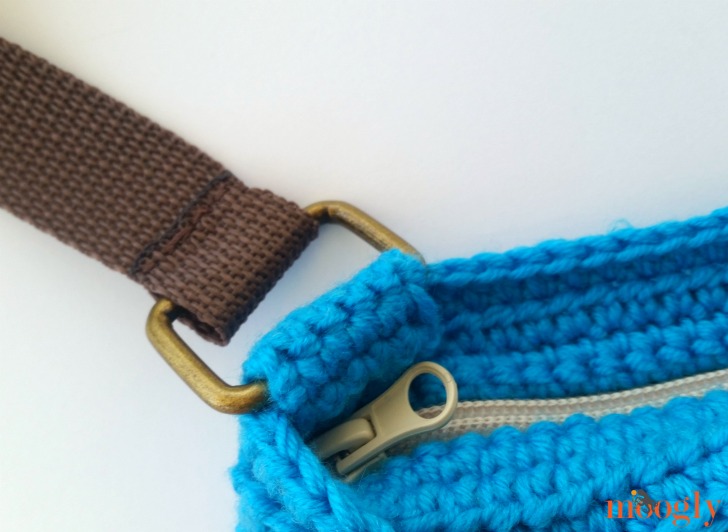
2 Square Rings - Everything Mary Antique Square Rings (purchased at JoAnn Fabrics)
Thread to match Color A and Color B
2 yds Ribbon or Strapping/Belt Trim (purchased at JoAnn Fabrics)
Decorative Button (optional) - Steampunk Buttons (purchased at JoAnn Fabrics)
Sewing needle, yarn needle
Stitch Markers - Clover
Gauge: 18 sts x 15 rows = 4"/10cm in hdc (yarn held doubled)
Finished Size: 7.25" wide x 9.25" tall (laid flat, not including handles)
Helpful Links and Videos:
Working in the 3rd loop of the hdc
NOTE: Yarn held doubled throughout pattern; use both ends of the skein held together to crochet as one.
INSTRUCTIONS:
Round 1: (Right Side) With Color A, ch 34, skip ch closest to hook, hdc in blo of each remaining ch across, then turn and hdc in unused loop of each st across; join to 1st hdc, turn. (66 sts)
Round 2 - 12: Ch 1, hdc in each st around; join and turn. (66 sts)
Round 13: Ch 1, hdc in each st around; break yarn and seamless join, do NOT turn. (66 sts)
Stop and Prepare Zipper: Shorten zipper per package instructions to match the width of the bag at Round 13. Mark the location of the sts on each side of the zipper. Work 33 sc along one side of zipper, then turn and work 33 sc along second side of the zipper; join to work in the round. Then, ch 1 and sc in each st around, join and break yarn. Set aside until Round 33.
Round 14: (Right Side) With Color B, join to 3rd loop of 1st st, sc in 3rd loop of each st around; join and turn. (66 sts)
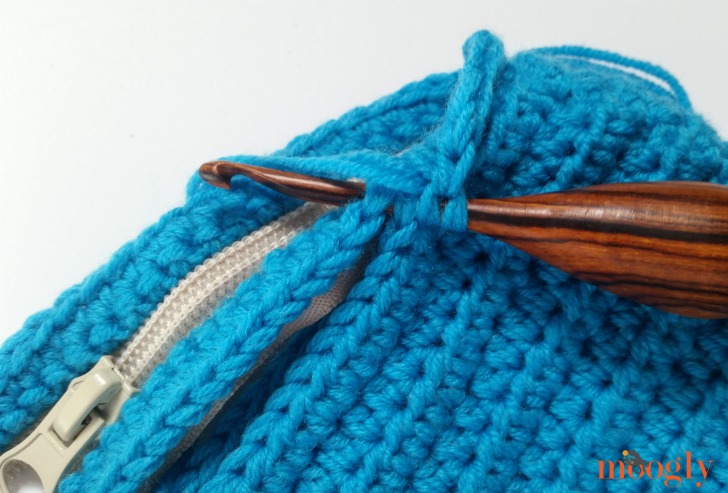
Round 15 - 33: Repeat Round 2. After Round 33, insert zipper piece inside bag so that last round of zipper piece matches up with Round 33; use stitch markers to hold in place as needed.
Round 34: Ch 1, hdc in each st through both layers (Round 33 and zipper piece); join and turn. (66 sts)
Round 35: (Wrong Side) Repeat Round 2.
Row 36: (Begin tabs for Rings; Right Side) Ch 1, sc in 1st 5 sts; turn (remaining sts left unworked). (5 sts)
Row 37 - 40: Ch 1, sc in each st across; turn. (5 sts) Break yarn after Row 40, leaving a long tail. Use stitch markers to mark the 5 sts of Round 35 that are opposite the sts used in Row 36.
Row 41: (Right Side) With Color B, sc in 5 marked sts; turn. (5 sts)
Row 42 - 45: Ch 1, sc in each st across; turn. (5 sts) Break yarn after Row 45, leaving a long tail.
Assembly:
- Slip square ring over each tab, and sew down inside the bag, near the zipper, using the long tails left on the tabs.
- Cut strap/ribbon to the desired length, and sew each end to a square ring, using matching thread.
- Add decorative button if desired.
- Look amazing and get stuff done!
And that's the free crochet pattern for the Every Day Crossbody Bag! It's super versatile, and the simple stitch pattern means it's easy to customize - start with the chain that's as wide as you want the bag to be, and work rows until it's the height desired.
You can crochet a handle of course, but for a crossbody bag, it's good to have something sturdy that won't stretch at all. As for the bag itself, holding the yarn doubled makes a nice thick fabric that doesn't require a lining - though you can add one if desired for sure!
I hope you enjoy this free crochet bag pattern - I can't wait to see what colors and buttons and embellishments you choose!
The Fine Print
Written pattern copyright Tamara Kelly 2017, all rights reserved. Please do not reprint or repost this pattern, but please do link to this page to share this pattern with others. If you wish to make items for sale from this pattern or translate it to another language, please visit the About page for details. Thank you to Lion Brand Yarn for providing the yarn for this pattern!


malti says
do you have video showing the cross body bag?
Tamara Kelly says
Not yet, but if you give it a try and think one is needed, please let me know!
Lani says
I think a video showing the whole zipper process would be great for a newbie like me.. I love crocheting but hate sewing,.. sigh
Tamara Kelly says
Thank you for the feedback!
Miriam I Rogers says
Hi Tamara,
I am having a hard time figuring out the first-row directions. I started crocheting in my teens, then switched to knitting in my 20's since nothing looked correct, in the crotchet patterns. I wanted to try crocheting again especially since a niece asked me to help her learn.
Anyway....
I get lost after the HDC in the BLO at the end. You mentioned in the initial instructions that this pattern is crocheted in turned rounds or joined rows, and that the end of each round (unless specified) the rounds are joined with a slip stitch. to the first stitch of the round. I watched the video you have on youtube for another cross body, but it seems a bit different since you have the maker go into that stitch between the rows to do a HDC (herringbone in that case) as part of the turn. This one does not seem to have that option. HELP 🙂
"Round 1: (Right Side) With Color A, ch 34, skip ch closest to hook, hdc in blo of each remaining ch across, then turn and hdc in unused loop of each st across; join to 1st hdc, turn. (66 sts)"
Tamara Kelly says
Hi Miriam! Okay, so you start by chaining 34. The last chain you make is the turning chain, and won't get worked into at all. So after you skip that, hdc in the back loop of the next chain, and put a stitch marker under the top two loops of that stithc. Now you work in the back loop of each remaining chain til you end up back at the slip knot. Now you're going to turn the piece not like the page of a book, but spin it like a plate, so that you have the unused loops from the chains on top now. Now, work into each of those unused loops, making your way back to the chain your first worked a st into. This should give you a total of 66 sts. Now, you slip stitch in that first hdc you made - the one with the stitch marker. I hope that helps!
Miraim says
thank you it does.
now my guage seems off.
The yarn, I think is a 4 and I used the 4mm hook
crocheted to over 15inches long.
tried a 3mm hook. very hard to work with, but was over 10 inches long,
What am i doing wrong???
Thank you
Tamara Kelly says
The yarn called for is a "3/Light/DK" weight so that's going to be the biggest factor. However, the nice thing is that it's a bag. So if you like the quality of the fabric you are getting, then you can run with it and just end up with a bag of a different size!
Lynndsei says
How much stretch does the fabric have once complete? Do you have any photos of it with stuff inside?
It's something I always wonder about crochet bag patterns; I carry a TON of stuff in my purse and I don't want a saggy bag!
Tamara Kelly says
You can line it for extra strength, as all crochet will stretch some. The less stretchy the yarn and smaller the stitch, the more sturdy it is. If you carry a lot in your purse, I would definitely recommend lining it - which you can do with minimal sewing with this technique: https://www.mooglyblog.com/nearly-no-sew-bag-lining-tutorial/
Danielle Drown says
I have to make this! Wish I would have known you were going to be in SLC I would love to meet you! I hope you enjoy our lovely city!
Tamara Kelly says
Thank you so much Danielle! It was a beautiful weekend to be there - I took a long walk on Wednesday through downtown, with Kathy from ELK Studio, and we couldn't have asked for better weather or nicer people! 😀
Charlotte Loring says
Tamara,
Where did you get the zipper? I checked amazon.and didn't see it. Do you have an item number you could post?
TIA
Charlotte
Tamara Kelly says
Hi Charlotte! It's linked above in the bullet points - click on it to go to Amazon! Alas.... I just did and it's sold out right now. 🙁 But the item number and pkg photo are on there, so that should help you find it. Dritz told me it's available in fabric stores like JoAnns too, though I haven't checked my local one.
Clotilde Menendez/Craftybegonia says
Neat bag, did not fail to notice the octopus button! Have pinned it.
Tamara Kelly says
Thank you! 😀 Yes, when I saw those buttons I couldn't resist! Didn't take too long before I found a use for one!