This pattern is also featured on Stitch & Unwind, a fantastic new craft blog! I'm so honored to have been able to participate in their launch. Check them out for great free patterns, giveaways, and more!
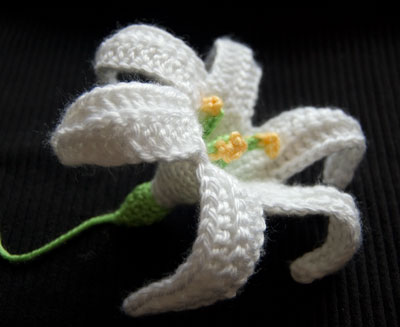
The Easter Lily, aka the November Lily, is a traditional spring time plant - as iconic as colored eggs and chocolate bunnies. But real Lilies can aggravate the allergies, and they only last a little while. What to do? Break out the hooks and create a handmade crochet Easter Lily!
Crochet Easter Lily
Add this pattern to your Ravelry Queue
This pattern is easy to intermediate, and takes just a few hours to complete. The finished flower is approximately 7 ½ inches wide.
- US F hook, 3.75mm
- Recommended: Red Heart Soft or Caron Simply Soft (Worsted weight yarn in white, green, and yellow)
Make the Stamens:
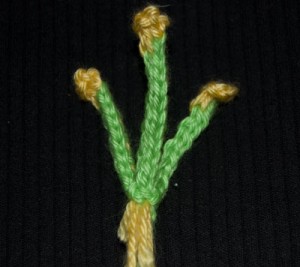 First Stamen: With light green yarn, ch10. Switching to yellow yarn, continue with 5 more chains. Sl st in fourth hump from hook (the back of the first yellow ch). Switching back to green, sl st into the next green hump and on down the rest of the stamen to the end, moving the yellow yarn ends back and forth with each stitch, to either side of the working yarn, so that they are trapped under the stitches. Cut the yellow yarn, but not the green.
Second Stamen: Continue with green yarn. Ch 12. Continue as for first stamen.
Third Stamen: Continue with green yarn. Ch 10. Continue as for first stamen. Sl st to bottom of first stamen. Cut the yellow yarn and the green yarn and finish off. Do not weave in ends. Set aside.
Make the Petals: (Make 6)
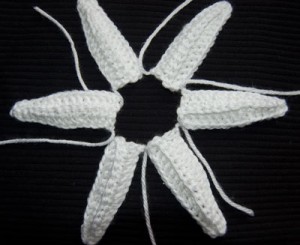 Using the white yarn, ch 15.
Row 1 (WS): Working into the back of the ch, sl st in second hump from hook. Sc in next 2 ch. Hdc in 3 ch. Dc in last 8 ch. Turn.
Row 2 (RS): Working in blo for this entire row, ch2 and dc in first 8 sts. Hdc in 3 sts, sc in 2 sts, join to last st with a sl st. Break yarn and finish off. Weave in this tip end only. Do not weave in the yarn end at the base of the petal.
Make the Trumpet, adding the Stamens:
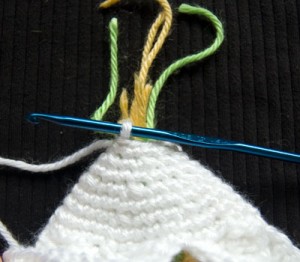 Joining Row: Using the white yarn, join yarn with sl st to WS of base end of first petal. Ch1 and sc 5 sts evenly across. Pick up second petal, and working into the wrong side of the end of this petal, continue with 5 more sc across. Continue in this manner until all 6 petals are joined. Sl st in first sc to create circle. (30 sc) Use the remaining yarn ends from the base ends of the petals to attach each petal to the one next to it with one stitch, and then weave in these ends.
Row 1: Ch1 and work evenly around. Do not join with sl st. (From here the Trumpet is worked in spirals.) (30sc)
Row 2: Working directly into top of first st of last row, [sc in 3 sts, sc2tg] 6 times. (24sc)
Row 3: Sc evenly to end of row. (24sc)
Row 4: [Sc in 2 sts, sc2tog] 6 times. (18 sc)
Row 5: Sc evenly to end of row (18sc)
Row 6: [Sc in 1 st, sc2tog] 6 times. (12 sc)
Row 7: Sc evenly to end of row (12sc) Now insert the stamen into the flower, so that the yellow crocheted ends are pointing towards the petals and the loose ends are sticking out the end you are working from. Hold these in place as you continue to work the flower Trumpet.
Row 8: Sc2tog around to end. (6 sc)
Row 9-11: Sc evenly around to end (6sc) Break yarn, finish off. Knot the white end and several of the stamen ends together so that stamens are held securely. Trim all these ends together to about ¼ inch.
Make the Trumpet Cap:
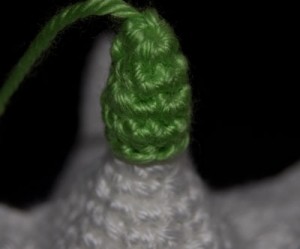 Leaving a long tail and using the magic circle, ch1 and sc 6 times in the circle. Pull the circle tight and move the tail to the front of the work, so that it points towards you from the middle of the circle. Join with sl st in first sc.
Row 1: Ch1 and sc evenly around, join with sl st in first sc. (6sc)
Row 2: Ch1, then [sc in st, then 2sc in next st] 3 times. Join with sl st. (9sc)
Row 3: Ch1 and sc evenly around, join with sl st. (9sc)
Break yarn, and finish off, leaving long tail to sew to flower. Firmly push the end of the flower into the Cap, making sure all the stamen ends are tucked in and not visible. Sew the Cap to the flower, then weave in and trim end. Flip the flower over and arrange petals to curve outward. Use the remaining long end to sew your new Lily to your favorite summer hat or to add it to your handmade springtime bouquet!
What decorations are you crocheting this year? Will Easter Lilies make the list? Let us know how you'd use these pretty flowers in the comments!
Written pattern copyright Tamara Kelly 2012, please use a link to this page when sharing this pattern with others. To print this pattern, click here.





Pam
Adorable! I can't wait to try this! BTW, I love your blog 🙂
moogly
Thank you Pam! 😀
Erin
Looks great, as always! I really like this pattern. Thanks for sharing.
moogly
You are very welcome Erin! 😀
Celia Tyszko
In row 2 What does blo mean
Working in blo for this entire row.
Tamara Kelly
Hi Celia! BLO is back loop only. 🙂
Una Beaumont
Thank you! You have the most beautiful Lily flower pattern on the net! And free! It's my favorite flower and a little Lily is born today 2 months premature, so I'm going to get busy with lots of positives thoughts for this little soul! Thank you so much!
Tamara Kelly
Thank you so much Una, and I'll be thinking of Lily!
Bea Lima
Omg I have a granddaughter being born I February but chances are she might be premature and her name is Lily. I want to make a few lilies to put on her gift so she can put it in a vase in her bedroom! Were they hard to make?
Jana
Hi. I'm having a hard time with the stamens. When I 'carry' the yellow yarn, it shows with the green! I'm pretty sure it shouldn't be doing this. How can I keep it from showing?
Tamara Kelly
A little bit of peeking out is normal, but if you want to hide it completely your could sc over it instead of slip stitching.
Amal Fahmy
I liked very much your idea and enjoy all hand works especially crochet
maria alexandra velasco
muy interesante lo de esta pagina
Mandy
Very pretty flower, thank you very much - hope I can manage it! xx
Pat Stubbs
I have just found your blog,and I think it's fantastic,I just love the November lily,and as we are coming into November soon,it will be appropriate to make at least 6 of them,which I will put some real fern with them,to celebrate a family birthday.Thank you so much
Tamara Kelly
😀 You're very welcome! I hope you have a wonderful birthday celebration.
Robin
This is a beautiful pattern, thank you for sharing. How do you get the petals to keep their shape?
Tamara Kelly
Thank you Robin! I find the tightness of the stitches holds them in shape.
marilynn shea
Cannot believe how beautiful this lily is worked up !!! Thank you for the exceptional pattern.
Tamara Kelly
I'm so glad to hear it Marilynn! Thank you!
Ashley
I love this lily pattern! i am actually going to be using them in my wedding next year. I have a question, i am confused about using the ends in the base to connect them with a stitch before weaving them in, how do i go about doing this? It is probably so much easier than i think that it is but I can not seem to figure it out. Thank you again, and thank you for the great patterns! I love your blog!
Ashley
Tamara Kelly
Thank you Ashley, and congratulations! 😀 Ok, so each petal has two yarn ends - the beginning and the end. You weave in the end that ends up at the tip, or narrow end of each petal, leaving the other end hanging free. Then you join the petals into a big circle by crocheting across all the base (wide) ends. After this you still have those 6 starting ends from each petal hanging there. Using a tapestry needle, sew each end through one stitch in the petal next to it, then weave it in. This better secures the petals together, so they aren't held together *only* by the circle sts around the bases. Does that help?
Ashley
Ah, thank you! see, i did make it much more complicated than it needed to be, i thought i had to use that extra end to crochet one stitch connecting it to the petal over and then use the tapestry needle to weave in the ends. hehe, thank you for clarifying!!!
Tamara Kelly
😀 I'm glad I was able to do so!
Karla
Thank you for posting the free flower pattern! It is so lovely 🙂 I have included it on my blog Karla's Making It (linking to your pattern, of course)! You can view it here http://www.karlasmakingit.com/free-crochet-patterns/free-crochet-flower-patterns/
Joy Overstreet
What does 2tg mean and tog
Tamara Kelly
Hello Joy! It's a decrease - tog is short for together, so 2 together is decreasing 2 sts into one. 🙂 You can see a tutorial HERE
Sheridan Weathers
Hello! May I use this pattern to create and sell?
Tamara Kelly
Yes, there's more about that here: https://www.mooglyblog.com/about-moogly/
cindy
Oh darn it's a crochet pattern. I would rather Knit but thanks for sharing.
Le-Anne Closter
I’ve just completed your Leaping Blpcks and Stripes baby blanket and found this, my daughter’s favourite flower. I’m going to make her some. I loved your blanket pattern so much 💜
Tamara Kelly
♥ Thank you so much!
Diane Snarski
The Easter Lily (November Lily) pattern looks like a really nice flower to crochet, though it looks a little complicated to me but I am going to give it a try. THANK YOU FOR CREATING A BEAUTIFUL CROCHET PATTERN!
Tamara Kelly
♥ Thank you so much!
Allyson
How could I add a stem to these that would hold and be sturdy enough to make an arrangement in a vase?
Tamara Kelly
I would use floral wire, found near the fake flowers at the craft store! It's green and flexible, so you can crochet right around it!