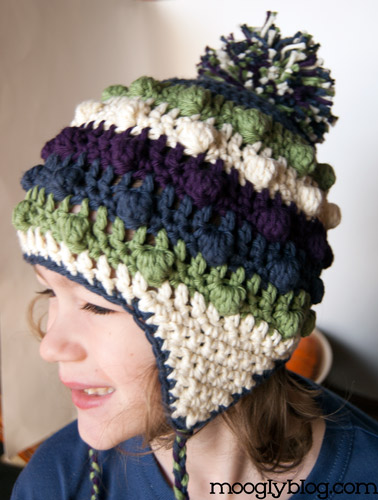
The Bobble Poof Crochet Earflap Hat has a whole lot going on, and it adds up to a fun toque for both kids and adults! This stocking cap is easily customizable too - it works just as well with or without the earflaps and pompom on top. With this crochet hat pattern you can make a great hat for men and women, boys and girls - and now newborns too!
 Disclaimer: This post includes affiliate links.
Bobble Poof Crochet Earflap Hat
Add this pattern to your Ravelry Queue and Favorites
Note: This hat utilizes the bobble stitch, aka dc5tog, in a unique way. As shown in this video tutorial, usually the bobble is made from the wrong side of the fabric, and worked so that it pops out on the right side. This pattern is made in rounds, and the bobble is made from the right side of the fabric, so be sure to push the bobble towards you as you work the following single crochet stitch. If you prefer, you can substitute the Popcorn Stitch.
US - I, 5.5mm hook
150-240 yds total worsted weight yarn in 1 to 8 colors
(I Love Cotton in Purple, Dark Denim, Sage, and Ivory shown, directions written for 4 colors as shown)
Clover Large Pom Pom Maker or other pompom making tool
Stitch marker
Gauge: After Round 4, Child/Adult hat should measure 5" in diameter; After Round 3, Newborn hat should measure 3.5" in diameter
Sizing: Directions are written for Child's Size (fits 19-21") with changes for Adult's Size (fits 22-24") in parenthesis (changes start on Round 5). Directions for Newborn size are written separately at the bottom of the page.
Video tutorials for the Bobble Stitch and other stitches used in this pattern, including the magic circle and seamless join, can be found on the Moogly Tutorials Page.
BOBBEL MUTS MET OORFLAPPEN (Dutch Translation in PDF) by Elke Wellens of Het Haakbeest – Dank je wel Elke!
Child and Adult Instructions (scroll down for Newborn)
Round 1: Using Color A, make a magic circle and ch 2. Make 12 dc in the ring, join to the first dc with a sl st. (12 dc)
Round 2: Ch 2, 2 dc in each st around. Join. (24 dc)
Round 3: Using Color B, ch 2. [2 dc in next st, dc in next st] 12 times. Join. (36 dc)
Round 4: Ch 2. [2 dc in next st, dc in next 2 sts] 12 times. Join. (48 dc)
Round 5: Using Color C, ch 2. [2 dc in next st, dc in next 11(5) sts] 4(8) times. Join. (52(56) dc)
Round 6: Ch 1, sc in first st. [Bobble in next st, sc in next 3 sts] 12(13) times. Bobble in next st, sc in last 2 sts. Join. (13(14) bobbles)
Round 7: Using Color D, ch 2. Dc in each st around. Join. (52(56) dc)
Round 8: Ch 1, [sc in next 3 sts, bobble in next st] 13(14) times. Join carefully to first sc of round. (13(14) bobbles)
Round 9: Using Color A, ch 2. Dc in each st around. Join. (52(56) dc)
Round 10: Ch 1, sc in first st. [Bobble in next st, sc in next 3 sts] 12(13) times. Bobble in next st, sc in last 2 sts. Join. (13(14) bobbles)
Round 11 - 12: Using Color B, repeat Rounds 7-8.
Round 13 - 14: Using Color C, repeat Rounds 9-10.
Round 15: Using Color D, ch 2. Dc in each st around. Join. (52(56) dc) If making the Child Size, break yarn and use seamless join to finish off. Place marker in the joined st and proceed to Earflap Instructions below.
Round 16 (Adult size only): Ch 1, [sc in next 3 sts, bobble in next st] 14 times. Join carefully to first sc of round. (14 bobbles)
Round 17: Using Color A, ch 2. Dc in each st around. (56 dc) Break yarn and use seamless join to finish off. Place marker in the joined st.
Earflap Instructions for Child/Adult: (optional - if no earflaps, skip to Edging Instructions below)
Left Flap:
Row 1: Count out 8 sts from the marked stitch, join last color yarn used with a sl st. Ch 1, sc in 10(12) sts. Turn. (10(12) sc)
Row 2: Ch 1, sc2tog (decrease), sc in 6(8) sts, sc2tog. Turn. (8(10) sc)
Row 3: Ch 1, sc in each st across. Turn. (8(10) sc)
Row 4: Ch 1, sc2tog, sc in 4(6) sts, sc2tog. Turn. (6(8) sc)
Row 5: Ch 1, sc in each st across. Turn. (6(8) sc)
Row 6: Ch 1, sc2tog, sc in 2(4) sts, sc2tog. Turn. (4(6) sc)
Row 7: Ch 1, sc in each st across. Turn. (4(6) sc)
Row 8: Ch 1, sc2tog, sc in 0(2) sts, sc2tog. Turn. (2(4) sc) For Child Size, break yarn and finish off. Weave in ends.
Row 9 (Adult size only): Ch 1, sc in each st across. Turn. (4 sc)
Row 10: Sc2tog twice. (2 sc) Break yarn and finish off. Weave in ends.
Right Flap:
Row 1: Count out 18(20) sts from marked st, and join yarn with a sl st.
Proceed as written for Left Flap. Go to Edging Instructions below.
Newborn Instructions
Round 1: Using Color A, make a magic circle and ch 2. Make 12 dc in the ring, join to the first dc with a sl st. (12 dc)
Round 2: Ch 2, 2 dc in each st around. Join. (24 dc)
Round 3: Ch 2. [2 dc in next st, dc in next st] 12 times. Join. (36 dc)
Round 4: Using Color B, ch 2. Dc in ea st around. Join. (36 dc)
Round 5: Ch 1, sc in first st. [Bobble in next st, sc in next 3 sts] 8 times. Bobble in next st, sc in last 2 sts. Join. (9 bobbles)
Round 6: Using Color C, ch 2. Dc in ea st around. Join. (36 dc)
Round 7: Ch 1, [sc in next 3 sts, bobble in next st] 9 times. Join carefully to first sc of round. (9 bobbles)
Round 8 - 9: Using Color D, repeat Rounds 4 - 5.
Round 10 - 11: Using Color A, repeat Rounds 6 - 7.
Round 12: Using Color B, ch 2. Dc in ea st around. (36 dc) Break yarn and use seamless join to finish off. Place marker in the joined st.
Earflap Instructions for Newborn: (optional - if no earflaps, skip to Edging Instructions below)
Left Flap:
Row 1: Count out 5 sts from the marked stitch, join last color yarn used with a sl st. Ch 1, sc in 8 sts. Turn. (8 sc)
Row 2: Ch 1, sc2tog, sc in 4 sts, sc2tog. Turn. (6 sc)
Row 3: Ch 1, sc in each st across. Turn. (6 sc)
Row 4: Ch 1, sc2tog, sc in 2 sts, sc2tog. Turn. (4 sc)
Row 5: Ch 1, sc in each st across. Turn. (4 sc)
Row 6: Ch 1, sc2tog twice. (2 sc) Break yarn and finish off. Weave in ends.
Right Flap:
Row 1: Count out 13 sts from marked st, and join yarn with a sl st. Proceed as written for Left Flap. Go to Edging Instructions below.
Edging Instructions (all sizes):
Remove marker and use this st to join color of choice with a sl st. Ch 1 and sc evenly around opening and flaps. Work sc2tog decrease in the four points where the flaps meet the hat to keep sharp corners. Break yarn and use seamless join to finish off. Weave in ends.
Ties: (optional)
Cut 6 pieces of yarn 18" long for kids, at least 24" long for adults. Hold 3 pieces together, fold them in half lengthwise and use a crochet hook to pull the center through one of the bottom edging stitches of an earflap. Pull the ends of the yarn through the loop made by folding the three pieces in half. Pull the ends down to create a snug knot on the earflap. Braid pieces together, knot at end and trim so ends are even. For thicker braids, add more strands until desired look is achieved.
Pompom: (optional)
Use Clover Large Pom Pom Maker (the larger one) or other pompom maker of choice to make a pompom. Sew to center of Round 1. Pompom!
The Fine Print
Written pattern copyright Tamara Kelly 2012. Please do not reprint or repost this pattern, but please feel free to link to this page to share this pattern with others. You are welcome to make items to sell from this pattern.



Diane
What a GREAT pattern! Thanks for creating! BTW, your model is a doll!!!
moogly
Thanks so much! He's proud of his new hat - getting him to stand still for the picture was the hard part! 😀
Vetty
Love the colors! Pattern is nice and would be great for boys. Thanks for sharing!!!
moogly
My boy certainly loves his! 😀 Thank you!
The Crafty nana
Thanks for the pattern and the many posts about free patterns.
Greatly appreciated.
moogly
You're very welcome! 🙂
Pam
Just made the hat n love it!!!! How can I share a pic of it?
moogly
Hi Pam! If you're on facebook you can post it to the facebook page as part of a comment, or if you're on Ravelry you can put it in your projects and send me a message there if you like. I'm so glad you like it! 😀
Robin
Love your hat pattern and mine turned out really cute. Thanks for sharing.
Robin
moogly
Thanks Robin! I'm so glad you liked it!
suzanne
I love this hat. I'm going to try making it for my adult grandaughter. She has Trigeminal neuralgia (sp?) in the sides of her face and the cold makes it quite painful.
moogly
Thank you suzanne - I hope it helps her!
Amy
I make hats every fall for all of my great nieces and nephews. I think this will be next years pattern! Looks like I can use up some bits and pieces of yarn as well. Love your patterns (working on infinity scarf now) and appreciate that you share your talents! THanks!
moogly
Thank you Amy! And you're very welcome! 😀
Beaj
Hi,
Love the Bobble Proof Crochet ear-flap Hat but for the life of me I can't download it.
Any help would be appreciated..
Thanks in advance..:)
moogly
Beaj, there isn't a download, but there is an easy to print version - just click the green print friendly button at the bottom of the post.
Victoria
I need help! I am making your cute BOOBLE POOF hat..but I am doing somehting wrong..What does this mean exactly..then I can get the rest: ch 2. [2 dc in next st, dc in next 11(5) sts] 4(8) times. Join. (52(56) dc)
I am ending up with 50 stitches on Row 5 not 56... thank you!!
moogly
Hi Victoria! I responded to you on your private message on facebook. 🙂
Denise
I am having questions about this round as well. Do I do (2 dc in st and then the (5 bobble) sts in the next 11? Then it would be 2 dc again and so on?
Thanks in advance. I am on FB also.
Denise
Priscilla
Can this be explain as I’m stuck getting to the adults size also
Tamara Kelly
Hi Priscilla! The different numbers are for the different sizes. So for the adult, it would be: "Round 5: Using Color C, ch 2. [2 dc in next st, dc in next 5 sts] 8 times. Join. (56 dc)" Does that help?
Beaj
moogly,
The green print friendly button wants me to download the PDF and I choose not to ...but turns out somehow or other I downloaded it and it went to my download area and not to my desktop. Have made a couple hats so far and am finding it a great easy pattern so I'm busy making as many of them in all sizes as I hope to donate them to a food bank so they can be given out there to anyone who needs one. Our temperatures here this winter are quite frigid.
Thanks for the Pattern.
Bea..:)
Am I correct in reading the pattern....the first number in brackets is for a child and the second number is for adult
moogly
You are correct in reading the numbers! And that sounds wonderful Beaj, I'm proud the hats I designed will be going to such a wonderful cause. And thank you for the heads up about the button, I'll have to look into that! Sorry if it caused you any trouble!
Beaj
Thanks again..:)
carol
Love the hat....I used the same colors!
Mary Jesman
This is the cutest hat I've seen this season! Can't wait to make a couple. Thank you!!!
Frankie
Thank you so much for this pattern.... i changed the colors and it came out great thank you....
Frankie
Thank you so much for this pattern.... i changed the colors and it came out great thank you....
Lee
Cute, cute, cute! I am never sure where to make my colour changes, though. Do you change colours while making the last stitch of the round or on the slip stitch to join? Also, do you carry your colours while working or do you cut and weave in ends each time? Thank you for your help.
moogly
Thanks Lee! I change colors on the slip stitch of the join. I think it works best for me, but if you get better looking results some other way then definitely go with that - everyone crochets a little differently. Whether I carry the colors or weave them in just depends on how many colors I'm using. More than 2 or 3 and I usually cut and weave them in, otherwise it gets a little crazy in there.
amanda
This pattern is so cute and so easy to follow. Thank you! I made a pink/orange/white/brown version for my 3 year old niece. I want to make a couple new born hats. Should I use the same hook size or use a smaller hook?
Tamara Kelly
For newborn going down a hook size or two should do the trick! 🙂
Stephanie
Love this pattern! I want to make it this for my daughter who will be 9 months during the winter. How big does the newborn hat come out? There are measurements for kids and adults but not newborn. Her head is about 17" now. What do you suggest? Thanks!
Tamara Kelly
Newborn size is usually about 15". To bump up a bit for your daughter a larger hook should work!
Brian wise, esq.
Just finished making an adult-sized one for my wife. I handed her the computer open to my Ravelry acct and told her to pick the pattern she wanted and she chose yours. Made mine with Cascade 220 in 4 colors. She loves it and wears it around the house. Thank you for sharing such clear instructions!
Tamara Kelly
😀 Awesome! Thank you Brian, glad you both enjoy it!
Anna Hibbard
I was going to make this for my 3 month old great nephew. The child sizes seems to big and I know the newborn is too small. Would taking it down a hook size on the child size help make it fit a 3 month old?
Tamara Kelly
That could indeed work very well! That, or use a thicker yarn and a bigger hook on the newborn size. 🙂
teresa
crear, iim knitting it now... could you please link me to the seamless join tutorial¿ i cant find it en the tutoriales page, thanks¡¡¡
Tamara Kelly
Hi Teresa! Sorry about that, it's at https://www.mooglyblog.com/crochet-video-tutorial-seamless-finishing-when-working-in-the-round/
Cyndi Fischer
This is so adorable, I am sure that some of the kids that receive from our charity will love this!!!
Clotilde/Craftybegonia
What a handsome little dude he is, great job (with the hat also, Tamara, LOL!)
Tamara Kelly
😀 Thank you so much!
Kristina and Millie
great color choices and what a cute model! thanks for sharing this fun pattern!
Tamara Kelly
😀 Thank you so much!
Monique
Love the hat and pattern but I've hit a wall. I've completed row 6 and have the correct number of bobbles and stitches but when trying to start row 7 I am confused! I cannot come up with a way to only dc in 52 stitches. To me every stitch meant every one but afterwards I saw it was over 100 putting a stitch in every dc and sc around. But if I only dc in the sc I can only come up with about 30 something dc. Where am I supposed to be placing these 52 dc exactly? I hate to give up because its a beautiful hat! Thanks so much!
Tamara Kelly
Hi Monique, and thank you! It's hard to say exactly what's happening on your hat since I'm not there to see it in person. But at the end of Round 6 you should have 13 bobbles with 3 sc sts in between each one. 13 x 3 means you'll have 39 sc sts. 39 sc plus 13 bobbles equals 52 sts to work into. Re-reading your comment now, I'm wondering if you're trying to crochet into each half-dc of the bobble? A bobble counts as one stitch, so you just crochet one stitch into it. Does that help at all?
Monique moody
Ah yes I totally understand now! I was trying to put a stitch in each stitch of the bobble! Thank you!
Tamara Kelly
Ah, I'm glad we were able to figure it out! 😀 You're very welcome!
Leslie Vanover
Can you help me out on the sizing for a one year old please.!
Tamara Kelly
I would make the child size version with a smaller hook. 🙂
Ladee
I am totally awestruck! Just visited the Moogly Tutorials Page. So many patterns I can try now because I understand how to make the stitches. So many stitches I want to revisit and learn! THANK YOU! THANK YOU! THANK YOU! THANK YOU!
Tamara Kelly
😀 Oh Wow!!! Thank you so much Ladee!!
Wendy
Love love love this pattern! Already have made two of them!! Thanks so much for sharing with us!
Tamara Kelly
Thank you so much Wendy!
Janice
Hi.. does the ch 2 at the beginning of each round count as the first DC? Thanks. Janice
Tamara Kelly
Hi Janice! No, it doesn't. 🙂
Janice
Thank you!