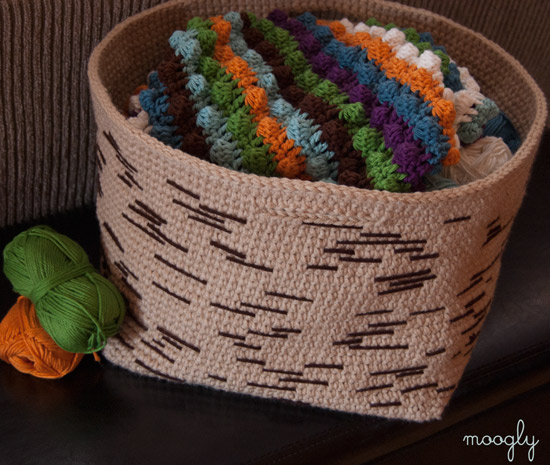
The Birch Bark Basket is perfect for home decor that's inspired by nature, farmhouse style, cabin living - anywhere cozy!
This easy crochet pattern is almost more of a technique and tutorial - you can crochet big baskets, small baskets, gift baskets... You get the idea! And each one will have you thinking of a walk in the woods.
Disclaimer: This post includes affiliate links.
Prefer an ad-free PDF? You've got options!


Prefer the free blog version? Keep scrolling!
Big Big Crochet Storage!
This crochet basket pattern as written is pretty big - I find it to be a great storage basket for my other current yarn project! And better looking than plastic baskets too. At about 43" around, it holds a lot!
But this pattern is super easy to downsize. Just crochet the base to the dimensions you desire and work the sides using the technique outlined below.
Birch Bark Basket Crochet Pattern
Add this pattern to your Ravelry Queue and Favorites
-
- US - I, 5.5mm hook
- 900-1000 yds Caron One Pound ("4"; Worsted; UK: 10-12 ply)
Color A - Lace - 826 yds
Color B - Espresso - 100 yds - Stitch Markers
How to Create the Birch Bark Crochet Stitch Pattern:
This stitch pattern is made using a variation of tapestry crochet.
Color A Held Doubled
The main color (Color A) is held doubled (two strands held and worked as together as if they were one) and worked in single crochet stitches.
Work Over Color B
Each stitch is worked over a single strand of Color B, enclosing and hiding it behind, or in back of the row. Color B might peek out from the back, but shouldn't be visible from the outside of the basket.
Begin a Stripe
Then, when you wish to add a stripe of Color B to the pattern, you pull the strand to the front of your work and let it hang. Continue making sc stitches as before, with Color B hanging loose in front of your work. This could be for just 1 stitch, or it could be for as many as 10 - it's up to you!
End a Stripe
Then when the stripe is done, pull Color B back behind the next stitch and continue as before, enclosing it in each stitch. Be sure to give a tug to Color B once in a while to make sure it doesn't sag - but don't pull so tight that the main color fabric buckles either.
Get Creatively Random
The length of each stripe and its placement is completely up to you. Birchbark trees have random (to our eyes) stripes, and like a tree, your basket should be your own unique work of art! Before starting mine, I looked at pictures of birch trees for inspiration, and then just proceeded to add stripes whenever I thought it was a good time to add them. There's no right or wrong to this, so have fun with it!

Instructions for the Base of the Basket:
Row 1: Holding yarn from both ends of the skein of Color A together, ch 36. Sc in the 2nd ch from the hook and each remaining ch. Turn. (35 sts)
Row 2 - 40 (or until roughly square): Ch 1, sc in each st across. Turn. (35 sts)
Instructions for the Sides of the Basket:
Round 1: Ch 1, sc in each st across row (place marker in first st and move up with each row), then turning to work into the left edge, sc 36 sts across, then turning again sc in each starting ch, then turning once more, sc 36 sts into other row edges. Join with a sl st to first sc made in this round. (142 sts)
NOTE: Exact st count isn't actually important here so much as using the right number of stitches for the size basket you're making and your own gauge. If it works and looks better to use a different number, then please do!
Round 2: Ch 1, and laying the end of Color B along the inside of the basket, sc evenly all around the basket, holding Color B behind the stitches and working over it to enclose it in each st. Join to first sc of round with a sl st.
Round 3 - 29 (or until the basket is desired height): Ch 1 and sc in each st around, enclosing Color B as before, except when bringing Color B forward to create birch bark pattern (see above for more information on this technique). Join each round with a sl st in the first sc of the round.
NOTE: On Rounds 13 and 26 I joined to the 2nd sc of the round and then in Rounds 14 and 27 I worked a st into the sl st. This technique maintained the st count while pulling the joining line back to the left. This is optional, but if you do not do this you'll need to adjust the placement of the handles from the stitch counts listed below.
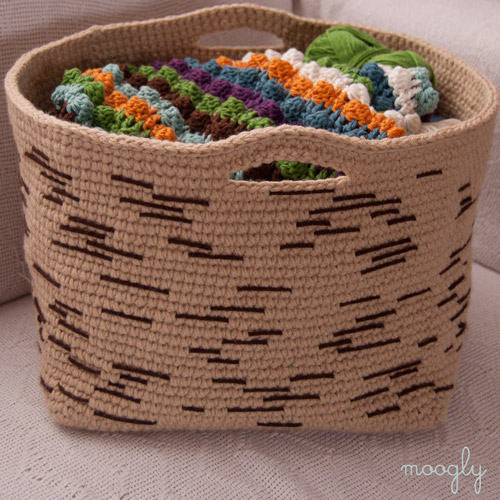
Instructions for Making the Handles (optional):
Round 30: Ch 1, sc in the first 12 sts of the round, ch 11, skip the next 11 sts, sc in the next 60 sts, ch 11, skip the next 11 sts, sc in the last 48 sts.
NOTE: These are the stitch counts that worked out for me, if you are making a different size or didn't adjust the joining line as noted above, you will need to move the handles around to suit your project.
Round 31: Ch 1, sc in each st and ch to end. Join with a sl st in first sc.
Round 32: Ch 1, sc evenly around. Join with a sl st in first sc.
Round 33: Ch 1, sl st in 2nd st and each st around. Break yarn and use seamless join to finish off.
Easy, chic, and right on trend in home decor. This crochet basket looks great in a cabin in the woods or in a modern loft - and in a suburban split level in Iowa. The neutral colors and inspired by nature design make it a really neutral piece that still has lots of character.
So tell me what you think! I love reading your comments! And if you make a Birch Bark Basket, hop over to the Moogly Facebook page and share a photo! We’d love to see it!
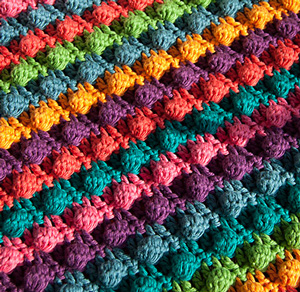
PS - Curious about the WIP inside the basket? That's a Blackberry Salad Striped Baby Blanket - another free crochet pattern here on Moogly! This one is made in Knitpicks Comfy Worsted in Bison, Peapod, Carrot, Marlin, Sea Foam, White, and Lilac.
The Fine Print
Written pattern copyright Tamara Kelly 2013. Please do not reprint or repost this pattern, but please do link to this page to share this pattern with others. If you wish to make baskets for sale from this pattern, please visit the All About Moogly page for details.


che says
there are no instructions for rounds 3,4, & 5. do you simply repeat round 2?
Tamara Kelly says
Hi che! The instructions read
Row 2 – 40 (or until roughly square): Ch 1, sc in each st across. Turn. (35 sts)
so you just repeat Row 2 until you have 40 rows, or until it's square. 🙂
Beth says
I believe Che was commenting about rounds 3-5 for the sides of your basket, not the bottom. It goes from round 1 to round 2, then rounds 6-29 (or until desired height). Also love the pattern, I have some Love this Cotton from Hobby Lobby that I plan on using.
Tamara Kelly says
ACK! Right you are, what a typo! Thanks so much Beth and Che - I'll fix that right away!
MarNella Cordato says
Thank you for asanother brilliant free pattern that is pretty and useful!!! I've been looking for a pattern for something to make for my sil's b'day. She's a southern belle and I never got a feel for her taste - even after 40 years!
Tamara Kelly says
You're welcome MarNella, I'm glad you like it!
Barbara says
We harvest chaga from birch trees and our neighbors harvest birch syrup. This basket caught my eye!
Tamara Kelly says
Birch syrup? I didn't even know that was a thing! I'll have to look that up!
celia says
This is FABulous and just in time. I was going to make a basket for a friend, but this is just so much better!
And it is PERfect because I am in Minnesota lake of Lake Wobegon!
Tamara Kelly says
😀 So glad you like it celia!
Carmen says
What a wonderful idea! I'm crazy about using wood for candleholders, bowls etc, 'crocheted wood' would be the perfect combination of my two favourite things! 🙂
Tamara Kelly says
😀 Glad you like it Carmen!
Christine says
This would be simple to change it slightly to make a round basket. I think it would be really pretty having 3 or so of slightly different shades maybe, but in different sizes and shapes sitting by the hearth-side chair with crocheting projects and yarn in them. Thank you very much for posting the pattern. This is my first trip to your site following a link to this pattern from the Crochet Me site. I am looking forward to browsing your site here and already have your page up on Ravelry to check out your patterns there. Great job!
Tamara Kelly says
thank you! And yes, it would be very easy to start with a round bottom, or even an oval if you like! 🙂
Darci says
I really would like the pattern to the blanket inside the basket too! 🙂
Tamara Kelly says
😀 No problem Darcy! That's the Blackberry Salad Striped Blanket!
For baby size: https://www.mooglyblog.com/free-pattern-blackberry-salad-striped-baby-blanket/
For afghan and larger sizes: https://www.mooglyblog.com/free-pattern-blackberry-salad-striped-afghan/
Penster47 says
If we were to use regular 'rug' yarn, could we make this with a single strand?
Tamara Kelly says
I would think so - it won't be as big, and you'll need to make sure you use a hook size that gives you a tight stiff fabric, but you can do one strand for sure.
Kim says
I have been looking for a cute basket pattern large enough and sturdy enough to make little laundry baskets for my kids. Ones about this size will be perfect for them to be able to carry it to the laundry room when it gets full. Can't wait to make them in fun bright colors for my boy and girl! Thanks!
Tamara Kelly says
😀 Great idea Kim!
sheila says
awesome...love all the free ones I have seen so far 🙂
MARRIE says
Tamara!
Please answer me what r ?
Tamara Kelly says
Hi Marrie! What r? I'm not sure what you're asking.
Allison says
I wanted to make a little basket to hold my small crochet projects as I am working on them. I am in the process of using this pattern. My base is a rectangle and I am working up the sides now. It is white (because that is what I have) and I'd like to add a thick stripe near the top and then use your alphabet patterns to add my initials. I like how thick and sturdy it feels already. Thanks for the pattern.
Tamara Kelly says
😀 Sounds fantastic! Thank you!
Linda says
Once I start the sides it talks about turning. Does this mean that I turn going back and forth or just do sc all around the last base rown? It seems if I keep going it will be in rounds with a large square just going outward and not upward.
Linda says
I am sorry to write again but I am trying to figure out the sides on the basket. I am a beginner and sure would like to complete the basket Any help you can be would be greatly appreciated.
Cathy says
Linda, I see that she hasn't had a chance to answer you - so I will try to explain. What she means by "turn" on the sides is not talking about turning and going back . She means do 35 (I think) stitches across the row. Turn and create the next side of the square (which will actually be the the side of what you had crocheted). Turn and create the next side of the square (which will be the bottom of your original bottom) and turn the last time to create the fourth side of the square (which will be the other side of what you crocheted). Does that make sense? You are "creating" sides of the square by going around (just like you would a circle) - only you are making it a square. Sorry if I've confused you more. lol
Tamara Kelly says
Sorry I missed your original comment Linda! Cathy, thank you for the great explanation! 😀
Linda says
So just keep going around only because the base is a square it will now just round off as I go along...I am going to try that . I know how to do rounds for sure. I have made my family hats for Christmas and I just made my granddaughter a strawberry purse. She is 5 and she will love it I am sure. Oh by the way, should I still maintain the same number of stitches 142? altogether? Thank You
MK Gilbert says
I didn't read it carefully enough the 1st time~ IT really is big! I used the black and white Sugar and Spice cotton yarn~get 2 big spools so it doesn't tangle like it did for me using both ends of one spool. They didn't have it in the small skeins at our WalMart~I thot that color looked more like birch bark. I used one strand of regular black worsted for the stripes, but would like it better if I'd used a black cord, I think, as it'd give the basket more "body" and be less likely to fray and catch on stuff. My new daughter-in-law (as of Sat!) loves black in white, so I'm using it as a gift basket for a set of white sheets and a white crocheted bedspread I made for them! All I need to do is add a ribbon! Thanx for sharing the pattern! Next time I think I'll try it in a smaller size in browns (for my other son getting married this fall.)
Oh, also, I find it easier to not bother with the slip stitch and chain one at the end of each row~if you just continue on it doesn't leave a crooked seam. Just mark which corner you started with~altho it doesn't really matter, I guess. If you read the directions (like I finally did when I made my 3rd copy of the pattern (kept losing it!), the size of your bottom square (or rectangle if you prefer, I suppose) determines the size of your basket.
jean says
The actual pattern is on ravelry.com and it's free. You use size I Hook. 900 1000 yds.worsted or aran wt yarn.
Color a 826 yds. OF Caron One Pound in lace. And 100 yds. In Caron One Pound Espresso.
Tamara Kelly says
The link on Ravelry takes you here. The pattern itself is not on Ravelry, just a link to this blog post. And yes, it's free. 🙂
Karen says
Would this pattern work as well to just make all the single crochets and leave the second color out until the end, and then weave them in with a tapestry needle? I fear I might mess up having so many threads on my hook!
Tamara Kelly says
Yes, but you'll want to use a smaller hook to achieve the same stiffness. 🙂
Sherrie says
I have a question. What is the size of the bottom panel? Even though I worked according to the pattern, mine doesn't look as big as I think it should be. Mine is 10x10.
Tamara Kelly says
Mine was about 12x12, so it's likely a difference in gauge. You can always increase the size of the bottom by crocheting around and increasing on the corners.
Isabelle says
Love this pattern... You can even make it with plastic yarn, made from plastic grocery bags that keep taking place in my closets... Great way to recycle!
Sandi Suggs says
Hi - I am confused. I am ready to start on the sides of the Basket, the instructions indicate to crochet 36SC on the left side and on the right side. My sides are 40 rows as per instructions. I do not understand the 36SC in a side with 40 rows???
Thank you!!
Tamara Kelly says
Hi Sandi! That was to keep the square shape - you space them evenly along the side. But do see the note as written in the pattern: NOTE: Exact st count isn’t actually important here so much as using the right number of stitches for the size basket you’re making and your own gauge. If it works and looks better to use a different number, then please do!
Sandi Suggs says
Thanks for your reply. I followed your pattern and made 40 rows for the bottom, am I understanding correctly that I only use 36 stitches along the 40 row sides on the right and left sides?
Tamara Kelly says
Hi Sandi! Yes, you understand correctly. 🙂
Diana says
Hi,
I would like to use one color or maybe add stripes. Is it necessary to crochet over a third strand to add body to the sides? I love your site, the patterns ,hookin on hump day so much. I am just amazed how much information is so willingly shared. Thanks to you and all who have shared their patterns for all of us to try. My e-mail is all small letters.
Tamara Kelly says
Thank you Diana! If you don't crochet over another strand, you may want to go down another hook size to add some stiffness to the pattern. 🙂
Diana says
Thank you for responding so quickly. The first basket is going to be a gift. If that one turns out Ok, I would like to try an animal print for myself.
MK Gilbert says
I made this basket and it turned out quite large. You can adjust it however you like. Not necessary to crochet over a strand if you don't care to. I thot I'd make it smaller if I did it again but use a heavier cord to crochet over to give it more "body". I used variegated white and black cotton yarn but just used a strand of regular medium weight yarn to crochet over...
Pat says
Alive your birch bark basket been looking for a large square one for along time could you use suer saver yarn and just use two strands instead of adding the other color
And what size crochet hook and then how would you do the instructions alsoovecvho it stands up on its own you are a great designer could you email m thankspat
Tamara Kelly says
Hi Pat! Thank you! You could absolutely just crochet with 2 strands held together for a solid look, I wouldn't change the hook size though, I'd keep it the same or just one size up if needed for stiffness.
PAT says
HI AGAIN I WROTE THE COMMENT ABOVE IM USING 2 STRANDS AND USING A SIZE I HOOK
I NDERSTAND THE FIRST PART THE FIRST 40 ROWS BUT NOT SURE HOW TO DO THE SIDES AS IM NOT ADDING DIFFERENT COLOR FOR THE BARK ETC SIDE PART DONT UNDERSTAND AND HOW TO YOU GET BASKET TO STAND UP AS ITS ONLY SC I JUST LOVE THIS BASKET AND YOU DO FIRST 40 ROWS FIRST RIGHT BEFORE STARTING SIDES THANKS PAT
Tamara Kelly says
Hi Pat! I would hold two strands together the whole time - that plus the small hook and sc sts will stiffen the sides. Just sc evenly all around. 🙂
PAT says
TAMARA IM DONE WITH THE 40 ROWS BUT CANT FIGURE OUT WHAT YA MEan by laying your yarn inside do you mean working in back loops only my bottom of basket isnt forming im only using 2 strands in super saver and not adding the birch part i just love this basxket of yours and how do the sides start forming like it as ya dont half to do sides etcd seperate you can email me too thanks
Tamara Kelly says
Again, that's only for the birch pattern. To skip that, just sc as usual, with 2 strands held together.
PAT says
HI AGAIN TAMARA I DID THE FIRST 40 ROWS NOW IM GOING ON 2ND ROW OF BASKET BUT WHAT DO YA MEAN BY LEAVING B INSIDE OF BASKET NEVER SEEN THIS TERM EVER ALSO WHEN DOES THE BASKET BOTTOM START FORMING AS IT HASNT YET DO YOU HALF TO GO IN BACK LOOPS OR SOMETHING
ALSO WHEN I DID THE FIRST ROUND OF SIDES I WENT ACROSS THEN DOWN THE SIDES ETC AS NOT SURE REALLY WHAT YA MEANT TURNING EACH TIME THINK YA MEANT GO ACROOSS THEN DOWN ALL THE SIDES RIGHT JUST DONT UNDERSTAND WHY IM NOT GETTING THE BOTTOM OF THE BASKET MAYBE YA COULD EXPLAIN TO ME BETTER AND THE PART ABOUT LAYING YATRN INSIDE AND SC NEVER SEEN THIS WRITTEN LIKE THAT IVE DONE ALOT OF YOUR PATERNS AND ENVER HAD THIS PROBLEM THANKS PAT
Tamara Kelly says
Hi Pat! The leaving inside and such is to create the birch bark pattern - I thought you wanted to skip all that. Rows 1-40 are the bottom, then Round 1 starts the sides. Maybe this video tutorial will help?
PAT says
Thanks somehow I guess I wasn't turning it right for the sides to start curling up video did help I just didn't a sample and it worked hopefully will work on one I started will try again
So will cotton thread be better than 4ply for birch basket using two strands and a I hook
And to your answer above I am skipping the birch part but didvtry that last night and then
Understood that part but next one after finish this one will try the bark
So the way I'm doing it I would do ROWS 1 thru 40
Then when starting sides I would do ROW 1 then skip ROW 2 ang go right to ROW 3 thru 29
When you sent the video on that page love your yarn bowl and the casserole cover
Also on the sides you slip STITCH to first sc on roungs except where you noted right
Glad you sent the video as has different stuff of yours on that
Page that I've never seen you are a great designer hope to hear from you soon
As then I'll attempt later on this project thanks pat
Tamara Kelly says
You can use whatever weight of yarn you like, just use a hook small enough to get it to be stiff. 🙂 I don't know why you would skip Row 2 when doing the sides?
Thank you!
PAT says
Tamara forgot to ask you one question which I forgot from above questions I know this is a stupid question but rounds 3 thru 29 on sides you are always slip stitching to same STITCH and sand single CROCHETING and marking the same STITCH in every round sorry for the stupid question but just wanted to make sure
Tamara Kelly says
You always sl st into the first st of that round, and then ch 1 and make the first st in that same stitch. 🙂
Pat says
Thanks so much it didn't s say to chain 1 and then do a sc in the same STITCH all it said is ch 1 and mark
And chain across
Tamara Kelly says
With sc it is standard in the US to crochet in each stitch when working evenly, not counting the ch1 as a stitch. Some UK patterns are different. 🙂
Sonya says
Hi Tamara,
I have finally gotten around to making this wonderful basket! I have a couple issues I'd like to run by you. Two of the corners on the bottom kinda developed a flattened look (they are opposite on another). And the basket has a little bit of an hourglass shape. Do you think the flat corners are the result of poor spacing on the "sides" of the bottom, or not enough stitches to match my gauge? And is the hour glass shape due to tensio issues or pulling color B to tight? I'm not really super new to crochet, but I am self taught and have really only done blankets and hats. I tend to be a bit of a perfectionist, and have been known to pull out days of work for a "do over." I don't plan on redoing this basket, but I am going to make it again and I want it to be right. Any suggestions you could provide would be greatly appreciated!
Thanks for all your wonderful patterns and tutorials!!
Tamara Kelly says
Hello Sonya! It might be pulling color B too tight - I found that to be the trickiest part. I would try blocking it and see if that doesn't help!
Sonya says
Thanks so much Tamara! I've already started on my "do over," but I'll try blocking the first one.
Can you give me instructions for blocking a basket?? 😳
Tamara Kelly says
Hi Sonya! Jessie At Home has a great tutorial for that: http://jessieathome.com/how-to-starch-crochet/ 😀
Sonya says
Thanks a bunch!
Margie Flinn says
Could you just use 3 strands of yarn instead of 2?
Tamara Kelly says
Sure, it's just a basket, so the end dimensions may change but that's okay! 🙂
Margie Flinn says
would it make it more firm, sturdy?
Tamara Kelly says
As long as you don't increase the hook size! 🙂
Kelly says
I think this would look great done in gray tones or white stripes to mimic Aspen bark. 😀
Kate says
Hello - is it possible to get the pink and cream basket instructions in English rather than Swedish ?
Thanks so much!
Kate
Tamara Kelly says
Hi Kate! Can you link me? I'm afraid I don't know what basket you are referring to.
Allison says
Is there an ad free version for purchase?
Tamara Kelly says
Hi Allison! I just got it up! ♥ https://www.ravelry.com/patterns/library/birch-bark-basket
Victoria says
Thank you for the pattern. I can't wait to get started. This will make a great Christmas gift also. Love your site. Thanks for the inspiration and pattern.