
What goes around comes around, and wiggly crochet is definitely coming around again! It's popping up on Pinterest and Ravelry, in rugs and afghan squares. Usually worked in squares and rectangles, with a base mesh and ruffles worked on top, it's got a great 3D big pop look. But I wanted to play around with the idea and maybe take it a new direction - and the Wiggle It Crochet Trivet and Dishcloth Set is the result!
Prefer an ad-free PDF? You've got options!


Prefer the free blog version? Keep scrolling!
The trivet and dishcloth are essentially the same pattern; the trivet just keeps getting bigger! So if the trivet is too big for your needs, just stop increasing when you like the size and go to the finishing row of the base mesh. Go way bigger and add a non-skid backing, and you can make a gorgeous super luxurious plush rug!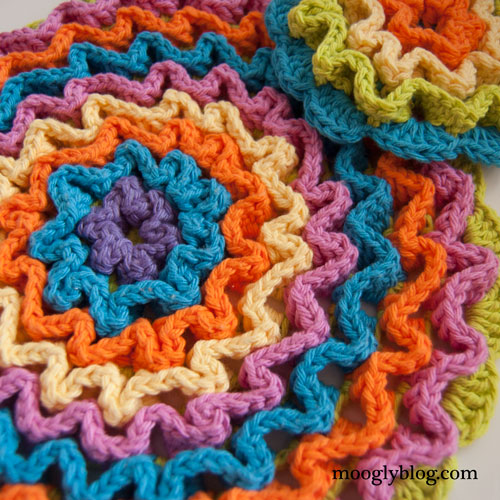

Wiggle It Crochet Trivet and Dishcloth Set
Add this pattern to your Ravelry Queue and Favorites
The Base Mesh is made all in one color, but then each round of ruffles is added separately - make them all the same color, alternate two colors, make each one different... it's up to you!
US - G, 4.00mm hook
Lily Sugar'n Cream (Worsted weight kitchen cotton, in 2 - 9 colors)
small amounts on up to 90 yds for base of trivet
Sizes:
Dishcloth: 5.5" finished diameter
Trivet: 11" finished diameter
Click HERE for the Video Tutorial!
Wiggle It Crochet Trivet and Dishcloth Set Instructions
Base Mesh Instructions:

Round 1: Make a magic circle, and sc 6 times in the ring. Join to the first sc with a sl st. (6sc)
Round 2: Ch 4 (counts as dc and ch 1), dc in the same st. *Ch 1, [dc, ch 1, dc] in the next st. Repeat from * to end. Ch 1 and join with a sl st into the ch 4 sp, (12 dc, 12 ch)
Round 3: Ch 4, dc in the same ch sp. Ch 1, dc in the next ch sp. *Ch 1, [dc, ch 1, dc] in the next ch sp. Ch 1, dc in the next ch sp. Repeat from * to end. Ch 1 and join with a sl st into the ch 4 sp, (18 dc, 18 ch)
Round 4: Ch 4, dc in the same ch sp. [Ch 1, dc in the next ch sp] twice. *Ch 1, [dc, ch 1, dc] in the next ch sp. [Ch 1, dc in the next ch sp] twice. Repeat from * to end. Ch 1 and join with a sl st into the ch 4 sp, (24 dc, 24 ch)
TO MAKE THE DISHCLOTH: Skip to "Finishing Round" of the Base Mesh.
TO MAKE THE TRIVET: Continue Base Mesh Instructions as written.
Round 5: Ch 4, dc in the same ch sp. [Ch 1, dc in the next ch sp] 3 times. *Ch 1, [dc, ch 1, dc] in the next ch sp. [Ch 1, dc in the next ch sp] 3 times. Repeat from * to end. Ch 1 and join with a sl st into the ch 4 sp, (30 dc, 30 ch)
Round 6: Ch 4, dc in the same ch sp. [Ch 1, dc in the next ch sp] 4 times. *Ch 1, [dc, ch 1, dc] in the next ch sp. [Ch 1, dc in the next ch sp] 4 times. Repeat from * to end. Ch 1 and join with a sl st into the ch 4 sp, (36 dc, 36 ch)
Round 7: Ch 4, dc in the same ch sp. [Ch 1, dc in the next ch sp] 5 times. *Ch 1, [dc, ch 1, dc] in the next ch sp. [Ch 1, dc in the next ch sp] 5 times. Repeat from * to end. Ch 1 and join with a sl st into the ch 4 sp, (42 dc, 42 ch)
Round 8: Ch 4, dc in the same ch sp. [Ch 1, dc in the next ch sp] 6 times. *Ch 1, [dc, ch 1, dc] in the next ch sp. [Ch 1, dc in the next ch sp] 6 times. Repeat from * to end. Ch 1 and join with a sl st into the ch 4 sp, (48 dc, 48 ch)
Round 9: Ch 4, dc in the same ch sp. [Ch 1, dc in the next ch sp] 7 times. *Ch 1, [dc, ch 1, dc] in the next ch sp. [Ch 1, dc in the next ch sp] 7 times. Repeat from * to end. Ch 1 and join with a sl st into the ch 4 sp, (54 dc, 54 ch)
Finishing Round: Ch 1, sc in the same ch sp. Dc 5 in next ch sp (scallop made). *Sc in next ch sp, 5 dc in next ch sp. Repeat from * to end. Break yarn and join to first sc using seamless join. (Dishcloth: 12 scallops, Trivet: 27 scallops)
Ruffles Instructions:
Ruffle 1: (click photos to embiggen!)
Working between dc sts from Round 2 of the Base Mesh, join with a sl st to the top of a Round 1 Base Mesh stitch.

Ch 3 (counts as dc).

Moving to the dc just to the left of the join, dc 2 around the post of the mesh dc, working toward the outer edge. 
Next, dc in the ch sp of the Round 2 mesh directly to the left of the dc you just worked around. Dc 2 around the next Round 2 mesh dc to the left, working back towards the center of the mesh. Dc in Round 1 of the mesh, to the left of the just worked dc.

Continue in this manner, working up and down the dcs of Round 2 of the mesh, working 2 dc around the post of each dc and one dc in the top and bottom of each turn.

At the end of the round, break yarn and seamless join to the first dc of the round. (36 dc, 6 petals)
 This is what it should look like from behind at this point:
 Ruffle 2:

Join yarn with a sl st in a ch sp of Round 2, between two of the dc of Round 3 of the mesh, between two of the petals of Ruffle 1, and ch 3. Moving to the dc to the left, dc 3 around the post, working toward the outer edge as before. 
Dc in the next ch sp to the left, then dc 3 around the next dc to the left, working back toward the middle. Dc in the next ch sp of Round 1 to the left. Continue the round, working up and down the dcs of Round 3, with 3 dc around each post and 1 dc at the top and bottom of each turn. At the end of the round, break yarn and seamless join to the first dc of the round. (72 dc, 9 petals)

Ruffle 3: Work as Ruffle 2, around the dc sts of Round 4 of the mesh. (96 dc, 12 petals)
TO MAKE THE DISHCLOTH: You're done! Enjoy your new dishcloth or tiny trivet!
TO MAKE THE TRIVET: Continue Ruffles Instructions as written.
Ruffle 4: Work as Ruffle 2, around the dc sts of Round 5 of the mesh. (120 dc, 15 petals)
Ruffle 5: Work as Ruffle 2, around the dc sts of Round 6 of the mesh. (144 dc, 18 petals)
Ruffle 6: Work as Ruffle 2, around the dc sts of Round 7 of the mesh. (168 dc, 21 petals)
Ruffle 7: Work as Ruffle 2, around the dc sts of Round 8 of the mesh. (192 dc, 24 petals)
Ruffle 8: Work as Ruffle 2, around the dc sts of Round 9 of the mesh. (216 dc, 27 petals)

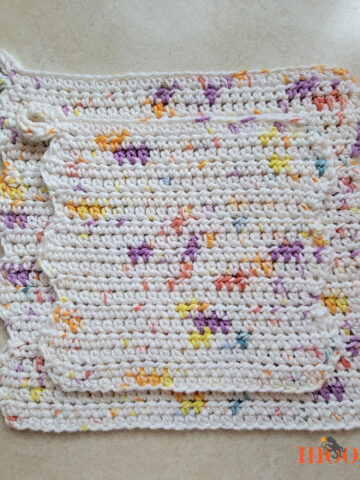
And now you're done with the Trivet! Here's a look at the back of the dishcloth, so you can get an idea of how they should look from underneath:

I hope these instructions are clear, and that the Wiggle It Crochet Trivet and Dishcloth Set are as fun for you to make as they were for me! Do you think you'd like to give it a try? Have you made wiggly crochet trivets or other wiggly patterns before?
The Fine Print
Be sure to Like the moogly Facebook page for the latest updates and have some fun with us! Written pattern copyright Tamara Kelly 2012. Please do not reprint or repost this pattern, but please feel free to link to this page to share this pattern with others.


debs says
Love your patterns!
Virginia says
Thanks for sharing your pattern and I can't wait to try it out. Looks like a lot of fun to make.
Genie says
My aunt suggested a band across the back of the dishcloth to slip three fingers through to make it easier to use. Works great!
Tamara Kelly says
Love that idea!
moogly says
Thanks so much! 😀
mzklever says
Wow! Thanks so much for the excellent instructions and great photos. I've been really curious about the Wiggly Crochet, but haven't been able to find anything that explained it until now. I love it! It looks like a great way to use up scrap pieces of yarn.
diane says
love the wiggle pattern trying it now your pictures help and find this very interesting stitch thank you thank you for sharing
michele maks says
Brilliant! Thank you!
Jackie says
I love making wiggle trivets but I hate making the base mesh; I don't suppose you can buy them somewhere...I would buy them!
Tamara Kelly says
Hm, that would be so cool!
Dorothy Hines says
I love this. I can't wait to make this. Thank you for your wonderful patterns.
Christine @ Projects Around The House says
What an awesome pattern! I love the ruffles. I pinned this for a future project
Micki says
Thanks so much for the tutorial. I made this hotpad and had a lot of fun with it. I'm already thinking up stitch combinations to use this in.
moogly says
Awesome Micki! It's fun, isn't it? I use my big one almost every day - it's just the right size for both my big crockpot and my cast iron skillet! 😀
Donna Hassey says
I love this pattern I'm excited to do this as stocking stuffers for my grown children!
fariba says
heloo
i am fariba
thank you
wery beautiful and easy
i am in iran
i dont wery english
thank you
moogly says
thank you! you are welcome. 🙂
Dee Grove says
Beautiful. Thanks for sharing your pattern. I can't wait to get started on it. I just found the pattern. I like making projects like this while watching tv with my hubby.
Linda says
Thanks for sharing so many of your beautiful patterns.
Is there anyway to print your patterns?? I've tried printing the entire page ~ highlighting and printing just what has been highlighted ~ and all it prints is the first page/picture.
This is a beautiful pattern and I was thinking of making it into a pillow!!
moogly says
Linda, you are very welcome! And I think a pillow is a great idea!
To print the patterns, look for the green Print Friendly button at the bottom of each post - that will take you to a page where you print a full copy without ads and with or without the photos. 🙂
Linda Mathews says
I have never made these; but I have several made in the 50's and left to me when relatives died. Those are made with crochet thread, not yarn. I suggest using all natural yarn, like Peaches N Cream all cotton if using for hot pots. Thanks for the pattern in the round. Mine are square.
moogly says
Great point Linda - definitely cotton only! Those sound like lovely heirlooms. I'm always impressed with threadwork - such patience!
natalie meherg says
Just finished my first dishcloth for my daughter-in-law for Christmas. Cant wait to make the trivet and go on to make the rug you spoke of. Thank you for a fun and easy design!!!!
moogly says
So glad you like it! I find the dishcloth makes a great trivet for small pans too. 🙂
Toni Doel says
This looks awesome! One question: by "seamless join" do you mean slip stitch or something else? Can't wait to get started!
moogly says
Toni I have a video tutorial on the seamless join technique I use here: https://www.mooglyblog.com/crochet-video-tutorial-seamless-finishing-when-working-in-the-round/ It's an alternative to the slip stitch that gives a more "invisible" finish. 🙂
Mary Young says
A few years ago I bought a square trivet with a raised surface at a sale and was quite enchanted but never could figure out how it was made or what to call it. Now I know! I figured that it was somekind of grid.......... I know that raised flowers is considered Irish but does this attributed to any
country or out of your amazing imagination? Thanks. Mary in NH
moogly says
Mary, Wiggly Crochet has been around for a long while, though as far as I know it's always been done one a square grid shape. I came up with working it in the round on my own, but I can't say no one else has every thought of it - I'm sure they probably have, I just haven't seen it (yet anyway). 🙂 Thank you!
Peggy says
thank you for the lovely pattern and instructions! Hope I can make some for gifts with the upcoming holidays! Thanks again.
carolyn seeger says
wow this is so cute thank you for pattern
Kassey says
Love you patterns.. will certainly try it out in this holidays
Jackie says
Hi - I am a little confused. In round 3, are you sure you mean to [dc, ch 1, dc] in the next st or in the next ch sp?
moogly says
Good catch Jackie - you're right! I'll edit the pattern now. Thank you!
MamaJ12469 says
I am currently teaching myself to crochet via the internet. I found your pattern and ran right out to MIchaels to pick up my yarn. I have spent the weekend crocheting it and while I've had to tear it out a few times due to my own inexperience, I am currently fnishing the last row of ruffles. This has been fun and I look forward to giving this as a gift to my beloved Aunts for Christmas. Thank you for the great idea!
moogly says
Wow, I'm really impressed - this isn't an easy pattern! Way to go, MamaJ!
Brenda jane says
So many pretties, thank you. Your work is beautiful
moogly says
Thanks so much Brenda!
Linda Hielscher says
Round 3: Ch 4, dc in the same ch sp. Ch 1, dc in the next ch sp. *Ch 1, [dc, ch 1, dc] in the next ch sp. Ch 1, dc in the next ch sp. Repeat from * to end. Ch 1 and join with a sl st into the ch 4 sp, (18 dc, 18 ch)
Hi, I'm new to crocheting and I keep getting confused on this part of the pattern and I can't figure out what I am doing wrong? I keep ending up with 26 dc and 24chains ? I started with 12 dc and ch.
moogly says
Hi Linda! I'm not sure where you're putting the extra stitches, but another way to think of the instructions for this row is that you are alternating one stitch in one space with two stitches in the next space (with 1 ch between each st). So you start with 12 sts/spaces, and you increase by 6 because you are adding one additional st (and ch) in every other space.
Does that make a little more sense?
Linda Hielscher says
lol, I finally figured out what I am doing wrong. I was crocheting into the individual chains not chain space. Duh !!! Mystery solved! Thanks for your quick reply. 🙂
moogly says
Oh good! It was hard to guess without seeing it!
Linda Hielscher says
I've got the base mesh done and one row of ripple. This is so adorable, I can't wait to finish it!
moogly says
😀 I'm glad you're enjoying it Linda!
Lee Ann says
This is so pretty! Thank you!! 🙂
______
Lee Ann H
Posted with Blackberry Z10!
Crochet...Gotta Love It! Blog
Tamara Kelly says
You're welcome Lee Ann, thank you for saying so!
Heather says
Love this pattern! I have made two for myself and I have had some friends ask if I would make some for an upcoming craft fair. Do you mind if I use your pattern to make trivets to sell at an Autumn Festival? Thanks so much!
Tamara Kelly says
That would be great Heather! My full FO policy is spelled out on the About page! 🙂 Good luck with your fair!
Heather says
Thanks!
Marrie says
OH GOSH!..this is epic! :P..JUST AWESOME!
katayoun says
very nice
i am iranian(persian)
Tamara Kelly says
Thank you katayoun!
Marla says
I just finished making my first dishcloth using your pattern and instructive photos. They were clear and easy to use. I am very pleased with the results. I am left-handed and so I worked to the right instead of the left on the ruffle rounds. It worked perfectly. Thank you.
Tamara Kelly says
So glad to hear it worked! I need to learn more about left handed crochet.
Pamela Poulin says
Thank you for your wonderful patterns.
Tamara Kelly says
😀 Thank you Pamela!
Michele says
This is a great pattern. Years ago (back in the early 70's) the hot thing was to make the "grid" in the shape of a square and make big throw pillows out of this pattern. Thanks for the great idea!
helen says
having a hard time with the instructions on row 3. cant end up with the correct amt. of dc.
Tamara Kelly says
Sorry to hear it Helen! Basically it's V sts and single dc sts alternating, with ch sts in between.
helen says
THANKS FOR RESPONDING. I DID FIGURE IT OUT EVENTUALLY. NOW TO THE SECOND LAYER. OY VEY! WILL LET YOU KNOW HOW I DO.
THANKS AGAIN
Mary says
Everything old is new again, as the saying goes. We were making wiggly trivets in the early 80's. All the patterns were square then too, but like you I wanted a round one so I came up with my own round pattern as well back then. My grid was a bit different than yours. I'll have to give yours a go,
Tamara Kelly says
🙂 Thanks Mary! And absolutely!
Anita Gonzales says
wiggle it trivet I am having trouble getting the wiggle just right! And I have been crocheting over 49 years. Is there a tutorial?
I see the step by step but am missing a step somewhere!
Tamara Kelly says
There's not a tutorial just yet, but I hope to make one very soon!
Texasc says
I made this but it sort of curled up on me. For some reason it looks like a cap. What did I do wrong?
Tamara Kelly says
It could be a matter of tension - working the pattern with a larger hook might help. If it's only slightly cupped, blocking it should help too!
sheila says
Been making these for years........Like to use rug yarn, tho now hard to find.
Can be made out of acrylic, Tho use upside down.
A little melting may occur, but doesn't affect good side and can still be used as decorative matt.
Great to set a casserole, pot of chili, hot dish in the middle of the table.
[[ Can you tell I'm from Minnesota?]]
merry says
Thanks so much for the lovely pattern you sharing. I will make it for my kitchen and put it on the glass dining table.
Tamara Kelly says
You're very welcome merry! 😀
pauline lynch says
Hi, Im Making this as a rug, about 3ft across but it is terribly warped. When I pick it up its like a giant mushroom!! Is there a chance it will lie flat when it's finished do you think? I have about another six inches to do. Each round is taking an hour!!!, I will be very disappointed with myself if it all turns out to be a waste of time
Tamara Kelly says
It's hard to say without seeing it, but I would recommend a severe blocking to help with the warping.
ELHAM says
THANKS FOR THE PRETTY PATTERNS
Tamara Kelly says
😀 Glad you enjoy them Elham!
Patricia says
I love it, I tried it and turn beautiful, thanks for sharing
Tamara Kelly says
😀 I'm so glad to hear it, thank you Patricia!
Misty says
Hello my name is misty and I am sort of new to crochet and I am trying your wiggle it trivet pattern and I am just now working on the base mesh and I can't figure out why it is curling in almost like a hat. Please help if you can or if you know of a video on how to make a base mesh in the round and you could tell me where to find it I would greatly appreciate it thank you and God bless.
Tamara Kelly says
Hi Misty! It sounds like you need to go up a hook size! 🙂
Regina says
Hi!! I was so surprised when I came across this pattern. Years ago, probably the late 60s, my grandma and mom made hotpads that looked like yours. Except they were square and made
from knit croschein (sp). I have always wanted to find a pattern and make some. Thank you for sharing your pattern. I can't wait to get started.
Tamara Kelly says
😀 Thank you Regina!
Emily Reiter says
I can't believe you said EMBIGGEN!!! It's a perfectly Cromulent word. 😀
Tamara Kelly says
A noble spirit embiggens the smallest man. Heheh!
Doris says
I'm looking for this pattern except in a square shape
Tamara Kelly says
I'm afraid I've only designed a circle at this time!
Angelica says
Lol! Have just discovered these... Great patterns really, as all of yours! Thanks a lot for sharing!
What I don't understand right now: how is it that I hadn't seen or noticed them until today if any time I come to your site I take a look at ALL your patterns? Well, another of those questions without answer...
Tamara Kelly says
😀 Thanks Angelica! I have over 250 patterns, so it's easy to miss a few. 😉
Karin Bingham says
I love the base as it is as well. I've made several as a doily or hot pad.
Tamara Kelly says
😀 I'm so glad to hear it!
Ruth M says
Hi Tamara,
I am finally ready to try a wiggly crochet--but I want to do a rectangle. I tried your suggestion to go to About.com--using your link and searching on google--but get nothing. I hadn't realized About was absorbed. Have you got a current link for their instructions? Or anyone's instructions so I can do a rectangle version? K-town seems to be mentioned in many places--but that's no longer there. The item on Rvvelry has been taken down--so I am coming up blank. I'd be glad for just a sentence or two on the basic method of constructing the mesh, if that were feasible. Thanks for any sies you can direct me to--or help, if you can.
Tamara Kelly says
Hi Ruth! I believe you could either just work mesh in rows, or you could make something like a solid granny square, replacing every other dc with a ch 1 and skip 1. Which method you choose would depend on how you wanted your wiggles to go! 🙂
Ruth M says
Thanks, Tamara. I'll give your circular one a try to get the feel of it, and then sample your two suggestions here to see which might work for the project I want to design. I've not been clear how the mesh is created--and you've given me two alternatives! Thanks for responding!
Ruh
Tamara Kelly says
Happy to help! I hope you enjoy it!
Stacey Reese says
Why does the base look like a lot of stitches? Saw the sunflower one and it didn’t look as busy on the base.
Thank you
Tamara Kelly says
You need different bases depending on the final shape you are trying to make! 🙂