
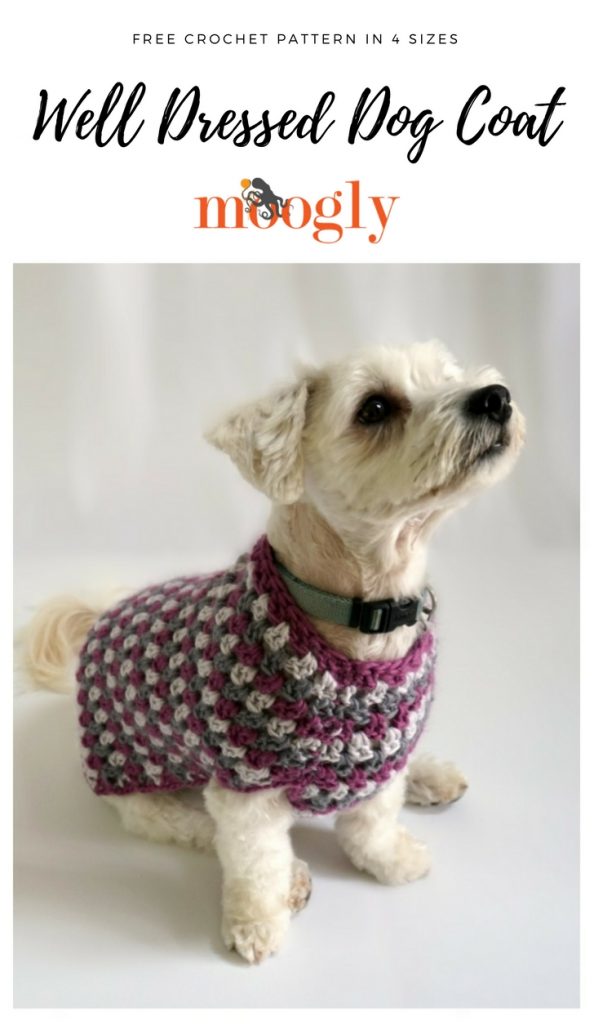
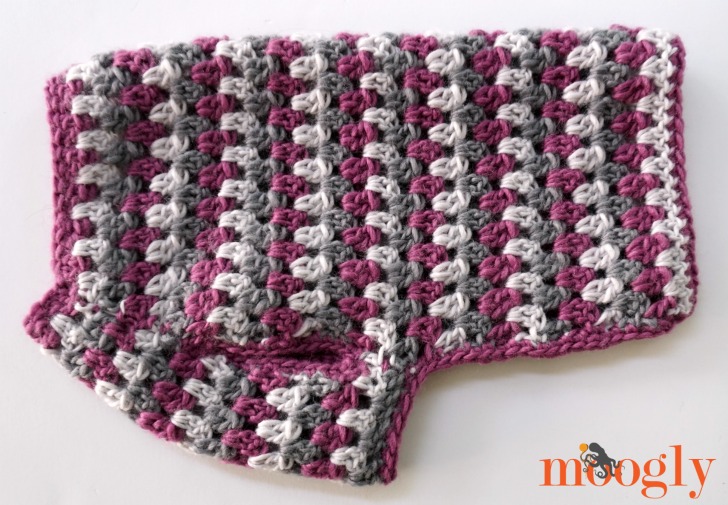
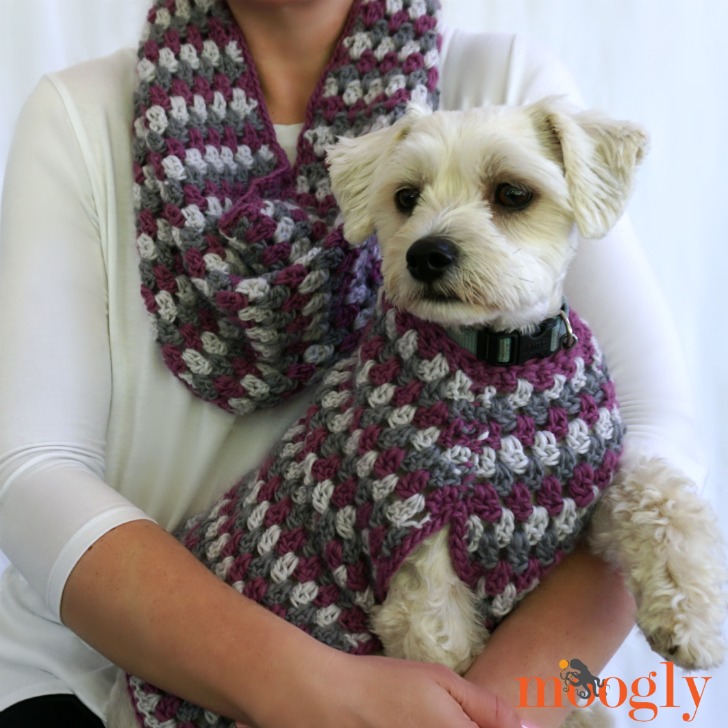
The Well Dressed Dog Coat is ready to perk up your pet with gorgeous colors - and a stitch pattern that's both familiar and fun! And there's a matching cowl too!
Disclaimer: This post includes affiliate links; yarn provided by Lion Brand.
Prefer an ad-free PDF? You've got options!


Prefer the blog version? Keep scrolling!
Dog Duds Done by You!
The Well Dressed Dog Coat is made with Lion Brand New Basic 175. It's a roving style single ply acrylic wool blend that looks amazing in crochet stitches! I've really enjoyed working with it over the last couple of weeks, and I think you will too.

As for the coat itself, it comes in 4 sizes! It's got a bit of stretch, so pick the size closest to the chest measurement of your dog, going with the larger size if it's a draw.
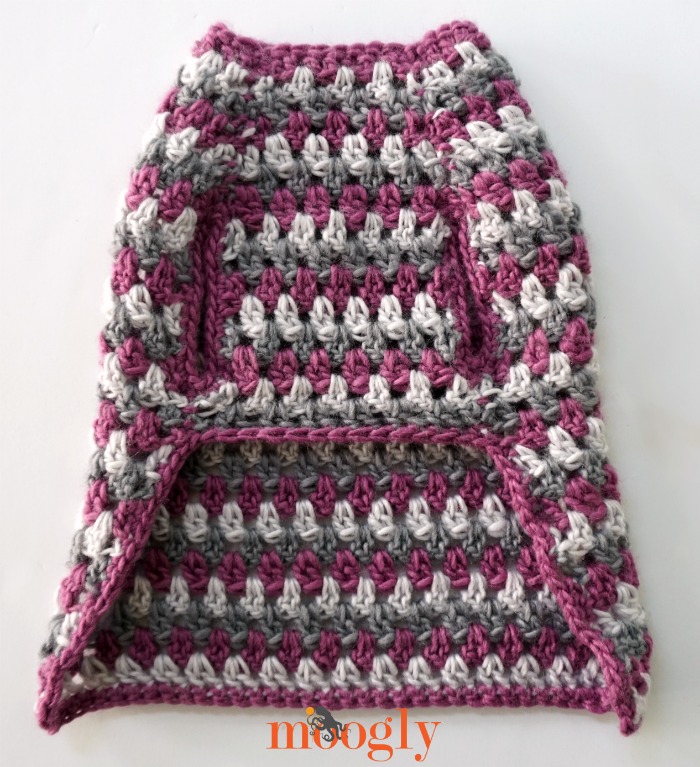
The Well Dressed Dog Coat is made in two parts - the back, and the belly. You'll see that the first row of each piece is made with foundation double crochet stitches. These super stretchy stitches create the neckline, so it's important to use foundation stitches so it can slip on and off your dog without irritating them. That is also why there's not a final edging around the neck - gotta preserve that stretch and keep your well-dressed pooch happy!
Well Dressed Dog Coat
Add this pattern to your Ravelry Queue and Favorites
US-K, 6.5mm hook - Furls Crochet
75-250 yds Lion Brand New Basic 175 (75% acrylic/25% wool; Worsted/yarn symbol “4”/UK:10-12 ply; 175 yds/160 m; 3.5 oz)
A: Plum - 1 ball all sizes
B: Whisper - 1 ball all sizes
C: Grey - 1 ball all sizes
Gauge: 10 sts x 7 rows = 4"/10cm in main st pattern
Sizes: Small (14" chest); Medium (18" chest) - shown; Large (22" chest); Extra Large (24.5" chest)
Helpful Links and Tutorials
FDC - Foundation Double Crochet
Changing Colors for Striped Patterns
Matching Pattern: Well Dressed Cowl
NOTES:
In Piece #1 and the first half of Piece #2, stitch and row counts for the different sizes are written in the pattern as follows: Small(Medium, Large, Extra Large). Please mark the numbers that correspond to the size you are making before you begin.
Switch colors at the end of every row, cycling through colors A, B, and C - see linked tutorial above on Changing Colors if needed.
Well Dressed Dog Coat INSTRUCTIONS:
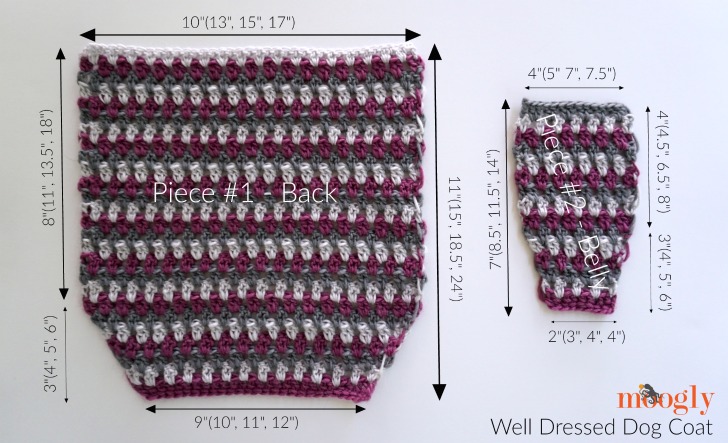
Piece #1 - Back
Row 1: FDC 24(26, 28, 30); turn. (24(26, 28, 30) sts)
Row 2: Ch 3 (counts as first dc here and throughout pattern), dc in first st, skip next st, 2 dc between previous and next st, *skip 2 sts, 2 dc between previous and next st; rep from * across, 2 dc in last st, turn. (26(28, 30, 32) sts)
Row 3 - 5(7, 9, 11): Repeat Row 2. (32(38, 44, 50) sts)
Here is a quick hand-drawn chart for Rows 1-3: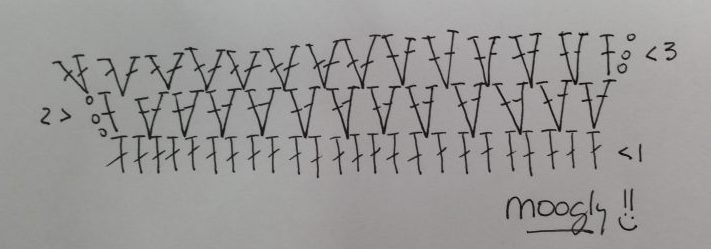
Row 6(8, 10, 12): Ch 3, skip next st, 2 dc between previous and next st, *skip 2 sts, 2 dc between previous and next st; rep from * across, dc in last st, turn. (32(38, 44, 50) sts)
Row 7(9, 11, 13): Ch 3, dc in first st, *skip 2 sts, 2 dc between previous and next st; rep from * across until 3 sts remain, skip 2 sts, 2 dc in last st, turn. (32(38, 44, 50) sts)
Row 8(10, 12, 14) - 19(26, 33, 43): Repeat previous 2 rows; break both yarns. Set aside Piece #1 until assembly.
Piece #2 - Belly
Row 1: FDC 6(8, 10, 10); turn. (6(8, 10, 10) sts)
Row 2: Ch 3, skip next st, 2 dc between previous and next st, *skip 2 sts, 2 dc between previous and next st; rep from * across, dc in last st, turn. (6(8, 10, 10) sts)
Row 3: Ch 3, 2 dc between first and second st, *skip 2 sts, 2 dc between previous and next st; rep from * across, dc in last st, turn. (8(10, 12, 12) sts)
Row 4: Ch 3, dc between first and second st, *skip 2 sts, 2 dc between previous and next st; rep from * across until 3 sts remain, skip 2 sts, dc between previous and next st, dc in last st, turn. (8(10, 12, 12) sts)
Row 5: Ch 3, dc in first st, skip next st, 2 dc between previous and next st, *skip 2 sts, 2 dc between previous and next st; rep from * across until 2 sts remain, skip next st, 2 dc in last st, turn. (10(12, 14, 14) sts)
Row 6: Repeat Row 2. (10(12, 14, 14) sts)
AFTER ROW 6, GO TO THE INSTRUCTIONS FOR YOUR SIZE BELOW:
Small Piece #2 Continued:
Row 7: Ch 3, dc in first st, *skip 2 sts, 2 dc between previous and next st; rep from * across until 3 sts remain, skip 2 sts, 2 dc in last st, turn. (10 sts)
Row 8 - 12: Repeat Rows 6-7; break yarn, go to Assembly instructions below.
Medium Piece #2 Continued:
Row 7: Repeat Row 3. (14 sts)
Row 8: Ch 3, dc in first st, *skip 2 sts, 2 dc between previous and next st; rep from * across until 3 sts remain, skip 2 sts, 2 dc in last st, turn. (14 sts)
Row 9: Ch 3, skip next st, 2 dc between previous and next st, *skip 2 sts, 2 dc between previous and next st; rep from * across, dc in last st, turn. (14 sts)
Row 10 - 15: Repeat Rows 8-9; break yarn, go to Assembly instructions below.
Large Piece #2 Continued:
Row 7 - 9: Repeat Rows 3-5. (18 sts)
Row 10: Ch 3, dc in first st, *skip 2 sts, 2 dc between previous and next st; rep from * across until 3 sts remain, skip 2 sts, 2 dc in last st, turn. (18 sts)
Row 11: Ch 3, skip next st, 2 dc between previous and next st, *skip 2 sts, 2 dc between previous and next st; rep from * across, dc in last st, turn. (18 sts)
Row 12 - 20: Repeat Rows 10-11; break yarn, go to Assembly instructions below.
Extra Large Piece #2 Continued:
Row 7 - 9: Repeat Rows 3-5. (18 sts)
Row 10 - 11: Repeat Rows 2-3. (20 sts)
Row 12: Ch 3, dc in first st, *skip 2 sts, 2 dc between previous and next st; rep from * across until 3 sts remain, skip 2 sts, 2 dc in last st, turn. (18 sts)
Row 13: Ch 3, skip next st, 2 dc between previous and next st, *skip 2 sts, 2 dc between previous and next st; rep from * across, dc in last st, turn. (18 sts)
Row 14 - 25: Repeat Rows 12-13; break yarn, go to Assembly instructions below.
Assembly Instructions:
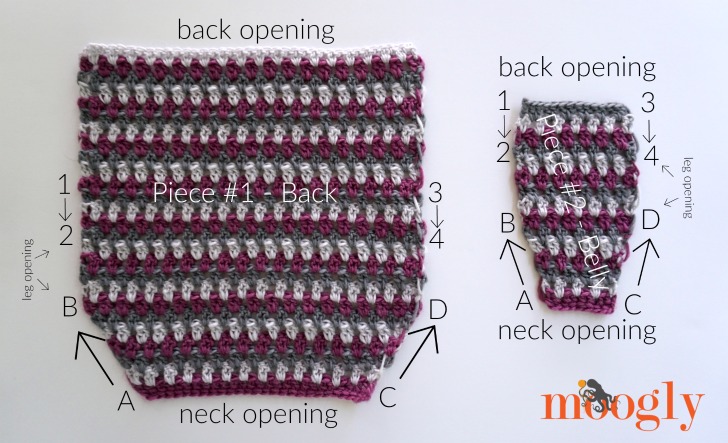
Step 1: Matching points A-D on the pieces as shown above, sew from A to B and C to D. Recommended method: whip stitch seaming
Step 2: Matching points 1-4 on the pieces as shown above, sew from 1 to 2 and 3 to 4. The seam should go from the back of the Belly piece toward the front of the coat for 1"(1", 2", 3").
Step 3: With Color A, sc evenly around leg openings, join and break yarn.
Step 4: With Color A, sc evenly around back opening, join and break yarn.
Now, isn't that snazzy!? (And that's a word I haven't heard in a while!) The Well Dressed Dog Coat is pretty darn quick to crochet - meaning you can whip one up for every occasion! Lion Brand New Basic 175 comes in all main colors, so you can go with oranges for Halloween, red and green for Christmas - and don't forget your favorite sports team!
And to match - there's the Well Dressed Cowl!
The Fine Print
Written pattern copyright Tamara Kelly 2017, all rights reserved. Please do not reprint or repost this pattern. Please do link to this page to share this pattern with others. If you wish to make items for sale from this pattern or translate it to another language, please visit the About page for details. Thank you to Lion Brand Yarn for providing the yarn for this pattern.


TERRI VASSMER says
Great pattern!!! Love my fur baby.
Tamara Kelly says
😀 I'm so glad you like it!
Lori says
Hi, I am attempting to make your beautiful dog sweater for my grandpug and got to row 6. Unfortunately, this where I am lost. I thought that I should have 44 stitches (lg pattern) after completing this row. As I read the comments I realized that there was only a 2 stitch increase each row until row 7 and that is where I should have 44 stitches. I have 36 stitches after completing row 5 which I believe is correct but I am not sure how I am going to gain enough stitches to get 44 by row 7. Also, what do the numbers located in () mean after the row #? Sorry so long and thank you for your help.
Tamara Kelly says
Hi Lori! You should have 44 stitches after Row 10.
When it says "Row 6(8, 10, 12)" the numbers refer to Small(Medium, Large, Extra Large). It's the same for the stitch counts at the end of the row: "(32(38, 44, 50) sts)" is (Small(Medium, Large, Extra Large) Sts)
Does that make sense?
Lori says
Thank you so much for the quick response. I am sorry for my mental block but I may have to go back a few rows because I read the pattern as row 3-5 to repeat row 2 and that’s what I did. Funny that the counts worked out as I have 36 at the end of row 5 which I thought was correct, but maybe it isn’t I am just confused about what I am suppose to do with the dog sizes at the beginning of row 3. Again, I am sorry for making this so confusing.
Tamara Kelly says
So you would want to repeat Row 2 through Row 9 for a Large. Here are your stitch counts for Size Large Piece 1, in the large size:
Row 1: 28
Row 2: 30
Row 3: 32
Row 4: 34
Row 5: 36
Row 6: 38
Row 7: 40
Row 8: 42
Row 9: 44
Rows 10 - 33: 44
Gladys Fourie says
Great pattern will like some dog dress and neck patterns. Thanks
Sharon Gratner says
Can I make an extra small?
Tamara Kelly says
I'm not sure what the measurements on that would be? I based these on commercial dog coats and sweaters I found online. 🙂
Beth says
How do I measure the chest to get the correct size? Are you measuring front to back ? Or around the body right behind the front legs?
Tamara Kelly says
Hi Beth! Great question! You measure right around the widest part of their rib cage, just behind the front legs.
Judy says
I don't know which is cuter--the coat or the dog! Always looking for more ways to pamper my pooches, so thanks for this pattern!
Angela says
I'll be making a few for our old man, a miniature Schnauzer. I also need to make a super large one for my girl Catahoula. Her chest is 28.5. I would guess that the FDC for the back piece would be 34 and then I would add 4 more stitches per row for the X: Belly piece?
Thanks
Tamara Kelly says
Hi Angela! The main thing is to make sure that the largest measurement of both pieces adds up to about 28-29 inches.
Nan says
This is so darn cute! I am allergic to most animals, and have none of my own, but my neighbor has the sweetest little Italian greyhound who is quite a fashion animal. Can't wait to make this for Asti. Thanks for the pattern and the adorable photo.
Tamara Kelly says
🙂 Thank you!
Sharon Mahoney says
Hi, Tamara! Thank you for designing a pet sweater. I look forward to making this for my cocker spaniel. The only question I had after reading through was how do you measure for the "chest measurement"? I found a website that has a good picture of a dog and showing how to measure. Maybe others have this question. Here is the website address http://paradiseamerica.hypermart.net/efy/dogmeasure.html .
Thanks once again for making this pattern available!
Audrey says
Ay i ask which size you used for your cocker spaniel. I have one im planning to make this for also.
Sharon Mahoney says
Hi, Audrey! I measured my cocker (he is a big boy) as per the guidance of the link I posted in my original comment http://paradiseamerica.hypermart.net/efy/dogmeasure.html. He measured 25 1/2 inches. That makes him a little over Tamara's pattern x-large. Because there is unique sizing to each dog, I encourage you to measure yours by using the instructions on the link above.
I hope Tamara will weigh in on this, but looks like I will have to increase her pattern by 2 stitches to get to size I need.
Good luck!
Tamara Kelly says
Hi Sharon! Thank you for sharing the link! 🙂
Nadine Z says
Tamara - The coat is adorable!!! It is a perfect pattern for my dog, which is impossible to find. I can't wait to make it for Buster just in time for winter. He said to tell you thanks very much...he is very grateful! He has really short hair and gets very cold very fast here in central Wisconsin. I am sure he will enjoy the outdoors much more once he's all snuggled up in your lovely coat. Thank you for such a great pattern!!
Tamara Kelly says
😀 Thank you Nadine!
Angela M Payton says
I have a question for making the coat for a dog with a 28.5 inch chest measurement. 34 for FDC? What would it be for the other measurements.
Tamara Kelly says
Hi Angela! You are welcome to try upsizing it for larger dogs but I don't have the dimensions for those.
Sheryl says
I started making this and I think that there is a problem.
I thin k that part of the back instructions are mixed up with the belly.
the way it is written the back is wide and short and the belly is long and thin....
I'm so confused.
Tamara Kelly says
Hi Sheryl! No, that is correct - the back is wide, covering from the sides of the chest across the back, and the belly piece is long and thin and runs up the center of the chest 🙂
Sheryl says
I guess I'm reading the pattern wrong or something.
In your pictures, clearly the back is wider and longer.
You're measurements say that the back is 11 X 9 and the belly is 7 X 2 in the small size. However you have the pattern saying the back is only 8 rows and the belly is 12 rows...I don't understand this.
It seems that the back should have the additional rows and the belly should stop at 6...
Tamara Kelly says
Hi Sheryl! The last row of the Back Piece #1, the last row of instruction is for Row 8(10, 12, 14) – 19(26, 33, 43). So for the smallest size, you go to 19 rows, for the largest 43.
Sheryl says
omg, can't believe I didn't see that...I knew I was missing something!!
thank you!
Lorie says
I was making the same mistake. I was hoping someone else asked about this. This pattern is so cute. Thanks
Linda mcmillan says
Tamara, I love this sweater and I'm looking forward to making it for my little pup.
I have a question regarding the pattern.
When it says to DC Between previous and next stitch, does that mean to DC between the posts of the DC in previous row?
Tamara Kelly says
Hi Linda! Yes, between the posts - like a granny square. 🙂
diane says
I to am confused on this, especially on the 1st row. Is there a picture or video showing how this is done please?
Tamara Kelly says
There is a link to the FDC stitch under helpful links above, or at https://www.mooglyblog.com/foundation-double-crochet-fdc/ 🙂
shanan says
Hi Tamara, thanks so much for designing this sweater. I immediately started one for my elderly little dog. I am working on the belly piece in size small and have a question. The stitch count for row 7 says 12, which is an increase of 2 from row 6, but when I follow the instructions of row 7, it doesn't increase. Can you help me with my confusion? Thank you!
Tamara Kelly says
Hi Shanan! I'm sorry, that was a typo - it should be 10 again. 🙂 I'll edit it now! Thank you for letting me know!
Shanan says
Thank you!
Becky says
Quick question, from row 3 on, is one crocheting in between the the groups of 2 stitches, or in between the 2 stitches? In other words, like a (traditional) granny square, or like a V-stitch without the chains?
Love the pattern, thank you!
Tamara Kelly says
Hi Becky! It would be like a granny square. 🙂
sarah says
How much ease/give is there to this sweater? I just measured my Rottweiler's chest at 32.5". I'm guessing with that big a disparity between the XL size and her actual measurements, I'll need to make some stitch count adjustments- unless the sweater is really stretchy. I'm really excited for the pattern, though! So cute.
Tamara Kelly says
Hi Sarah! There is a fair bit of stretch - I can get about 4" in on the Medium size. 🙂
Sarah L says
Thanks!
gina says
I am working on the medium size now. I can't get past row 2. Row 2 is 28 stitches and then row 3 is a repeat of that row but has 38 stitches. I am very confused
Tamara Kelly says
Hi Gina! I think I see what happened! The stitch counts are for the number of stitches after the repeats of that row. So that line reads:
Row 3 – 5(7, 9, 11): Repeat Row 2. (32(38, 44, 50) sts)
Since you are making the medium size, for you it would read:
Row 3 – 7: Repeat Row 2. (38 sts)
The 38 sts is what you should have after Row 7, not Row 3. Does that make sense?
Larissa says
I made this last night. The first row is kind of confusing. Maybe a picture of what you mean? a row count or inch count would be nice so i could know exactly were i am suppose to start sewing the pieces. For me it's not really clear. I guessed based on the picture, but ended up moving it to make the openings bigger. From the top i went 6 rows down to seam it together.
Other then that i always love your patterns. Thank you for posting!
Tamara Kelly says
Hi Larissa! I'm sorry you had trouble! I'm not sure what you mean by the first row is confusing - it has a stitch count for each size, and a linked video tutorial for the stitch.
You start sewing at Row 1 and stop when the rows start working even. Then at the belly match up the rows with the inches given - and of course, adjust for your dog, as dogs are as varied as people. 🙂
Jean Jones says
As always i love your patterns. Only problem I have is when downloading the patterns I can't get the photos to load. I really like to have photos so I know what I'm looking at making. Maybe I'm doing something wrong. THANKS AGAIN!
Tamara Kelly says
Thank you! I'm sorry, I'm afraid I have no idea why the photos won't download for you. Perhaps it's timing out on your computer?
Ann Downey says
Tamara, I love this pattern and I'd like to make one of these as a Christmas gift for a coworker, but don't want to ask her to measure her dog as that would kind of let her know what I was planning. I do know her dog weighs about 23 pounds. By guessing, I would think that medium might work? Could I ask how much your dog weighs? Thanks so much!
Tamara Kelly says
Thank you so much Ann! Our dog is about 20 lbs, so unless her dog has a more "barrel chested" shape, like a bulldog, the Medium *should* be fine. 🙂
Ann Downey says
Thank you!
Paula Johnson says
Tamara I have a question: When you say, "2 dc between previous and next st", do you mean make 2 dc in the next stitch? I can't quite figure out what you mean. Love the pattern by the way. Your fur-baby looks a lot like mine, so I know my puppy will look good, too. Thanks for the pattern.
Tamara Kelly says
Hi Paula! Thank you! 🙂
I mean to work right between the posts of the stitches - as if there was a chain 1 space to work into, although there is not. Does that make sense?
Kaitlin says
Hi there.
I am new to crocheting and am having trouble getting past row 2.
I just can't seem to figure out how to.skip 2 stitches and only do a cluster of 2 stitches. I read through your comments and noticed that you likened it to a granny square, but granny squares need a cluster of 3 DC to make the stitch count the same.
I would appreciate any help you could give
Tamara Kelly says
Hi Kaitlin! The pairs of stitches are worked between the posts - as if there was a chain 1 space there to work into, although there is not. Does that make sense?
Kaitlin says
Thank you for your quick reply although it doesn't really help I'm still don't know how to get the Stitch count to match up. I'm starting with 26 FD but as I skip two stitches and then crochet two stitches it cuts my Stitch count in half and I don't know what I'm doing wrong.
Thanks for your help but I may have to
Tamara Kelly says
If you skip 2 sts, but crochet 2 more, you should end up with the same amount of stitches. Would a chart help?
Kaitlin says
If you haven't turned I would like to try it although I don't know if it will help I think I may need to find a new pattern, may be too new to crochet to do this pattern
Tamara Kelly says
I'm going to add a hand-drawn chart for Pc 1 now. 🙂
Kaitlin says
Thank you
Lisa says
Thank you for this wonderful pattern!!! May I ask what stitch you used for seaming?
Tamara Kelly says
Hi Lisa! I'm sorry I forgot to mention that, I used the whip stitch seaming method: https://www.mooglyblog.com/whip-stitch-seaming/ 🙂
Lisa says
Thank you for your reply and providing the link! I've finished both pieces and am ready to sew. Making these for my mom's three doggos for Christmas :-))
Tamara Kelly says
😀 Yay, I hope you'll share a photo after the holidays if you get the chance!
Cai says
Tamara, thank you so much for the pattern! I love it!!
I am having a small issue. Where you say
"Row 3 – 5(7, 9, 11): Repeat Row 2. (32(38, 44, 50) sts)"
I take that to mean (i am making the medium size) that i need to have 38 stitches for these rows. Where or how do i work those in? I am a very literal and visual person. I have enlarged the pics and counted the stitches but still dont get it. Sorry to be a pain, but i would appreciate any clarity you can give me.
Thank you. 😊
Tamara Kelly says
Hi Cai! You will have 38 sts at the end of Row 7. The stitch count for each row will go up by 2 sts per row.
So for Row 2 you should have had 28 sts, then Row 3 is 30, Row 4 is 32, Row 5 is 34, Row 6 is 36, and finally Row 7 is 38. 🙂
Lisa says
I’m working on the belly piece and am having trouble on roe three. For a medium it says that I should end with 10 sts. But I actually only end in 7? Not sure what I’m doing wrong.
Tamara Kelly says
Hi Lisa! It's so hard to say without being there and seeing what you've got so far, but I can try to help. It sounds like perhaps you aren't counting the ch 3 as a stitch (it counts as the first dc), and like maybe you missed a pair of dc sts somewhere - I'm guessing at one of the ends? Make sure you have 2 dc between the first and second st of the previous row, as well as between the last and second to last. I hope that helps!
Pattie Arnold says
I'm also stuck on this row. I have 8 stitches in the second row, I chain 3 and 2dc between that and the last stich of the previous row, that makes 3 stitches . There are 3 clusters of 2 stitches in the second row so adding 2dc between those creates 6 stitches for a total of 9. I can't seem to find a way to get 10 stitches in this row. Here's what I have so far.
https://m.facebook.com/story.php?story_fbid=10212964343877952&id=1071939800
Tamara Kelly says
Hi Pattie! As far as I can tell you're just missing the dc in the last st:
Row 3: Ch 3, 2 dc between first and second st, *skip 2 sts, 2 dc between previous and next st; rep from * across, dc in last st, turn. (8(10, 12, 12) sts)
Pattie Arnold says
Hi Tamara, I actually did do 2 DC before the first DC of the previous row. Any other ideas?
Tamara Kelly says
Yes, but according to the photo you didn't dc in the top of the ch 3/first dc of the previous row. 🙂
Tenna says
Hi Tamara,
I have a chuichua that is 7lbs, do you think the small size would work for him , thanks for the pattern,
Tamara Kelly says
It depends on how big around his chest is! 🙂
Danica Ljubisavljevic says
Hi Tamara, I plan on making this sweater for a friend's Jack Russell terrier. But I have no idea which size to use. Has anyone made this for that breed or a breed that's similar size to them? Thanks in advance.
Tamara Kelly says
According to the internet, Jack Russells have an average chest measurement of 14", so the Small would be a good bet. 🙂
Danica Ljubisavljevic says
Thank you so much for your quick reply! I'll try the small one then! Thanks again xx
Yolanda says
I'm so excited to crochet this pretty sweater for my fur baby. Tinkerbell is apple head chihuahua. She's smaller than the average chihuahua so my question is, would the small pattern do?
nATALIE says
Thanks so much I like it very much, it will be my baby grils first jacket.
Kimberly says
Just to make sure I am doing this right — rows 15-43 for the back piece are just repeating the previous two rows, correct?
Tamara Kelly says
Yes, you've got it! 🙂
Kimberly says
Thank you for your quick response! Another question for you because I like to over think things - so do we start of with the size of the neck then work up to the size of the chest or automatically start with the chest measurement?
Tamara Kelly says
It starts at the neck. 🙂
Lisa Barnett says
Hi I'm loving this pattern but I've been fighting with it from the beginning. I'm doing the large size and so I did the FDC for 28 stitches and then when I start row 2 and follow the chart and the written directions I still only get 28 stitches not 30. Am I doing something wrong???
Tamara Kelly says
My best guess is that you are skipping 2 sts at the beginning and end where you are only supposed to skip 1?
Lisa Barnett says
This is what I have so far (picture) it looks just like the chart though.
Tamara Kelly says
I'm afraid pictures don't work in the comments software. Could you email me at tamarakelly@mooglyblog.com?
Liz Johnson says
I can’t wait to make this for my dog, thanks for the pattern. What kind of dog do you have? It looks just like my dog, a Coton de Tulear. Thanks again!
Tamara Kelly says
Thank you! He's a "Teddy Bear" - half bichon frise and half shih-tzu! 🙂
Beverly says
Thank you so much for this pattern. I finished a large one today and have started on a small one. I had made a different pattern and it didnt fit at all....yours fit perfectly.
Tamara Kelly says
I'm so glad to hear it! Thank you, Beverly! ♥
Hannah says
That was very fun to make. My large lab is very happy with it. Thank you!
Tamara Kelly says
I'm so glad to hear it! Thank you Hannah!
Animacafe says
I loved making this pattern. Once you get the hang of placing the stitches it works up very quickly and is easy to adapt for sizing. Thank you!
https://ravel.me/Animacafe/wddc
Tamara Kelly says
So great! Thank you, Animacafe!
Simone says
Hi, I’m having real trouble understanding where the stitch goes after skipping 2. I’ve read The comments and you say go in between the posts but theees nothing to go into. What am I missing??
Tamara Kelly says
Hi Simone! You know how you can stick a finger or hook in between the posts of 2 dc stitches? Even though there's not a stitch or ch sp there, there's still a place you can go - and that's where the stitch goes. 🙂
Carol Dilgard says
I don't know how anyone could follow this pattern. 24 FDC for first row, then add 2 DC in the space doesn't equal 26 stitches in second row. Terrible!
Tamara Kelly says
Hi Carol! I'm sorry you're having trouble, but 24 + 2 is 26. The chart should help you on the placement of the stitches.
Sandra McDonald says
What yarn can you substitute - you can no longer buy the yarn specified for this project. Help! I love the looks of this sweater.
Tamara Kelly says
Thank you! Any worsted weight yarn should work - Red Heart Super Saver is always a good choice for pet items!
AllTheYarnEver says
what size did the dog in the pattern wear? my dog is around the same size.
Tamara Kelly says
Medium (18" chest) 🙂