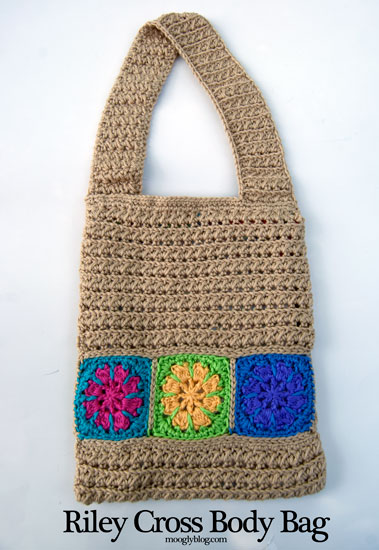
I was walking through a big department store recently with my daughter, when she spied a purse she thought was "so pretty!" This was the first time she'd ever had that reaction to a purse that didn't feature pink feathers and a Disney princess, so I had to take a closer look. Lo and behold it was crocheted! Well, I can't buy when I can make, so the Riley purse was born, based on the purse we saw - with a couple of custom improvements, of course.
The body of the purse is made with a hdc cluster stitch, and the motif squares are made separately - then the whole thing is assembled and the strap is added right to the bag. I recommend a fabric lining as well. You don't have to get fancy, a flat rectangular pouch is all you need. I've written up the motif pattern separately because I think it's got lots of other fun uses. But for the convenience of those who prefer to print patterns out, I've included the motif pattern at the bottom of the bag pattern.
Riley Cross Body Bag
Add this Pattern to your Ravelry Queue and Favorites
Tips: Don't chain too loosely when starting the body of the bag - you want enough give to get the hook in there, but not a whole lot more. Also, you'll want to block the pieces before assembly to square them up: for acrylic, use a steam blocking method to avoid crushing the stitches; for natural materials, a wet blocking should suffice.
- US - H/8, 5mm hook
- Caron Simply Soft (Worsted weight yarn, 280 yards)
Colorway Shown: Bone - Three Riley Flower Square Motifs (Caron Simply Soft in various colors shown) or other 3.5" square motif of your choice
- Gauge in Hdc Cluster Stitch Pattern: 17 sts x 10 rows = 4 inches (row gauge doesn't matter as much as stitch gauge - you want 10.5 inches finished width)
Hdc2tog: Yo, insert hook into st and pull up a loop. Yo again and insert hook into the next st and pull up anther loop. Yo once more and pull through all 5 loops on the hook.
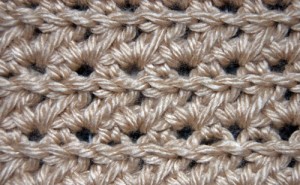 Hdc Cluster Stitch Pattern:
1st Row (RS): Working in BLO, sc in 1st st. *Ch 1, skip next st, and sc in next st. Repeat from * to end. Ch 2 and turn.
2nd Row (WS): Skip the first sc and hdc in the first ch sp. *Ch 1, and work hdc2tog over the last ch sp you worked before and the next ch space. Repeat to end. Work the last hdc2tog into the sc at the end of the 1st Row. Ch 1 and turn.
INSTRUCTIONS
Back and Bottom Piece:
Ch 44. Turn.
Row 1 (RS): Sc in the 2nd ch from hook. *Ch 1, skip next ch, and sc in the next ch. Repeat from * to end. (22 sc and 21 ch sp made) Ch 2 and turn.
Row 2 (WS): Work the 2nd Row of the Hdc Cluster Stitch Pattern (above).
Row 3 - 38: Repeat both rows of the Hdc Cluster Stitch Pattern.
Row 39: Sc (in both loops) of each ch and ch sp across. (43 sc) Break yarn and finish off.
Top Front Piece:
Ch 44, turn.
Repeat Row 1 - 17 as in the Back and Bottom Piece. Break yarn and finish off.
Assembly:
- Using the main color of yarn, join one side of the first motif to one side of the second motif, using the Amazing Flat Crochet Seam, (slip stitching through the BLO of both motifs). Join the third motif to the other side of the second, using the same technique.
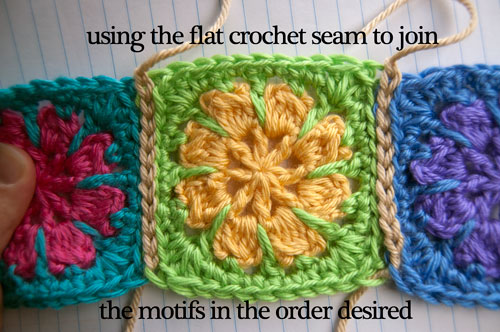
- Use the same flat crochet seam technique to join the last row of the Back and Bottom Piece to the bottom of the row of motifs, but skip every fourth stitch of the Back and Bottom piece, so that the pieces are joined evenly.
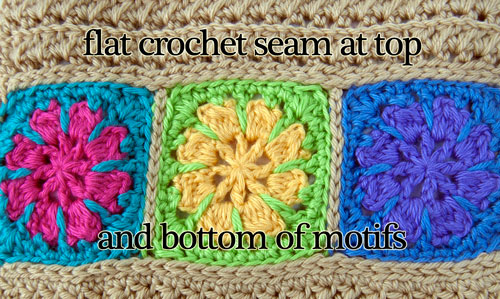
- Join the first row of the Top Front Piece to the top of the motif row, skipping every 4th stitch of the Top Front Piece (as in step 2).
- Check measurements and make lining if desired. I cut my fabric to 11" x 26", and sewed it using a ⅝" seam, but measure the bag here in case your gauge is different.
- Holding the RS together, whip stitch the sides of the bag closed.
- Add the strap (see directions below).
- Sew in the lining.
Adding the Strap (see photo above for placement help):
Row 1: From the RS front, join yarn to the second stitch from the right side seam with a sl st. Working in BLO, ch 1 and sc in same st. [Ch 1, skip next st, and sc in next st] 4 times. (5 sc and 4 ch sp made) Ch 2 and turn.
Row 2: Work the 2nd Row of the Hdc Cluster Stitch Pattern.
Repeat both rows of the Hdc Cluster Stitch Pattern until the desired length is reached. Whip stitch the end to the back opposite side of the bag, keeping it one stitch away from the left side seam. Make sure the RS of the strap is facing out and the strap is not twisted.
Work a row of sc around the open top of the bag and up the edge of each side of the strap. If using natural fibers, you may want to sew a ribbon to the inside of the handle to keep it from stretching more than desired.
I hope you enjoy this bag as much as Riley does! She likes to wear her bags across the body right now (perfect for bike riding). But if you wear yours over the shoulder, then you may want to attach the straps a little differently. I also have a plan for lengthening the strap as she gets older (and bigger) - but I'll share that another time! Good luck, and as always, remember that YOU are my pattern testers, so if you find a problem with the pattern or have a question, please let me know!
**************************************************************************
Riley Flower Square Motif Pattern:
- US - H/8, 5mm hook
- Small amount worsted weight yarn, 2 colors (Caron Simply Soft shown)
- Finished dimensions: 3.5 inches x 3.5 inches
Round 1: Using first color, make a magic circle and sl st into the ring. Ch 5 (counts as first dc and ch 2). [Dc into the ring, and ch 2] 7 times. Join with a sl st in the 3rd ch of the starting ch 5. Tighten and close ring. ( 8 dc and 8 ch sp made)
Round 2: Sl st into the next ch sp. Ch 3 and dc3tog, all in the same ch sp. [Ch 5, and then dc4tog in the next ch sp] 7 times. Ch 5 and break yarn, using a seamless finish to join to the top of the dc3tog cluster.
Round 3: Join second color with a sl st in the top of any dc4tog cluster. Ch 1, sc in the same st. [Ch 2, and enclosing the next ch 5 arch in your st, dc into the next dc of Round 1. Ch 2, sc in top of next cluster] 7 times. Ch 2, dc in the top of the next dc, ch2, and sl st in the top of the 1st sc of the round.
Round 4: Ch1 and sc in the same st. [Hdc in the next ch sp, then dc, trc, dc all in the next st. Hdc in next ch sp. Sc in each of the next 5 sts and ch sps] 3 times. Repeat for 4th side, but end with sc in the last 4 sts and ch sps. Break yarn and use seamless finish to join to 1st sc.
**************************************************************************
Be sure to Like the moogly Facebook page for the latest updates and have some fun with us! And if you like what you see but don’t craft, I take custom orders and commissions. Written pattern copyright Tamara Kelly 2012. Please do not reprint this pattern, but please feel free to link to this page to share this pattern with others.



Jaderenee
Thanks for the cool pattern! I love making and using babs and this one is especially interesting to make. Looks like it's fun as well as practical.
tahora
hi ti is very good plz send me this page
moogly
Hi tahora! If you want to print it out, there's a Print Friendly button at the bottom of the page. 🙂
Alycia
I started making this bag and have made about 10 rows of the back and bottom piece. My bag is going at an angle. Everything else looks good. I can't figure out what I am doing wrong. I have correct number of stitches and I have remembered to do my chain/s at the end of the rows. Any ideas? THANKS!!!
moogly
It's been a long while since I made this, but as I recall I too had a slight lean. Blocking fixed it though!
Becky gaar
Hi Tamara I just wanted to let you know I used a cloth dinner napkin to line my bag because it's seamed already at the top you don't have to worry about that. I did a different bag than this one but just wanted to give you an idea in case you don't know about it yet. I love all your post make a lot of your items. Thank you for your hard work.
Tamara Kelly
That's a great idea Becky!! Thank you! 🙂
Barb Schultz
Hi! I have done a bit of crocheting, but am not so good at reading the patterns. I want to start the Riley
Cross Bag, but am confused on what the first row is exactly. Don't I need at least a chain to start woring out of? Thanks for any explanation.
Tamara Kelly
Hi Barb! The Chain count is listed right above Row 1. 🙂
Harperjo
❤️ the pattern but”body bag” is something for a dead body...maybe something like a bring along, a don’t forget, a crogo,
a crochet away, a grab and go, so many other variations...your patterns are great, so, thank you for my next project...my kids will use them like crazy...Harperjo.
Tamara Kelly
Cross body bags are a popular category of bag here, I never thought of it broken up like that, huh! Thank you so much!
Nancy Fisher
Good Day Tamara:
Approximately what are the finished measurements of the crossbody bag (not including the strap). Thinking of excluding the motifs. Want to make it a solid color.
Thank you.
Nancy
Tamara Kelly
Hi Nancy! You can use the gauge info to figure that out, but the easiest thing to do is just make two "back" pieces! 🙂
Linda
I found this posted on Pinterest and had to try it. It only took me one day, but I still need to line it. I used four smaller granny squares instead. Thanks for the cute pattern.
Tamara Kelly
🙂 Thank you so much, I'm so glad you like it!