Have you noticed how HOT weaving is right now? And I don't mean the temperature outside! So with a Martha Stewart Crafts® DIY Weaver™ in hand, it was time to make my first wall hanging! And I took lots of pictures so you can too!

Loom weaving of all sorts has made a huge comeback lately, and I was excited to give it a try myself. I hope you like my first weaving project - I can't wait to hang it in my new craft room as soon as we're done remodeling!
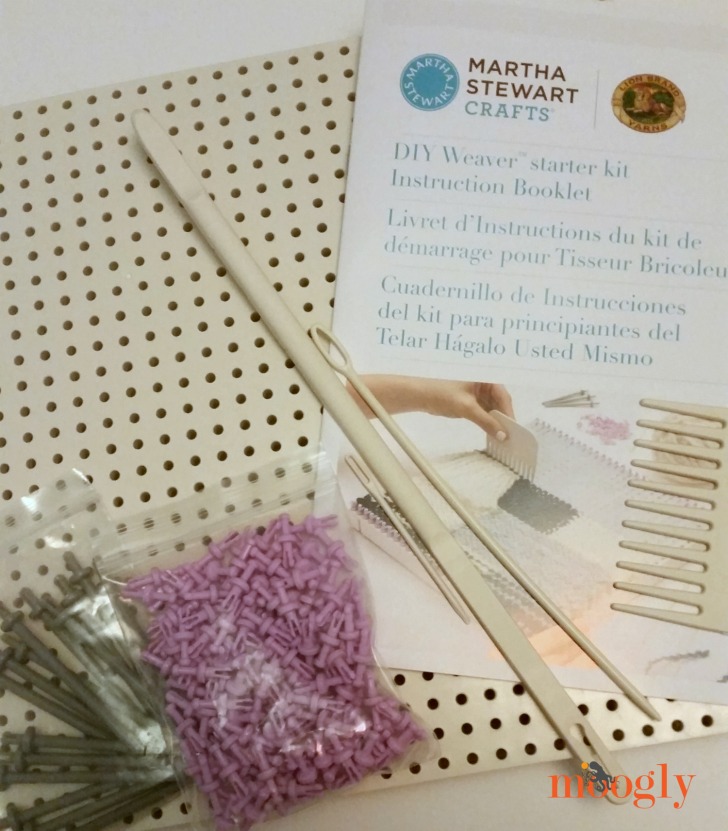
First, I gathered the supplies: the Martha Stewart Crafts® DIY Weaver™ Starter Kit, LB Collection Wool, and LB Collection Silk. I also got the Extender Kit, but I didn't end up using it this time!

Opening up the DIY Weaver Starter Kit, you get the loom base, 150 standard (purple) pegs, 15 embellishment (gray) pegs, a shuttle, needle weaver, tapestry needle, comb, and thankfully some instructions!
Being the creative type I am, I skipped the small pegs that you're meant to start with, and used the large embellishment pegs to set up the loom board. I left 2 holes in between each peg, and put 7 on each side directly across from each other.

This allowed me to warp the loom using LB Collection Wool! It's crazy thick and super plush, and it took only a few yards to set up the board for weaving. With a slip knot on the first peg, it was back and forth until I reached the last peg - where another slip knot secured the second end.

Only a few minutes in, and it's time to get weaving! To contrast with the soft, downy wool, I used fine, smooth, bright and shiny LB Collection Silk to weave the weft. Warping the loom is the set up in one direction, and weaving the weft is when you go back and forth the other direction to create the weave. (The more you know!)

I cut lengths of silk a few yards long, and using the shuttle I wove through the wool in one direction and then back in the other - this is the Basic Weaving Technique, just over one and under the next, back and forth. I then cut the Silk, leaving a 12" tail on both ends. Tying these ends together, I left the tails hanging long for now.

Working from the bottom up, or left to right, I did 5 strands of the Satellite (gray) colored Silk, followed by 11 strands of the Neptune (blue) colored Silk, followed by 5 more strands of the Satellite Silk. The ends of each strand were tied together at the bottom.

Then, it was time to take it off the loom! The Silk, aka the weft, holds everything in place, so with the included needle weaver I was able to slip the ends of the Wool under a few stitches of the back to hide them.

Then it was time to do something will all those silk strands! So with a pair of scissors and a ruler to guide me, I cut the strands hanging off the bottom into an arrow or chevron shape.

Now to get it hanging: I slipped a large knitting needle that I had inherited from my grandmother-in-law under several of the silk strands along the top of the weaving. Then, I cut another piece of silk and tied it to the strands at both ends.

Et voila! My first ever wall hanging... and my first DIY Weaver project! It might be perfect, but I like it!

It was a lot of fun using the DIY Weaver, and I can see so many possibilities for it in the future! With the addition of the extension kit, the sky's the limit. The Weaver itself was super easy to use, and the instructions were great too. If you are considering trying out weaving yourself, then the Martha Stewart Crafts® DIY Weaver™ is a great entry point to this popular craft!


Leave a Reply