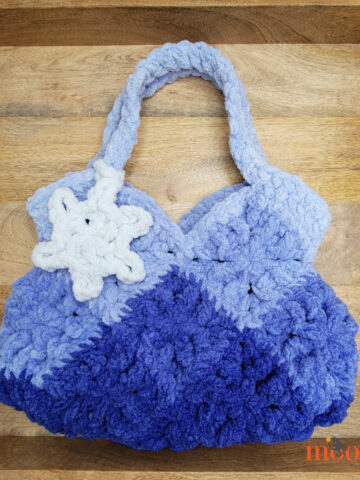
The Chroma Crochet Bag features gradient ombre coloring and 3 different finishing methods - so you can make the purse that's just right for you. Make one today and go out on the town with it tonight!


You can add more stripes for a taller crochet bag if you like - it's an easily memorized 4 row repeat. And there are even more finishing options than what are pictured here! Make small flaps at each end to attach D rings for a leather strap, or crochet a short wrist strap to attach to the clutch. The only limit is your imagination and yarn stash!
Chroma Crochet Bag
Add this pattern to your Ravelry Queue and Favorites
- US-G, 4.0mm hook
- Approximately 300 yds total Aran or Worsted weight yarn, in 5 colors
(I Love This Yarn in Navy, Royal, Turquoise, White, and Gray Mist shown) - 4 Stitch Markers
- Handles, optional
- Fabric lining with closure, optional
- Overlapping Post Stitch
- Crochet Abbreviations
Bag Instructions:
Row 1: With Color A, ch 40. Hdc in 2nd ch from hook and each ch to end. Turn. (39 sts)
Row/Round 2: Ch 1, hdc in each st to end of row. Turning to work in the side, hdc in the side of the first st of Row 1. Turning again, hdc in the each ch of the starting ch, opposite the first row of hdc sts. With one more clockwise turn, hdc in the side of the last st of Row 1 and join to the first st of Row 2 with a sl st, to begin working in the round. Do not turn. (80 sts)
Round 3: Ch 2 (does not count as first st), dc in each st around. Join with a sl st to first dc. (80 sts)
Round 4: Ch 1, sc in each st around. Join with sl st to first sc. (80 sts)
Round 5: Ch 2, fptrc around dc below the first st. Dc into the next st. *Fptrc around the st below the next st, dc in the next st. Repeat from * to end. Join with a sl st to first fptrc. (80 sts)
Round 6: Ch 1, sc in each st around. Join with sl st to first sc. (80 sts)
Round 7: Ch 2, dc in the 1st st, fptrc around st below next st. *Dc in the next st, fptrc around the st below the next st. Repeat from * to end. Join with a sl st to first dc. (80 sts)
Round 8: Ch 1, sc in each st around. Join with sl st to first sc, using the Next Color. (80 sts)
Round 9-12: With Color B, repeat Rounds 5-8.
Round 13-16: With Color C, repeat Rounds 5-8.
Round 17-20: With Color D, repeat Rounds 5-8.
Round 21-24: With Color E, repeat Rounds 5-8. Add more stripes in pattern for a taller bag if desired. Do not cut yarn, but go to the Finishing Instruction set of your choice.
Finishing Instructions:
For Clutch Style Bag:
At end of Round 24, break yarn and use seamless join to finish off. Weave in ends. Add fabric lining if desired.

For Crochet handle Style Bag:
Round 25: Ch 1, sc in each st around. Join with sl st to first sc. (80 sts)
Round 26: Counting from the 1st st, place marker at sts #15, 30, 55, and 70. Check that they match up when the bag is laid flat, and that they are spaced to your preferences. [For a longer (arm or shoulder style) strap bag, move the markers out to the sides to create the opening desired.]  Ch 1 and sc to 1st marker. Remove marker and sc in that st. Ch 14 and skip to next marked st. Sc in marked st (remove marker). Sc in each st to next marker. Remove marker and sc in that st. Ch 14 and skip to next marked st. Sc in marked st (remove marker). Sc in remaining 10 sts. Join with sl st to first sc. (52 sc and 28 ch)
Round 27: Ch 1, sc in each st and ch to end. Join with sl st to first sc. (80 sts)
Round 28: Ch 1, sc in each st around. Join with sl st to first sc. (80 sts)
Round 29: Ch 1, sc in each st around. (80 sts) Break and use seamless join to finish off. Weave in ends. Add lining if desired.
For wooden/plastic handle Style Bag:
Round 25: Ch 1, sc in each st around. Join with sl st to first sc. (80 sts)
Round 26 - end:
- Counting from the 1st st, place marker at sts #15, 30, 55, and 70. Check that they match up when the bag is laid flat, and that they are the approximate width to fit in your handles, adjusting if necessary.
- Without making a starting ch, sl st in 2nd st of round and each st to marker. Sc in first marked st (remove marker) and each st to second marker, including second marked st (remove marker). (16 sc)
- Ch 1 and sc even across those 16 sc. Repeat until flap is long enough to cover handle. Ending on left side of flap, sl st down left side of flap back to top of bag.

- Sl st in each st around to third marker. Sc in third marked st (remove marker) and each st to last marker, including last marked st (remove marker). (16 sc) Make second flap as in Step 3.
- Sl st in remaining 10 sts. Break yarn and use seamless join to finish off. Use additional yarn to sew flaps over handles. Weave in ends and add lining if desired.

Ready to make another?
So which style is your favorite? Clutches are hot for evenings out, crochet handles are super cute and great for immediate gratification, and wooden and plastic handles are easy on the hands and look good too. They all have their appeal! With the different finishing options and all the colors of yarn available, I can't wait to see what you all come up with while making the Chroma Crochet Bag!
The Fine Print
Written pattern copyright Tamara Kelly 2013. Please do not reprint, or repost this pattern, but please do link to this page to share this pattern with others. You may sell items made from this pattern, but please include a link to www.mooglyblog.com on the online listing, or on the sale tag if selling at a craft fair, storefront, or other in person sales.

Tammy
Love love love! Can't wait to try this. I love the ombre look so I will try it with one of my favorite color families! Thank you!
Susan
This is awesome! I'm digging through my yarn to put together a fun combination right away!
Mindi
Sweet! And I know exactly which yarn from my stash that I'm going to use.
Diane Loraine Hatch
Thanks for sharing, another pattern on my to do list
Soumya
Hey..
Wanna start it right away. But, I'm not sure whether I'm missing the stich. What is fptrc??? Couldn't find it in the video tutorial page too.
moogly
Hi Soumya! Fptrc is front post treble crochet. Worked just like front post double crochet (fpdc), but as a treble instead of a double. 🙂
megan
I love this bag and it's colors. I have added it to the directory at http://www.cochetatplay.com
thanks
megan
moogly
Thanks so much megan!
Darlene A Fetterman
Hi, there is no Abbreviation chart and there is a Fptrc which is front post triple crochet it says to do it around the front stitch below. Am I reading this correctly?? Hope I can here from you soon am going to start this bag soon.
Thank you
Tamara Kelly
Hi Darlene! You fptr around the dc below the next sc. There's a video tutorial for this stitch linked above as well. 🙂
moogly
Thank you megan! 😀
Aubrey
So I love this and am working on it right now! I have a question: I can fptrc but cannot figure out how to do around the dc under the first stich. I will check the tutorial link. But I am stumped here. help please?
moogly
Thanks Aubrey! Ok, so the first stitch of the round from the previous round (round 4) is a sc. That sc was worked into the top of a dc stitch. You want to fptrc around the post of that dc st. Does that help at all?
Aubrey
Sure does. I think I have it. I have never done it before so can't tell if it looks right. But we shall see!! Thanks!! 🙂
Meghna
Is it not HDC before the SC in round 4?
Meghna
OK, just read through again. It's DC in round 3. Apologies
Tamara Kelly
Whoops, going through comments in order. 🙂 No worries!
Tamara Kelly
Round 4 is just sc sts. 🙂
Karol
Hi! Thank you so much for sharing this pattern. I love it and I'm working on it :). I'm a bit confused with round 8. Is the entire round with the next color? Thanks again!
moogly
Hi Karol! I'm so glad you like it! Yes, Round 8 is all in one color until the very very end - when you go to slip stitch to the first stitch of the round, to complete the round, yarn over and pull through with the next color. That sets you up to use that next color for the next round. When you work the first st of round 9, you can enclose or work over the end of the previous color to hold it down a bit before you continue on. I hope that clears it up, let me know if you have any other questions!
Karol
Wonderful! Thank you so much!!!
Agnieszka
I love this bag, thank you for the instructions! 🙂
Tamara Kelly
You're very welcome, I'm so glad you do! Thanks for commenting!
Marie
I don't understand the instructions here: Turning to work in the side, hdc in the side of the first st of Row 1. Turning again, hdc in the each ch of the starting ch, opposite the first row of hdc sts. With one more clockwise turn, hdc in the side of the last st of Row 1 and join to the first st of Row 2 with a sl st, to begin working in the round. What side? I have done lots of front and back posts, but just don't understand this. Thanks.
Tamara Kelly
Sorry for the confusion Marie! There aren't any back posts in this row. What you're doing, rather than turning the piece over to work back in the opposite direction, is working half double crochet (Hdc) sts around all the edges - spinning the work clockwise, working into the edge or side of the end of row 1, then along the starting chain, and then a stitch in the side of row 1 at the other end, and then finally joining with a sl st to the first hdc of the round. Does that help at all?
OPAL
I remember this part.. it's the start and the base of the clutch so it can sit a little flat on the bottom if you like. It threw me for a loop at first, as well. And I often make up intricate grouped stitches, just for fun. But, and you'll laugh at this... In my 35+ years of crocheting, I have never come across a "seamless join" before. It makes me wonder how long it's been around. I could not find it in any of my crochet books or patterns. I do prefer it though. Opal
Tamara Kelly
😀 It's just a little trick I happened across a few years ago, and it gives such a nice invisible ending I can't help but use it every time I work in the round!
Fredi
I love this bag!!! I was just wondering how big it is when finished? Thanks for sharing the pattern:)
Tamara Kelly
Thanks Fredi! Mine turned out about 10.5 inches wide by about 7 inches tall when flat, excluding any handles. Tension and specific yarn used will change the measurements a little bit, but that's a good estimate. 🙂
MARLENE
THIS IS A BEAUTIFUL BAG. THE STITCHING IS ELEGANT. I WILL BE MAKING IT SOON. THANK YOU FOR SHARING YOUR PATTERN.
kristen
Just finished mine and i love it! Thank you for another fantastic pattern :O)
Tamara Kelly
Glad you liked it kristen! 😀 You're very welcome!
Judy
I'm lost with regards to the "turning to work in the side, hdc in the side of the first st of Row 1" What is the side? and what is the hdc in the side of the first st of Row 1? I love the pattern and I'm just learning to crochet so I thought I'd give this a try. I know how to hdc but I don't understand working in the side .....!!!
Sorry I'm so dumb Thanks for any help.
Tamara Kelly
Not dumb at all! Ok, so what I'm talking about when I say turn to work in the side, is different then what is usually meant by "turn." Instead of flipping your work over to make the next row, you spin it - working into the edges all around. So the top of the row is where the next row is usually worked into, the bottom of the row is attached to the previous row, and the sides of the rows are the edges on the left and right.
Therefore, you work across the top of the previous row as usual, then instead of flipping your work over, you spin it a bit to keep working into the left edge - the sides of the rows. In this bag there's only one row already made, so it's just one stitch worked into the side of the first st you made in row 1. Then you spin it a little more and work along the other side of the starting chain, as if it were the top of the row. Then one more stitch into the side of the last stitch of the first row you made and you're ready to join to work in the round.
Here's a video about working into the edge that might help a little bit: https://www.mooglyblog.com/working-into-the-edge/
Gardenchef's Needle and Pen
Will definitely try this! Thank you for the pattern. Got you from Hooked on Crochet.
Tamara Kelly
Thank you! Love that newsletter!
sandy Lucci
Love this! Have made a few bags in a variety of patterns and sizes and wanted to show you but can't figure out how to put up pictures.
Tamara Kelly
I'm glad you like it! I'm afraid I can't offer picture hosting here on the blog, but if you're on facebook you can post them on the Moogly page there! 🙂
Letizia
Hi! Beautiful this bag! Sorry, but can you make a video showing how to make this stitch? I don't speak english and read the pattern is so difficult for me and can't understand how to make it. We use to make symbol pattern that are more easy to read.
Thanks so much from Argentina
Tamara Kelly
I'll try to make a video! 🙂
Letizia
Thanks so much!
Janice Corley
Can a beginner Crocheter like me crochet this purse without much problems.
Tamara Kelly
Hi Janice! It depends how familiar you are with post stitches! If you're ready to learn some new skills I think maybe so!
Lori Johnson
I love this bag!! Just made it with bamboo handles. I put a lining in it with a little pocket. I got a lot of compliments on it. I see Christmas gifts..........................
Tamara Kelly
😀 So glad you do!!
amanda nichols
is the handle you used white plastic..im having the most horrible time trying to find white online and i dont think black will look good..what was the brand you found as yours looks white ...where did u get it?
Tamara Kelly
Hi amanda! This one is actually wooden - unfinished! I got it at Joann Fabrics.
MARLENE
THIS BAG IS ON MY TO DO LIST. I DON'T KNOW WHERE TO FIND THE WHITE HANDLES. SORRY, I CAN'T HELP YOU.
Joyce
Love it, going to give it a try, thanks for sharing
kathyweidner
Looks really cool.and Easy
Courtney
I made this bag. Love it.
http://media-cache-ak0.pinimg.com/originals/f4/c9/0e/f4c90ef80c67a0ed25e57bfbc738dc89.jpg
Tamara Kelly
Very pretty Courtney! 😀
Heather patternsforcrochet
Love this textured stitch pattern and the colours you have used, They look lovely together. I don't get on well with bag handles though, I never seem to find what I want were I live.
Pat Stubbs
I am so glad I subscribed to you,this site has everything I need and will ever need.Thanks to all concerned in putting this site and everything that goes with it together.
Tamara Kelly
😀 Thank you so much Pat!
opalwind
I crocheted this "crochet handle clutch" version, in one day. It's a beautiful Patten. I used Knit Picks "Shine Worsted" (60% pima cotton, 40% modal (Modal - beach wood fiber)). Perfect yarn for this purse. I started with black for the base, then used purple, periwinkle, aqua and silver grey for the last rows and handle. I also slip stitched around handle openings, to add more strength and durability. I just have to line it. Thank you for this unique and great pattern! Everyone who sees it, wants me to make them one! Opal
Tamara Kelly
😀 Thank you so much Opal! I'm so glad you like it!
Janice Corley
Can a beginner crocheter make this bag Or do we need to know how to read directions better. I too a beginner class in 2012, and just have made dish cloths and a few potholders.
Tamara Kelly
Only way to find out is to try! 😀 There's a video tutorial for the stitch pattern to help! 🙂
Regina T
what are the dimensions of this
Tamara Kelly
Mine turned out about 10.5 inches wide by about 7 inches tall when flat, excluding any handles. Tension and specific yarn used will change the measurements a little bit, but that’s a good estimate.
kaz
lovely bag, Could I use this pattern to use in a workshop. I would have your site mentioned and point all the ladies to follow you and your wonderful patterns. No problem if this is not possible. many thanks
Tamara Kelly
Hi Kaz! If you could email me so we could discuss it further that would be great! TamaraKelly@mooglyblog.com 🙂
Laura Landgren
Love this bag. Made it for my daughter. She requested it in with purples instead of blues but just realized I made it wrong. It came out good but misread the instructions and did a FPDC so my bag isn't as tall as yours but it still came out very nice. I wish I had read the comments to see that you used a wood handle. I couldn't find the white plastic handle so used a clear handle for my bag. If I make it again, I'll know to use the FPTC
maria
i love it. i watched your video tutorial. thank you so much. im not good at reading patterns.
Tamara Kelly
😀 Thank you so much Maria! I'm so glad the video helped!
chetalee
l am going to start out now.
thanks for pattern.
Tamara Kelly
😀 I hope you enjoy it!
Jo Atkin
I just finished the chroma purse..it turned out beautifully! I was having trouble with the Manchester bag, but your instructions on this bag were perfect.. (not that the other was not perfect) I just could never get the meeting of the rows right. I am going to try it again..want to thank you for such unusual bags, I love making them.
Thanks again, and keep up the good work, you're amazing!
Tamara Kelly
🙂 Thank you so much Jo!
Judy
thanks for the really great pattern. Took me awhile to get it right. But i"'m new at crocheting and now I'm on a roll with this one... Thanks again... Appreciate ....
Tamara Kelly
🙂 Thank you Judy! I'm so glad you're enjoying it!
YemEe
I love this ombre bag pattern. I completed it two months ago. However, I would like to make a larger version of this bag. I am still very new to crocheting. So how many stitches would I increase the bag to for a fall shoulder bag or tote size? Thanks you so much for sharing your talent with others.
Tamara Kelly
Thank you YemEe! You can start with any number of stitches in the first row. So if you want it to be twice as big, start with a chain that's twice as long! 🙂 Any number will work.
manisha
hi, where can i c the video tutorial for this bag?
Regds
Manishaa
Tamara Kelly
Hello Manisha! The tutorial for this stitch pattern is at https://www.mooglyblog.com/overlapping-post-stitch-pattern/
suki
i love this titorial. thanks. 🙂
Tamara Kelly
Thank you! 😀
Jan
Thanks for the pattern !
Tamara Kelly
🙂 Thank you Jan, I'm glad you like it!
kimberly joslin
question, I know in round 3 you put the chain does not count as 1st stitch, is that the same with all rounds or am I to count the chain as a stitch in the other rounds
kimberly joslin
does the stitch at the begin of every row not count or just round 3?
Tamara Kelly
The ch 2 does not count as a stitch in any row of this pattern. 🙂
Renae
Love love the chroma crochet bag and would like to use same yarns you used! Could you please tell me what they are and where to purchase them. Thank you! Renae
Tamara Kelly
Hi Renae! I Love This Yarn is sold exclusively at Hobby Lobby. If that doesn't work for you, Red Heart With Love is the ideal substitute! 🙂