
I've always wanted to give Lion Brand's Bonbons yarn packs a try. They're just so cute, with all the tiny colorful skeins of yarn! And I finally merged that idea, with my idea for a colorful little pouch with one of a "kiss clasp" metal frame. And the Bonbon Kisses Crochet Pouch was born!
Disclaimer: This post includes affiliate links.
Prefer an ad-free PDF? You've got options!


Prefer the free blog version? Keep scrolling!
Pick Your Favorite Flavor - I Mean, Colors!
Lion Brand Yarn Bonbons come in lots of colors and styles, but I used the "Brights" pack, which has Light weight skeins - yarn symbol "3." Other packs have different weight yarns, so be sure to check the back of the bag! I used less than half of each skein, so you could easily make 2 Bonbon Kisses Crochet Pouches out of the one pack of yarns!
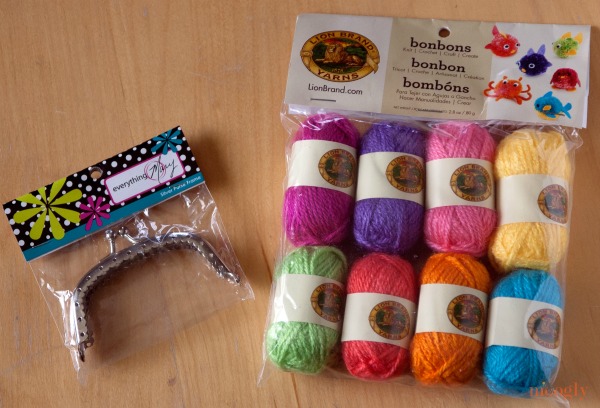
I purchased the frame at my local JoAnn Fabrics store (now closed, alas). I also found a gorgeous one on Amazon, linked below! They're sold in lots of craft stores too, so look for one that's approximately 3.3 inches to make your own Bonbon Kisses Crochet Pouch. And don't forget to Pin the image below!

Bonbon Kisses Crochet Pouch
Add this pattern to your Ravelry Favorites and Queue
US - F, 3.75mm hook
1 pkg Lion Brand Bonbons in Brights (Light "3" yarn)
1 silver purse frame with kiss clasp, 3.3" wide
thread and sewing needle
Helpful Links and Video Tutorials:
Bonbon Kisses Crochet Pouch Tutorial
FSC - foundation single crochet
BLO/FLO - back/front loop only
NOTES:
This pattern switches back and forth between Rows and Rounds - this helps to indicate when you'll turn, and when you will join and continue working in the same direction. However, there are some sneaky turns in there to make the ruffles, so pay close attention - at that point you'll be working from the inside of the bag! Only turn when it says turn. Also, I suggest you weave in your ends as you go - it'll get real tricky if you leave them for last.
Bonbon Kisses Crochet Pouch Instructions
Row 1: With Color A, FSC 16, turn. (16 sts)
Rows 2 - 4: Ch 1, sc in each st across, turn. (16 sts)
Round 5: (In this round, you'll circle all around the rectangle you've made in Rows 1-4, so that they become the flat base of the pouch and you're ready to work in rounds.) Ch 1, sc in each st across, spin work clockwise and work 4 sc along the side, spin clockwise again and work a sc in the bottom of each fsc, spin once more and work 4 sc along last side. Join to first sc with a sl st. (40 sts)
Round 6: Ch 1, sc in each st around, join to first sc with a sl st.
Round 7: Ch 1, sc in each st around, join to first sc with a sl st, turn. )
Round 8: Working into BLO, (the loops on the outside of the bag), ch 1, sc in each st around, join to first sc with a sl st.
Round 9: Ch 1, sc in 1st st, *skip next st, dc 5 in the next st, skip next st,** sc in next st. Repeat from * 8 times, and repeat from * to ** once more. Join to first sc with a sl st. Break CA and finish off. (10 shells)
Round 10: With Color B, and working from the RS again, join with a sl st to an unworked loop from Round 7 that is on the side of the pouch, above a sc between two shells. Ch 1, sc in each loop around, join to first sc with a sl st. (40 sts)
Round 11: Ch 1, sc in each st around, join to first sc with a sl st.
Round 12: Ch 1, sc in each st around, join to first sc with a sl st, turn.
Round 13: Working into BLO, ch 1, sc in each st around, join to first sc with a sl st.
Round 14: Ch 1, sc in 1st st, *skip next st, dc 5 in the next st, skip next st,** sc in next st. Repeat from * 8 times, and repeat from * to ** once more. Join to first sc with a sl st. Break CB and finish off. (10 shells)
Rounds 15 - 19: With Color C, repeat Rounds 10 - 14.
Rounds 20 - 21: With Color D, repeat Rounds 10 - 11.
Round 22: Ch 1, *sc in 8 sts, sc2tog. Repeat from * 3 times, join to first sc with a sl st, sl st in the second st, turn. (36 sts)
Round 23: Working into BLO, ch 1, sc in sl st and next 15 sts, sl st in next 2 sts, sc in next 16 sts, sl st in last 2 sts, join to first sc with a sl st.
Round 24: Ch 1, *[sc in next st, skip next st, dc 5 in next st, skip next st] 4 times, sl st in next 2 sts. Repeat from * once. Join to first sc with a sl st. Break CD and finish off. (8 shells)
FLAPS: Rows 25 - 39 are repeated on each half of the Bonbon Kisses Crochet Pouch, creating the flaps that will be sewn into the metal purse frame.
Row 25: With Color E, and working from the RS again, join with a sl st to an unworked loop from Round 22 that is on the right side of one set of 4 shells. (Count out from the center, between second and third shell, to 8 sts out - the flaps will be 16 sts wide.) Ch 1, sc in same loop and next 15 loops, turn. (16 sts)
Row 26: Ch 1, sc in each st across, turn.
Row 27: Working in FLO, ch 1, sc in each st across, turn.
Row 28: Ch 1, [sc in next st, skip next st, dc 5 in next st, skip next st] 3 times, sc in next st, skip next st, dc 5 in next st, sc in last st. Break CE and finish off. (4 shells)
Row 29: With Color F, join with a sl st to second unworked loop of Row 26, sc in same st and next 13 sts, turn. (First and last unworked loops remain unworked.) (14 sts)
Row 30: Ch 1, sc in each st across, turn.
Row 31: Working in FLO, ch 1, sc in each st across, turn.
Row 32: Ch 1, sc in first st, skip next st, dc 5 in next st, skip next st, sc in next st, skip next st, dc 3 in next st, dc 2 in next st, skip next st, sc in next st, skip next st, dc 5 in next st, skip next st, sc in last st. Break CF and finish off. (3 shells)
Row 33: With Color G, join with a sl st to first unworked loop of Row 30, ch 1, sc in each loop across, turn. (14 sts)
Rows 34 - 36: Repeat Rows 30 - 32, break CG and finish off (3 shells)
Row 37: With Color H, join with a sl st to second unworked loop of Row 35, sc in same st and next 11 sts, turn. (12 sts)
Rows 38 - 39: Ch 1, sc in each st across, turn. At end of Row 39, break Color H and finish off.
Repeat Rows 25 - 39 on other side before proceeding with the edging.
EDGING:
Round 1: With Color H, sc all around opening, working a sc2tog over the unworked sts between the flaps (from Round 24) on each side. Join with a sl st to first sc.
Round 2: Ch 1, sc in each st around. Join with a sl st to first sc. Break yarn and finish off.
BLOCKING:
Get the pouch wet with cool water. Carefully press out excess water with a clean towel, making sure all ruffles are pointing down. Stuff pouch with a plastic bag (a plastic grocery bag works great!) and shape. Let dry.
SEWING ON THE FRAME:
This was a new one for me, so I had to look up a tutorial! I found a great one at Craft Couture by T.C - very helpful! I used a sparkly metallic thread, but you can use the thread color that works for you! Start in the middle, and stretch the flaps a bit to fill the frame as you sew them in.

And that's all there is to it! I hope you've enjoyed the pattern for the Bonbon Kisses Crochet Pouch - it was a lot of fun to make, and it's perfect on it's own or stuffed with little goodies. Have a great day!
The Fine Print


Grace says
OMG That is the MOST ADORABLE little purse I have EVER seen!!!! I must make one 🙂
Tamara Kelly says
😀 Thank you Grace!
julie says
could i make this project and sell it on my etsy shop?
Tamara Kelly says
Yes! 😀
Julie says
Thanks
wmiehm says
Ok I'm confused 🙁 after the first row of shells it says to single crochet in each stitch around and you should end with 40 stitches but thats not possible.ifyou have ten shells with five stitches each....and then after several rows of sc it no longer looks like a shell....what am I missing?
Tamara Kelly says
Have you watched the video tutorial? I think it might help. You can CLICK HERE to see it. 🙂
yarnpumpkin says
This is so cute. My granddaughter would totally love it. Thanks for sharing.
Tamara Kelly says
Thanks so much! 😀
jan says
Love this little coin purse; it makes such a nice gift!
Clotilde/Craftybegonia says
That is totally cute. I love how flirty and feminine it is. The colors are beautiful and just shout spring at you and I think that little purse would make a lovely gift for any friend. Thanks for sharing!
Tamara Kelly says
Thank you! 😀
Sheri says
This is adorable! I can't wait to try it. I got my yarn today and ordered the purse frame. Thank you for sharing!
Tamara Kelly says
😀 Thank you so much Sheri!
Dot says
That little purse is darling! I think my granddaughter needs one. I've also been wanting to thank you for using Print Friendly. Makes it so easy to save your patterns as PDFs.
Tamara Kelly says
😀 Thank you so much Dot! And you're welcome!
Jacqueline Strand says
This will be such a cute gift for my granddaughters. I love the M&M's pictured with the purse - Thanks for sharing your pattern
Tamara Kelly says
😀 Thank you Jacqueline!
Carol says
I always gravitate to your patterns. I just happen to have the same BonBons and clasp! Can not wait to make this and thank you for all the patterns you create!
Tamara Kelly says
That's amazing Carol! 😀 Thank you so much!
Naomi says
Just beautiful!!!!!
Tamara Kelly says
😀 Thanks so much Naomi!
Diane says
How darling is this?! I must give it a try.
Also Tamara I wanted to ask if you had the pattern for the little crochet butterfly that winds up and flies? I think it incorporated a bobby pin and a rubber band. What a great gift the sweet little purse and butterfly would make for Easter.
Tamara Kelly says
Hi Diane! Thank you! I remember that little wind up butterfly, I haven't thought of it in ages! I don't know where to find it though, sad to say!
MARRIE says
wow
its too cute.. i am gonna try this
Monica says
What a great idea! I couldn't resist buying the bon-bons either... They just look so fun! This little purse is really adorable and would make an awesome gift. Good to know that one pack makes two purses, too... Thanks for sharing this, Tamara 🙂
Tamara Kelly says
😀 Thank you Monica!
Jeanette egan says
On row 24, it ends with 36 sts and 8 shells. ( I had 9,). Row 25, start if flap, we work 16 sts each side. That will be total of 32 sts. Are the remaining 4 sts left unworked? Pattern doesn't state so I don't know if it is or if a mistake I tried working 18 sts each side and now I'm going to try with 16 and see what happens
Tamara Kelly says
Hi Jeanette! Yes, the remaining 4 sts are left unworked.
Debbie says
Love the purse it is so cute. I was wondering if you could give me any measurements? I used the same hook and yarn as the pattern but it was too big for the clasp. I am going to try a smaller hook but a few measurements would be helpful. Thank you.
Tamara Kelly says
Hi Debbie! My finished pouch is about 3.5" tall when laid flat, and almost 4" wide at the base. The flaps were about 2.5" wide at the top ruffle - they get pulled a bit to fit the frame.
danielle drown says
Question: onRound 9: Ch 1, sc in 1st st, *skip next st, dc 5 in the next st, skip next st,** sc in next st. Repeat from * 8 times, and repeat from * to ** once more. Join to first sc with a sl st.
So do we not do the sc after the dc 5 skip next st repeats?
Thanks
Danielle Drown says
nevermind! I figured out what i was missing LOL
Luna says
Wait!! What did you figure out, cause that is where I'm currently stuck at.
Tamara Kelly says
There will be a video very soon- it's been edited right now! 🙂
shauntel messer says
Me too?! Help?! Is the video ready now? I'm doing this for a bday present and am stressing I won't be done in time, so excited to give it to her!
Tamara Kelly says
I just heard back from Lion Brand this weekend - it should be up within the next week or two!
Jen says
I've made quite a few of these purses and I love them 🙂 My only suggestion/change is that I do BLO in round 6. It gives the bag a nice flat bottom.
Thanks for such a great pattern!
Tamara Kelly says
😀 You're very welcome! Good tip!
Jennie says
In Round 10, is it supposed to say to join to an unused loop from round 8 (rather than 7)? I kept trying to figure out how to attach to round 7, then gave up and went with 8 🙂 Love this project, by the way! I'm waiting for it to dry so I can finish up!
Tamara Kelly says
Hi Jennie! I suppose it's all in how you look at it - it's the loop you left unworked while making Round 8, but it's the loop that was formed while making Round 7... either way, it sounds like you've got the idea! 😀
JEnnie says
Ah, I never thought of it that way! Makes sense though. I just finished sewing on the clasp and posted on Ravelry. My daughter absolutely loves it, and I might make the second one for myself 🙂
Tamara Kelly says
😀 Yay! I'm so glad to hear it!
shauntel messer says
Hey!! I'm on round 9 but if I do all the dc (clusters ) I will end up with 12 of them probably,. What am doing wrong?
Tamara Kelly says
It's hard to say without being there, but it sounds like maybe you're missing some skipped stitches or sc sts in between the shells?
shauntel messer says
am I supposed to do the skip stitch, 5 dc, skip stitch once then repeat 8 times and then do it again but add in the sc? I guess I'll try it again by adding in the sc between the skip stitches see if that works,. The ruffles go all the way around the pouch right?
Tamara Kelly says
You repeat "skip a stitch, dc5 in the next st, skip a stitch, sc in the next st" all the way around. Does that help?
SHAuntel messer says
yes it does thank you! that is what my mom has been trying to tell me to do but I reused to listen lol! I just got confused with the * and the **
Tamara Kelly says
Ah, glad I was able to clear it up! 😀
MCAtherine says
I am making these for 5 friends who were recently the 'rainbows in my cloud'. Thank you.
Tamara Kelly says
<3 Thank you MCAtherine!
MCatherine says
Just wrote a blog post about these sweet treats. Hope you received the ping.
Shirley Sackett says
Very cute. Love it! Thanks for sharing! Will make a lovely gift for someone!
Marrie says
Tamara! I found video tutorial for this pouch.. was sooo glad to hear it!
Tamara! Thanks for your cooperation and taking out lots of time for us from your busy time! I can never forget a teacher like u! Thanks a lot for declaring every thing from bottom to top! <3
Marrie says
What is the full form or BLO??
Thankx
Tamara Kelly says
BLO stands for Back Loop Only. 🙂
Alexis says
Oh my goodness, this is just the type of project perfect for me to make for my niece's birthday. She will be 5 at the end of September, and I was just starting to wonder what in the world I'd make for her this year. Thanks so much for sharing your talent! 🙂
Tamara Kelly says
😀 So glad you like it Alexis!
Connie says
THANK YOU for this ADORABLE little purse!! I have four granddaughters that will be THRILLED!!! Can't wait to start!! Will send you a pic!!
Tamara Kelly says
😀 You're so welcome Connie! I can't wait to see them!
Tami W. says
Help am I the only one having trouble with the stitch count? I do good until I get to the first round #5 step. I keep my stitch count is either one too many or a couple short.. I did exactly as she stated: chain one, sc 16 st across,sc 4 on the end, sc 16 across, and sc 4 on the last end st to first st. Then on the next round #6 some how I end up short a couple stitches. Am I supposed to count my chain stitch in the beginning of the round and the slip stitch at the end in my stitch count? I'm so frustrated I've been trying to figure it out for a few days now. If anyone can help me I would greatly appreciate it.
Tamara Kelly says
Hi Tami, sorry you're having trouble! It's hard to say without being there. The ch does not count as a stitch. Have you watched the video tutorial?
Tami W. says
Well I didn't give up and I finally figured it out. After you told me that the first chain doesn't count as a sc I knew where my problem was. I couldn't tell where my first sc started so I marked it with a safety pin. This pattern is adorable. I am making these for my daughter and nieces for Christmas. Also can we use this pattern to make and sell these pouches?
Tamara Kelly says
I'm so glad you were able to figure it out! 🙂 You are welcome to sell finished items made from any of my patterns!
Tami W. says
Thanks! That is very generous of you! 🙂
shauntel messer says
you're not the only one but I don't think it's the pattern lol at least it wasn't for me! I've never been very good at keeping count so I would just skip one here or add one there but with this pattern it didn't work that way! Lets just say I've started over probably a dozen times and have finally got it. I have one almost completed one half way completed then on my third one of being extremely careful with my stitches I finally have one I like 🙂 it's definitely a tricky one but worth it, hang in there
Tami W. says
Thanks for the pep talk. I did end up figuring it out. Thanks again.
jessica HSu says
This purse is so cute, since i'm a beginner and not an English speaker, is this possible you can make a video tutorial for this?
it will be really appreciated!
Tamara Kelly says
Hi Jessica! There is indeed a video tutorial! 😀 It's linked in the pattern above, or you can CLICK HERE!
Carole byars says
I have tried to print several of your patterns, but can't make the Printer Friendly button work. What am I missing here? How many ways can you click on a button??? HELP!
Tamara Kelly says
Hi Carole! It might be that you have popups blocked on your computer. In that case, I recommend going to PrintFriendly.com and entering the URL of the pattern there. 🙂
TC says
The lion brand website says the BonBons are #2 Fine yarn. Do you know if this is something that has changed since your posted the pattern? I want to try this but I'm not sure if I should use the #3 light yarn.
Tamara Kelly says
Different packs have different weights, but this should work pretty well with either weight - they are very close. 🙂
aika watanabe says
this pouch is absolutely adorable!!!
so i'm making one doubling its original width.
how tall is this when it's completed?
i'm wondering if i need to add some colors at the bottom
to make it a little taller than the original...
thanks for your assistance in advance!
Tamara Kelly says
3.5-4 inches if I recall correctly. Thank you!