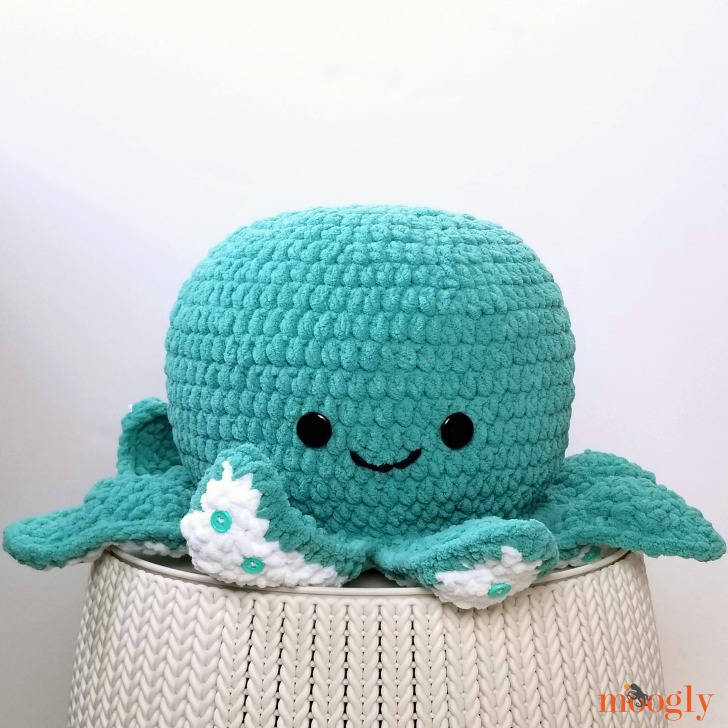
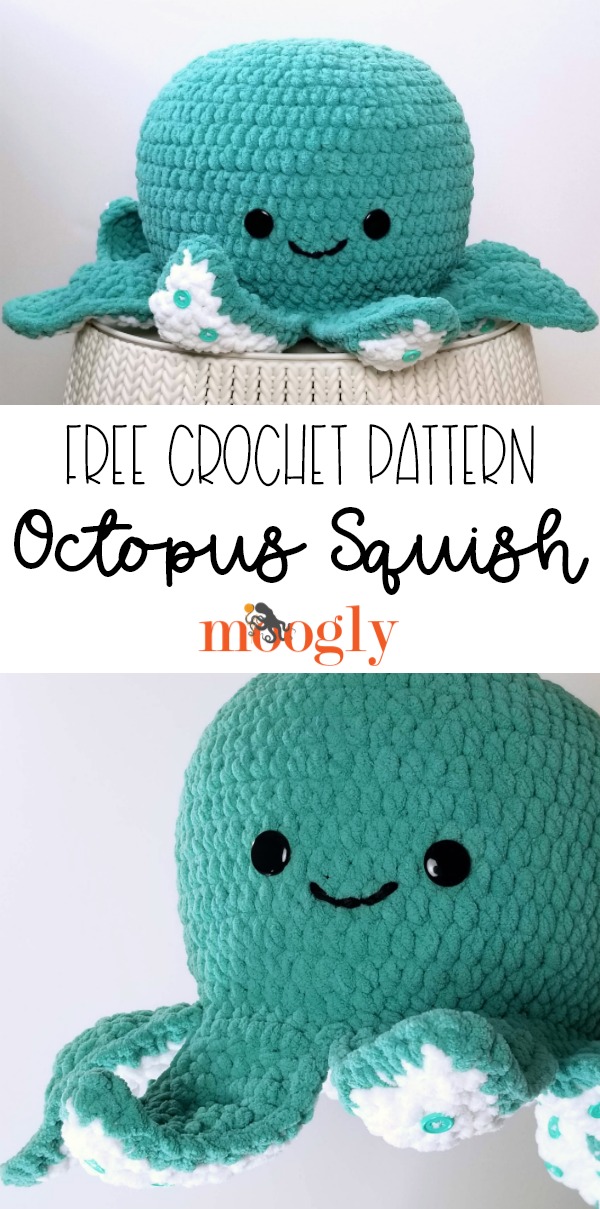
The Octopus Squish is a cute, cuddly, very squishy free crochet pattern on Moogly! Crochet this cute companion with Bernat Blanket and the pattern below!
 Disclaimer: This post includes affiliate links; materials provided by Yarnspirations and Furls.
Super Quick Squish!
The Octopus Squish is filled with a microbead pillow ball, making it addictively huggable! And by using Bernat Blanket, it works up pretty darn quickly too - and is just as soft as can be! If you prefer, of course, you can fill it with Fiberfill.

Cute and Cuddly
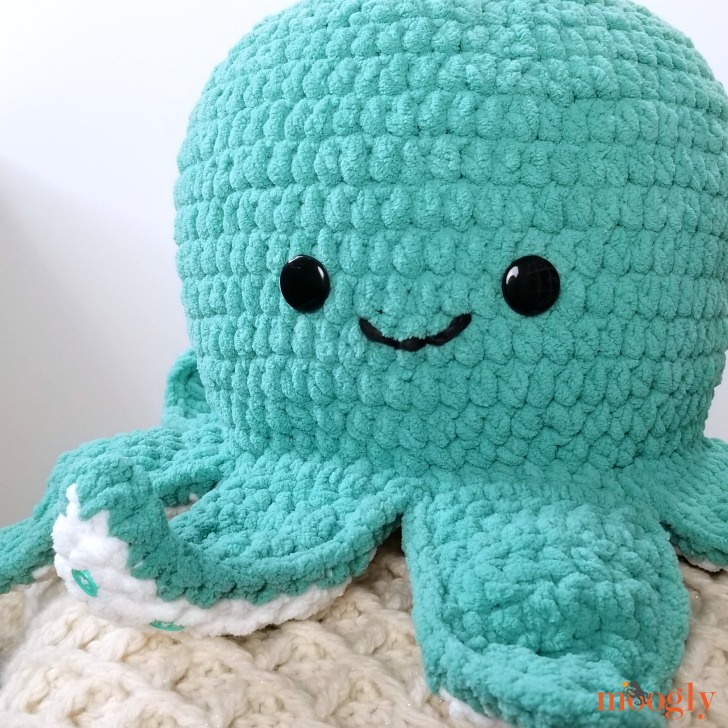
I had so much fun crocheting this octopus pillow! I love his cute little face and wiggly tentacles! You can make this little guy your own with yarn and button choices, and how you sew on the face.

A Note on Toys for Kids
While the Octopus Squish itself is too big for babies to choke on... the buttons are not. This pattern has not been tested for safety for children under 3 years of age. If you are crocheting it for a baby or toddler, please embroider on the face and tentacle suckers rather than using buttons. If using it as a photo prop, be sure not to leave the toy with a baby unattended.


Octopus Squish
Add this pattern to your Ravelry Queue and Favorites
US-L, 7.0 mm hook - Furls
320 yds Bernat Blanket (6 - Super Bulky/UK: 14-16 ply; 100% polyester; 300g/10.5 oz; 201 m/220 yds)
Color A: Light Teal (220 yds, 1 ball)
Color B: White (100 yds, 1 ball)
12" (30 cm) worsted weight black yarn
40+ ½" (12mm) teal buttons (My Favorite Colors, JOANN)
2 ⅞" (22mm) black buttons (La Mode, JOANN)
10" Round Microbead Pillow (blue) - Amazon
Alternative if the above is sold out - Amazon square!
Coats Sewing Thread - White
Gauge: 4"/10cm across after Rnd 3.
Size: 10" around excluding tentacles
HELPFUL LINKS AND TUTORIALS
NOTES:
Rnds 1 - 18 are worked in a spiral.
Do not ch 1 at the beginning of Rnds 2-19, and do not join any rnds with a sl st.
Move a stitch marker along the first st of each rnd as you work to keep track of your progress.
INSTRUCTIONS:
Body
Rnd 1: With Color A, make a magic circle, ch 1, sc in the ring, 9 hdc in the ring. (10 sts)
Rnd 2: 2 hdc in each st around. (20 hdc)
Rnd 3: *Hdc in the next st, 2 hdc in the next st; rep from * around. (30 hdc)
Rnd 4: *2 hdc in the next st, hdc in the next 2 sts; rep from * around. (40 hdc)
Rnd 5: *Hdc in the next 3 sts, 2 hdc in the next st; rep from * around. (50 hdc)
Rnd 6: *Hdc in the next st, 2 hdc in the next st, hdc in the next 3 sts; rep from * around. (60 hdc)
Rnd 7: Hdc in the next 5 sts, 2 hdc in the next st, *hdc in the next 9 sts, 2 hdc in the next st; rep from * until 4 sts rem, hdc in last 4 sts. (66 hdc)
Rnd 8: *2 hdc in the next st, hdc in the next 10 sts; rep from * around. (72 hdc)
Rnd 9: Hdc in the next 8 sts, 2 hdc in the next st, *hdc in the next 17 sts, 2 hdc in the next st; rep from * until 9 sts rem, hdc in last 9 sts. (76 hdc)
Rnd 10 - 15: Hdc in each st around.
Rnd 16: *Hdc in next 17 sts, hdc2tog; rep from * around. (72 hdc)
Rnd 17: Hdc in next 4 sts, hdc2tog, *hdc in next 7 sts, hdc2tog; rep from * around until 3 sts rem, hdc in last 3 sts. (64 sts)
Rnd 18: *Hdc2tog, hdc in next 6 sts; rep from * around. (56 sts) - DO NOT BREAK YARN.
Tentacles
Tentacle #1:
Row 1: Hdc in next 7 sts; turn (rem sts left unworked). (7 hdc)
Row 2 - 4: Ch 1, hdc in each st across; turn.
Row 5: Ch 1, 2 hdc in the first st, hdc in the next 4 sts, hdc2tog; turn.
Row 6: Ch 1, hdc2tog twice, hdc in next 2 sts, 2 hdc in the last st; turn. (6 hdc)
Row 7: Ch 1, 2 hdc in the first st, hdc in the next st, hdc2tog twice; turn. (5 hdc)
Row 8: Ch 1, hdc2tog, hdc in next st, hdc2tog; turn. (3 hdc)
Row 9: Ch 1, hdc in the first st, hdc2tog; turn. (2 hdc)
Row 10: Ch 1, hdc2tog; break yarn and finish off. (1 hdc)
Tentacles #2 - 8:
Row 1: Join to next st of Rnd 18, ch 1, hdc in same st and next 6 sts; turn. (7 hdc)
Row 2 - 10: Rep as for Tentacle #1. Weave in all ends. Set piece aside.

Underbelly
Rnd 1 - 5: With Color B, rep Rnd 1 - 5 of Body. (50 hdc)
Rnd 6: *(Hdc in next 7 sts, 2 hdc in the next st) twice, hdc in next 8 sts, 2 hdc in the next st; rep from * around. (56 hdc) - DO NOT BREAK YARN.
Under-Tentacles
Under-Tentacle #1:
Row 1: Hdc in next 7 sts; turn (rem sts left unworked). (7 hdc)
Row 2 - 4: Ch 1, hdc in each st across; turn.
Row 5: Ch 1, hdc2tog, hdc in the next 4 sts, 2 hdc in the last st; turn.
Row 6: Ch 1, 2 hdc in the first st, hdc in next 2 sts, hdc2tog twice; turn. (6 hdc)
Row 7: Ch 1, hdc2tog twice, hdc in the next st, 2 hdc in the last st; turn. (5 hdc)
Row 8: Ch 1, hdc2tog, hdc in next st, hdc2tog; turn. (3 hdc)
Row 9: Ch 1, hdc2tog, hdc in the last st; turn. (2 hdc)
Row 10: Ch 1, hdc2tog; break yarn and finish off. (1 hdc)
Under-Tentacles #2 - 8:
Row 1: Join to next st of Rnd 18, ch 1, hdc in same st and next 6 sts; turn. (7 hdc)
Row 2 - 10: Rep as for Under-Tentacle #1. Weave in all ends.
Assembly
Add the Suckers to the Tentacles: Sew the teal buttons to the Under-Tentacles as shown (5 per tentacle).

Create the Face: Sew the black buttons to the Body for eyes and sew on a smile using the short length of black yarn.

Prep for Finishing: Insert the Pillow into the Body, then match up the Tentacles and Under-Tentacles. Making sure that all buttons are facing out, use stitch markers to secure the pieces together.


Final Seam: Using Color A, sc through Tentacles and Under-Tentacles from the Body side of the project, working evenly around the entire body. Use Seamless Finishing to join, break yarn and weave in end.
Looking for more free crochet toy and softie patterns? Browse them all on the Moogly Free Patterns Page or Ravelry!
If this pattern inspires you to make your own project, and you post a photo on social media, be sure to tag me @mooglyblog or #mooglyblog so I can check it out too!
THE FINE PRINT
Follow Moogly on Facebook, Twitter, Pinterest, Instagram, and Tumblr! Thank you to Yarnspirations for providing the materials shown in this post. Written pattern copyright Tamara Kelly 2020, all rights reserved. Please do not reprint or repost this pattern, but please do link to this page to share this pattern with others.
To print or download, use the Print Friendly button below, or go to PrintFriendly.com, or right-click to copy and paste it into a word processing document if those options do not work for you (please note that Print Friendly is a free outside website that the button links to, and you can click here for a tutorial on how to use it, but I cannot provide additional technical support for this service).
If you wish to make items for sale from this pattern or translate it to another language, please visit the About page for details.


Carolyn C Bolivar
Adorable !
Crystal
I don't have 7mm hook! Do you think I could use a 6.5mm or 8mm?
Thanks!
Tamara Kelly
Hi Crystal! I'd go with the 6.5mm in that case - you want a nice tight fabric. 🙂
Alma
I made this for my bbf, he just graduated and I attached a graduation cap to this plushie.
Thanks for sharing this pattern ❤️
Tamara Kelly
Oh my, that sounds adorable! Thank you so much! ♥
J
In the written pattern (this post) it recommends a 7mm hook, but in the video tutorial I saw you used an 8. Which is a better size to use for this project?
Tamara Kelly
I accidentally grabbed the wrong one for the tutorial - you'll want the 7mm!
Lilah Morales
If I want to make it smaller can I use regular single crochet or will it mess up the shape of the octopus?
Tamara Kelly
I think it would be easiest to use thinner yarn and a smaller hook. 🙂
Nancy Puckett
Making this now but the blue microbead pillow is out of stock. Only the neon green is available on amazon and I'm scared it will peek through. Any thoughts?
Loving the pattern by the way--so easy to follow!!
Schmiller
Hi,
I'm trying to find the 10" ball but they are not available anymore at Amazon. They do have the 8" ball. Do you have advice on how to adjust the octopus size so that it's not too big for the 8" ball? Or do you think it should fit fine?
Thank you! I want to start making these for both of my daughters!
Tamara Kelly
Oh dear! You could try padding it out with some batting/fiberfill, or I'm thinking these corners might just squish in? https://amzn.to/38PD7IL
Miss Mahtab
I love your ideas. That's all is so impressive and unique. you are doing nice and loveable crocheting.
Tamara Kelly
Thank you so much, Miss Mahtab! ♥
Michelle
This is adorable! I have just under a large skein of the teal, do you think I would have enough? I have at least 200 yards, easily. I can barely tell I have any missing from the skein, except for the fact I know I used it,
Tamara Kelly
I would think you'd be okay!
Kerryn
Hello, Gorgeous pattern!
I’ve done the body and the first 3 tentacles, but I’ve noticed the first tentacle is curving in the opposite direction to the next two. Do the tentacles all curve in the same direction?
The first one is done with the right side facing (the outside of the body), I’ve presumed the rest are worked round to the left, going round anti clockwise (with right side facing), but that’s made them curve in the opposite direction.
So can you give me some advice on where I’m going wrong?
Thank you xx
Tamara Kelly
They should all curve in the same direction - right side facing to begin, last row from the wrong side. 🙂
Kerryn
Thank you Tamara!
After lots of thinking, I realised I’d missed row 4 of the first tentacle, which is why it was curving the wrong way. All 8 successfully done.
Thank you for getting back to me x
Tamara Kelly
Ah, I wondered if that happened! I'm so glad they all worked out! 😀
Jantzen
Great project! Used an 8 mm hook and poly fil stuffing and it turned out great!
Tamara Kelly
Yay, thank you so much Jantzen!
Victoria
I love this! Just wondering roughly how big this would be finished?
Tamara Kelly
10″ across excluding tentacles 🙂
jen
Hi! For some reason everytime I do row 2 and 3 it doesn't look like the one in your video. Mine looks more curled and i also used the tip to lightly pull the last stich but it still cruls. I also have a question since it's my first time crocheting that I was wondering where I would place my stich marker. As in after the first stitch or is it in the first stitch. Also, my 2nd and 3rd row the sticthes seem so far away? how would I keep them closer? Also I'm not sure what's the difference of a 2hdc and a hdc... so sorry for all these questions.
Tamara Kelly
Hi Jen!
Experimenting with hook sizes might help with the curling up!
The stitch marker would go in the first stitch you make for each round.
I'm not sure why the stitches seem far away? I'm not sure what that means?
2 hdc is two half double crochets worked into the same st, as opposed to just one hdc. 🙂
I hope that helps!
Melanie
Can you explain the final seam or do a video on it? Color A is thick and shows through the white.
Tamara Kelly
Hi Melanie! If you look at the pics, you'll see the white peeking through on mine as well. 🙂
Jen
Yes, So I retried the first row and I notice that it doesn't seem full? or at least I would need 1 or 2 more 2hdc to make a full circle for the first row of the body. I have also did the tip to pull the last stitch and such but it still looks a bit wonky. So, when I tried to do the second row it wasn't a circle anymore... and I'm still confused where I should place my stitch marker because I'm not use to it yet but is it the space before the stitch?
and thank you so much for answering my previou question!!! You are very sweet!
Tamara Kelly
Hi Jen! I'm not sure what's happening with the first couple rows without being there I'm afraid. Have you pulled the tip circle closed?
Each stitch has a V in the top of the stitch - the two loops. You put the stitch marker under the top two loops of the first stitch of each round.
Alison
Hello- does this use the entire amount of each yarn? Trying to price out to make multiple of these and was curious about how much of each is used. Thank you! And thank you for the fantastic video. Really helps!
Tamara Kelly
Hi Alison! No, the exact amounts for each color are listed above, along with the color names (with the hook and gauge info,etc). Thank you so much!
Kat
Hi!! I tried out the pattern with Bulky (5) cashmere acrylic blend yarn and different sized hooks (4.5mm & 6mm) but no matter what I do, there always seems to be gaps between my stitches (rows). Would you know how I might be able to fix this? I tried increasing tension, but my yarn just became too tense and hard. I was also wondering if any changes need to be made to the pattern in order to get an octopus of the same size (with the thinner yarn). I'm just starting out with crocheting, and I absolutely adore this squish. I'm hoping to make one of these as a gift for a friend this Christmas! 🙂 Any feedback would help. Thank you!
Tamara Kelly
Hi Kat! I think what helps here is using a yarn that has a good amount of fuzz, like the chenille in Bernat Blanket. If you're using a thinner yarn, try doubling or tripling it - that often helps fill in those gaps too. 🙂
Kat
Thank you so much! I'll try that out 🙂
Peyton Hocanson
Would you be okay with me making these and selling them? I have an Etsy shop and I'd love to add these.
Tamara Kelly
Yes, I just ask that you include a link on the listing to the pattern for other crocheters. 🙂 Best of luck with your shop!
Aisha
Wonderful wonderful pattern! Just wondering, I’m using a thinner yarn with a 5mm hook. The body looks great but the underbelly is so small. I’m considering repeating row 6 a few times to extend the diameter but I just wanted to check if it’s intentional that it’s much smaller. Maybe it has something to do with my yarn being thinner... I’m new to crocheting so I have a few things to learn lol 😀
Thanks for the amazing pattern though!
Tamara Kelly
Thank you! Rnd 6 of the Underbelly and Rnd 18 of the Body have the same number of sts so they should be the same size, or very close!
Samantha
I’m having the same problem. Every time I finish the 6th round I’m about 2 inches away from the border of the main body. There’s no way I’m going to get it stitched together.
Tamara Kelly
I'm always amazing just how much it stretches - it never *looks* like it's going to work!
Mary Kay
My 10" amazon ball thing doesn't fit snugly in the top of the octopus. Should I switch to an 8mm hook?
Tamara Kelly
That sounds like it would help - you could also use fiberfill to make up the difference. 🙂
Mary Kay
Another question: do you have any suggestions as to how to crochet the suckers? I’m making two; one for my niece and for my nephew. My niece is under two yo, and my nephew is an infant, so I’m not taking ANY chances with buttons. I already know how to crochet eyes. I was thinking that for the suckers I could make tiny little Pom poms?
Tamara Kelly
Hi Mary Kay! The pom poms might be a bit easy to pull off - for suckers for littles I usually recommend crocheting small flat circles and sewing them on like appliques. A round of 12 dc in a magic circle ought to about do it!
Mary Kay
Using the Bernat blanket?
Tamara Kelly
That, or you could grab some Red Heart Super Saver, With Love, Caron Simply Soft - whatever color coordinates! 🙂
Mary Kay
I'm going to cry. I've tried 3 times (about to take it apart again) to make this adorable stuffy. EVERY SINGLE TIME I have a large gap (about 4 sts) between the first tentacle and the last tentacle. I'm super anal about counting, and I use the stitch markers to mark the rows, but I also use stitch markers to mark every 10 sts in case I lose count.
Tamara Kelly
I'm sorry you're having trouble Mary Kay! Has the video helped at all? I can't really guess what the issue is from here.
Aurora Johnson
With the ball as the fill, the body should be fitting over the entire ball correct? I had gotten down to 18 rows and have enough stitches in each but it doesn't cover to the bottom edge essentially. I used the 8mm based off of the video but I see the pattern actually calls for 7? Would a 7 help me better, or should I go up a size from the 8? Everything is nice and tight around the ball just not covering the ball enough.
Thank you for this pattern! Once I get the body all the way over the ball, I can then finish it successful!
Tamara Kelly
If it's tight, you don't want to go down a hook size. There should be a bit of ball at the bottom that is covered by the tentacles, but if it's too full, you can open a seam in the ball and empty some of the beads. Unfortunately, I've found that some balls come overfilled!
Alex
Hello,
I am currently about to finish round 7 of the body, but I keep counting and I only have 64 stitches! Is there anything I can do? Please help 🙁
Lindsay
Every time that I get to the point of making the tentacles, the body shape is more of a plate than a bowl (much more short and wide than in the photo). What am I doing wrong?
Tamara Kelly
My best advice is to check your gauge, and add more of the rounds worked even if needed!
Georgia Mahala
Oh my gosh! Thank you soo much for sharing and your video tutorials. I have struggled starting to crochet but your videos and steps were clear and easy to follow. I have two tentacles on the body to do then it’s off to the underbelly. So excited. I am looking for the ball suggestion every where I can Bc I’d prefer that over the fiber fill. Thank you again and God bless!
Tamara Kelly
♥ Thank you so much!
Juliette
Hi! I just finished this wonderful pattern and I’m so happy! It work out perfectly! Thank you so much!
Tamara Kelly
♥ Thank you so much!
Karen Blaine
Hi. I’m in the process of making this now. I’m putting 3 threads together and and 8mm hook. So far so good. My question is I bought the ball last year and now looking at the tag attached. It says
‘This item is not intended for use by infants or children’. Also to avoid contact with the contents. Making this for a child. Have you had any problems in the past with the ball tearing or anything. I can’t use fiber fill due to there’s small holes and it would come through. Not to sure what to do. Thank you for this adorable pattern. First time making it. I usually make smaller ones. Thank you and have a great day.
Tamara Kelly
I have not had any issues, but if you are worried you could use one of these - just remove some of the interior filling through the zipper: https://amzn.to/3BctWAD
Karen Blaine
Thank you so much. This is a great help. Have an awesome day.
Linda
I’m using Bernat blanket yarn,& #7 hook. can you tell me how to make this a little smaller , approx 8 “” ( instead of 10”) Thanks
Tamara Kelly
Hi Linda! You would need to eliminate 2-3 rounds of increases, and probably at least one of the work even rounds as well.
Karen Blaine
Hi. So I finished the Octopus Squish. I’m not able to down load a picture. I did make my own ball. Thanks for the suggestion. It’s for a 1 year old boy. Take care and have a great day. 🤗
Tamara Kelly
Yay, I'm so glad you liked it! I'm afraid we can't host photos here in the comments, but if you want to email me a photo to tamarakelly@mooglyblog.com I would love to see it!
Wendy
I love making quick and easy but super cute stuffed animals, but then I don't know what to do with them after they're made. I recently started a new job and mentioned it to my boss. She said, "Bring them in!" HOLY COW, THEY ARE A HUGE HIT!! It was a stressful day and they were hugged and petted (I made one with velvet yarn) SO many times throughout the day! Then one of my coworkers asked me to make two for her kids. I love spreading the love and a HUGE thank you to YOU for the patterns!
Laura
Hello! I’m new to crochet, and I’m just wondering what does it mean to hdc in the next 3 stitches, what’s the difference of two hdc in 1 stitch?
Tamara Kelly
Hi Laura! Hdc in the next 3 sts means that you work one half double crochet in each of the next three stitches. 2 hdc in the next stitch means that you are putting two half double crochets into the top of the next stitch - adding an increase or additional stitch. Does that make sense?
Laura
Yes, thank you, in rounds 10-15 how many stitches should there be per round?
Tamara Kelly
There should be (76 hdc) - it's not listed, because there's no change from the previous row/round. 🙂
Moriah
This pattern is so cute and I just love it and can't wait to have it on my bed and cuddle with it!!!