Inspiration comes from funny places sometimes. A photo, a mood, a yarn... and sometimes a silly saying! Introducting Totes McGoats... the goat tote!
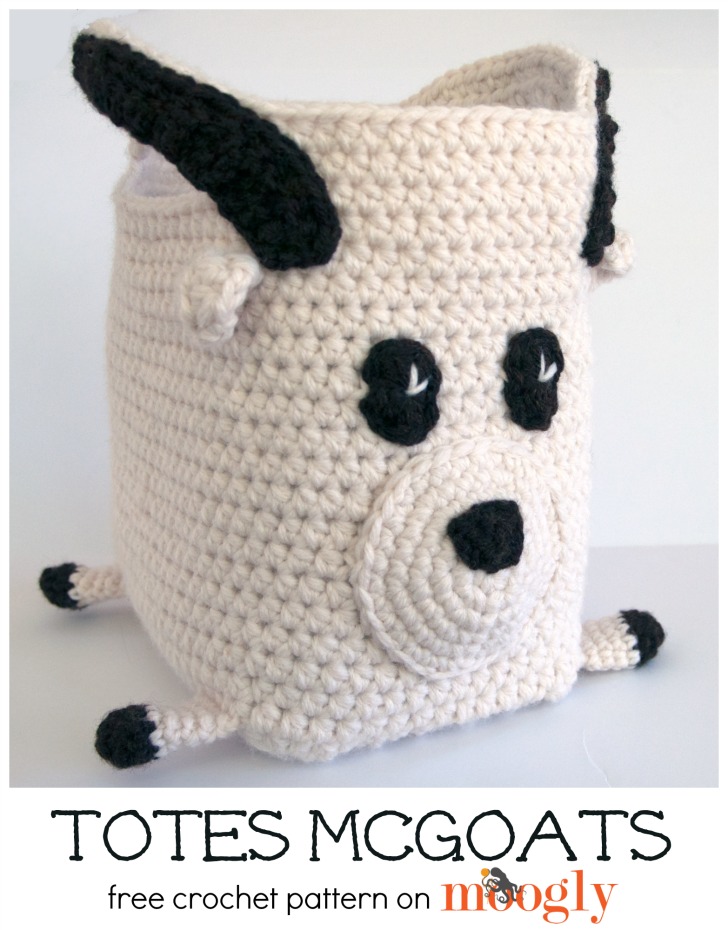

Totes McGoats makes a great all purpose tote for goat fans, meme lovers, goat farmers, and people with that certain sense of humor. And it makes a great Halloween treat bag or basket too!

It makes a great yarn basket too - it can hold 6 skeins of Vanna's Choice with room left over for your notions pouch! Of course, if you like the bag, but aren't a goat fan, the bag instructions alone make a fantastic sturdy tote!
 Disclaimer: This post includes affiliate links.
Totes McGoats
Add this pattern to your Ravelry Queue and Favorites
- US - I, 5.5 mm hook (Furls Fiberarts)
- US - K, 6.5 mm hook (Clover Jumbo)
- Lion Brand Wool-Ease Chunky (discontinued) (Bulky/yarn symbol "5"; 153 yds/140 m; 4.94 oz)
Color A: Fisherman - 4 balls; 500 yds
Color B: Walnut - 1 ball; 40 yds - Stitch Markers (Clover Lock Ring Markers recommended)
- Yarn/Tapestry Needle
- Gauge: 10 sts x 8.5 rows = 4" in hdc with yarn doubled and larger hook
- Finished Size: 10" wide excluding muzzle; 7" wide excluding legs; 9.5" tall before handles
- Useful Video Tutorials: Magic Circle; Bag Bottoms: Rows to Rounds; Bag Handles
Special Stitches:
sc/hdc2tog - insert hook in indicated stitch, yo and pull up a loop, yo and insert hook in next st, yo and pull up a loop, yo and pull through all loops on hook.
hdc/sc2tog - yo and insert hook in indicated stitch, yo and pull up a loop, insert hook in next st, yo and pull up a loop, yo and pull through all loops on hook.
Note: In some parts of the bag, the yarn is held doubled, and two different hook sizes are used - be sure to read the instructions carefully! Make the parts in the following order.
LEGS: Using the smaller hook and yarn held single, make 4.
Round 1: With Color B, make a magic circle, work 5 sc into the ring; join with a sl st in first sc to work in the round. (5 sts)
Round 2: Ch 1, 2 sc in each st around; join with a sl st. (10 sts)
Round 3: Ch 1, sc in each st around; join with a sl st and break yarn. (10 sts)
Round 4: With Color A, join to any st of previous row, ch 1, sc in each st around; join with a sl st. (10 sts_
Round 5 - 7: Ch 1, sc in each st around; join with a sl st. (10 sts)
Row 8: Folding leg flat, ch 1, sc through both layers closing up leg; break yarn and finish off. (5 sts)
BAG: Using the larger hook and yarn held doubled, make 1.
Row 1: With Color A, ch 24, skip the ch closest to the hook, hdc in each of the remaining chs; turn. (23 sts)
Row 2 - 12: Ch 1, hdc 23; turn. (23 sts)
Round 13: Ch 1, hdc 23, turn work 90°, hdc 14 along sides of previous rows, turn work 90°, hdc 23 along foundation chain, turn work 90°, hdc 14 along sides of previous rows; join to first hdc of round with a sl st. (74 sts) Place stitch markers on sts #1, 19, 39, and 56.
Round 14: Ch 1, hdc in the first 5 sts working through the sts of one leg and the sts of the previous round (hold so that the hook goes through the leg before the stitch), *hdc to next st marker, hdc 5 working through the sts of one leg and the sts of the previous round; rep from * 3 times, hdc in last 14 sts; join with a sl st. (74 sts)
Round 15 - 31: Ch 1, hdc in each st around; join with a sl st. (74 sts) Place stitch markers on sts #15, 31, 52, and 68 - make sure these line up as they will be the handle openings.
Round 32: Ch 1, hdc to 1st st marker, *hdc in marked st, ch 20, skip 15 sts, hdc in next marked st, hdc to next marked st; rep from *, ending with hdc in last st, join with a sl st. (44 hdc, 40 chs)
Round 33: Ch 1, hdc in each st and ch around; join with a sl st. (84 sts)
Round 34: Ch 1, hdc in each st around; join and break yarn. (84 sts)
MUZZLE: Using the larger hook and yarn held doubled, make 1.
Round 1: With Color A, make a magic circle, work 6 sc into the ring; join with a sl st in the first sc to work in the round. (6 sc)
Round 2: Ch 1, 2 sc in each st around; join with a sl st. (12 sts)
Round 3: Ch 1, *sc in the next st, 2 sc in the next st; rep from *, join with a sl st. (18 sts)
Round 4: Ch 1, *sc in the next 2 sts, 2 sc in the next st; rep from *, join with a sl st. (24 sts)
Round 5: Ch 1, *sc in the next 3 sts, 2 sc in the next st; rep from *, join with a sl st. (30 sts)
Round 6: Ch 1, sc in each st around; join and break yarn leaving a long tail for sewing. (30 sts)
NOSE: Using the smaller hook and yarn held single, make 1.
Row 1: With Color B, ch 6, skip the ch closest to the hook, sc in each remaining ch; turn. (5 sts)
Row 2: Ch 1, sc2tog, sc in the next st, sc2tog; turn. (3 sts)
Row 3: Ch 1, sc3tog; break yarn leaving long tail for sewing. (1 st)
Sew nose to muzzle as shown, then sew muzzle to bag as shown.
EYES: Using the smaller hook and yarn held single, make 2.
Round 1: With Color B, make a magic circle, then working into the ring sc 2, hdc, dc 3, hdc, sc 2, hdc, dc 3, hdc; join and break yarn, leaving a long tail for sewing.
Add "twinkle" with Color A and a yarn needle, then sew to bag as shown.
EARS: Using the larger hook and yarn held doubled, make 2.
Row 1: (Leave long tail at beginning for sewing.) With Color A, ch 4, skip the ch closest to the hook, 2 sc in the next ch, hdc in the next ch, 2 sc in the last ch; turn. (5 sts)
Row 2: Ch 1, sc in the 1st st, hdc in the next 3 sts, sc in the last st; turn. (5 sts)
Row 3: Ch 1, sc/hdc2tog, dc in the next st, hdc/sc2tog; break yarn and finish off. (3 sts)
Sew to bag as shown.
HORNS: Using the smaller hook and yarn held single, make 2.
Row 1: (Leave long tail at beginning for sewing.) With Color B, ch 29, skip the ch closest to the hook, sl st in the next 4 chs, sc in the next 4 chs, 2 sc in the next ch, hdc in the next 5 chs, 2 dc in the next ch, dc in the next 5 chs, 2 tr in the next ch, tr in the last 7 chs; turn. (31 sts)
Row 2: Ch 1, sc in the first 27 sts, sl st in the last 4 sts; break yarn and finish off, leaving long tail for sewing. (31 sts)
Sew to basket as shown, going from next to/above the ears and along the handles.
And that's that! Relatively simple, for a bag that looks like a goat! And it's a great practical bag too - making the main part with the yarn held doubled means it's strong, sturdy, and ready for action, and doesn't need a lining unless you're filling it with super small stuff! I hope you enjoy this free crochet pattern - I do, Totes McGoats!
The Fine Print
Written pattern copyright Tamara Kelly 2015, all rights reserved. Please do not reprint or repost this pattern, but please do link to this page to share this pattern with others. To print this pattern for personal use, please use the green Print Friendly button at the bottom of the pattern. If you wish to make items for sale from this pattern, or translate it to another language, please visit the About page for details. Thank you to Lion Brand Yarn for providing the yarn for this pattern!

Kai Naconi
I just had to tell you how much I LOVE your patterns! I can't begin to recall how many I've made, and they are ALWAYS huge hits with the recipients! THANK YOU for your generosity AND for writing the patterns in an easily understood manner for beginners and long-time crocheters like ME! (I've been a 'hooker' for 44 years! HAHAHA!) You are a DOLL! Kai
Tamara Kelly
Thank you so very much Kai! <3 I really appreciate it!
SueRad
Tamara, your Totes McGoats is so sweet and brought with it a smile and a giggle or two. Thank you for sharing!
Tamara Kelly
😀 Thank you so much SueRad!
Patrice
Do you have a shop where you sell stuff like this that you make? I WISH I had any crochet talents, but I don't. However, I neeeeeeeeed this bag as a Christmas gift for my colleg daughter who is obsessed with goats!
I'm posting again, because I forgot to ask for notifications. Sorry!
Tamara Kelly
Hi Patrice! I'm afraid I don't, but the Moogly Makers page is a great place to look for someone who does!
Mary anne
I Totes McGoats LOVE this! I've been looking at various patterns for something to corral my WIPs, and I think this is the winner! Can't wait to start it!
Tamara Kelly
Thank you so much Mary Anne!! 😀
Gina
I just LOVE goats!!! Thank you so much. I hope to see more "goatie" patterns in the future.
Gina
Central NYS
Tamara Kelly
😀 Thank you so much Gina!
Maggie
I love this pattern. It is a gift for my sister in law who is a goat farmer and farmers market seller in North Carolina . I have run out of yarn though ?. I made the legs, muzle, and ears and am only to row 30 with color a. This is ok. Just an FYI. I think my gauge is spot on as it measures out good just need to make a stop to get another ball to finish the handles??
Tamara Kelly
Oh dear! I'll up the yarn requirements, I had plenty left over, but these things happen. Thank you for leting me know Maggie!
Carol
This is just too cute for words, thank you for sharing with us!
Tamara Kelly
😀 Thank you so much Carol!
Carla
Hi there, this is fab. I love all your patterns by the way lol. I was wondering do you think double stranded worsted would work on this or triple? Thanks!
Tamara Kelly
Thank you Carla! It's made with double stranded already, so I'd try triple or even quadruple with worsted - whichever gives you the gauge and fabric you like best!
Shirley
Hi Tamara, let was wondering if you had any ideas on how to turn this into a cow basket? Thanks.
Shirley
Tamara Kelly
Ooo, good question! I would make the horns lighter and much shorter (just make the end "point" portion) Make the muzzle pink and add two dots for the nostrils, and add a couple black splotches to the body! 😀
Tonya
Hey I really love this pattern the only thing is that I'm having a hard time with round 14 on the bag. Where you work through the legs. But I'll keep trying and see if I can get it to work.
Tamara Kelly
Thank you Tonya! Adding the legs is sort of like crochet seaming - just making your stitches through several layers at once.
Bonnie
I am having a problem with row 15. The stitch markers placed at 15 and 31 are placing my handles in odd spots. I have 74 stitches. Why are my handles not in the right places? Any idea what I may have done wrong? Thanks, Bonnie
Bonnie
I forgot to ask, is there a video for this tote?
Tamara Kelly
Hi Bonnie! No, there isn't a video for this one. But I'd be happy to help you if you have any other questions! 🙂
Tamara Kelly
Hi Bonnie! The placement of the handles may need to be changed due to personal tension - everyone crochets a little bit differently, and that can create a different angle in the stitches. This is why I include instructions to check them to make sure they line up - so you can move them as needed so they are just right for your bag. 🙂
Joey
OMG - you are so-o-o cute - this is definitely my next project
Tamara Kelly
😀 Thank you so much Joey!!
Ann
First goat - no problems. Second goat - handles were on front and back, not sides. Finally figured out the bottom was a row off(+/-1) so seam went up the side not the back of the goat. Looking forward to goat #3!