The Posy Toes Crochet Slippers are soft, cozy, and made in breathable cotton they're just right for spring - and summer too! Wear these to ward off a mild chill or just to look pretty!


As soon as I came up with this pattern, I couldn't resist sharing it! The Posy Toes Crochet Slippers feature flowers that are made as you crochet - no sewing them on later! This means they stand up a bit, giving you a little garden on top of each foot!

This would be a great project for stash-busting too, as they only take one skein of yarn, plus a bit of a second skein... or 3 shorter lengths, to make 3 different colored stripes and flowers!
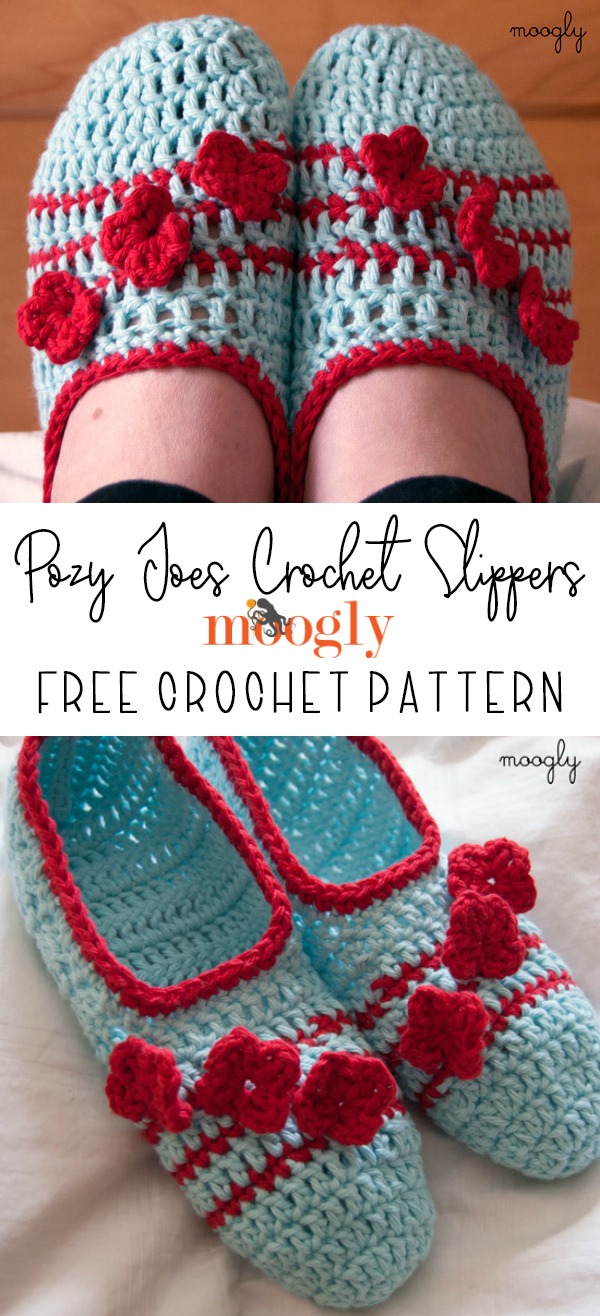
Pozy Toes Crochet Slippers
Add this pattern to your Ravelry Queue and Favorites
- US-G,4.0mm hook
- 160 yds Bernat Handicrafter (Worsted; 100% cotton)
100-120 yds Color A; 40 yds Color B - Gauge: 18 sts x 8 rows = 4"
- This pattern is written for both average and wide width. When the stitch counts are different, they will be written as Average(Wide).
- For length, please be sure to try the slipper on as you go, and again after seaming the heel, before cutting the yarn.
SPECIAL INSTRUCTIONS: Make Flower - Ch4, and skipping the last 3 ch made, sl st in the first ch to create a ring. [Ch 2, dc in the ring, ch2, sc in the ring] 4 times.
RIGHT FOOT INSTRUCTIONS:
Round 1: With Color A, make a magic circle and ch 2 (does not count as first st). Dc 12 in the ring and join to the first dc with a sl st. Tighten ring.(12 sts)
Round 2: Ch 2, *dc in next st, 2 dc in next st. Repeat from * to end. Join to first dc with a sl st. (18 sts)
Round 3: Ch 2, *dc in next 2 sts, 2 dc in next st. Repeat from * to end. Join to first dc with a sl st. (24 sts)
Round 4: Ch 2, *dc in next 11(3) sts, 2 dc in next st. Repeat from * to end. Join to first dc with a sl st. (26(30) sts)
Round 5: Ch 2, dc in each st to end. Join to first dc with a sl st, using Color B. (26(30) sts)
Round 6: Using Color B, ch 1, sc in next 2 sts, make flower. Sc in remaining 24(28) sts. Join to first sc with a sl st, using Color A. (26(30) sts)
Round 7: Using Color A, ch 2, dc in each st to end. Join to first dc with a sl st, using Color B. (26(30) sts)
Round 8: Using Color B, ch 1, sc in next 5 sts, make flower. Sc in remaining 21(25) sts. Join to first sc with a sl st, using Color A. (26(30) sts)
Round 9: Using Color A, ch 2, dc in each st to end. Join to first dc with a sl st, using Color B. (26(30) sts)
Round 10: Using Color B, ch 1, sc in next 8 sts, make flower. Sc in remaining 18(22) sts. Join to first sc with a sl st, using Color A. Break Color B. (26(30) sts)
Round 11: Using Color A, ch 2, dc in each st to end. Join to first dc with a sl st. (26(30) sts)
Round 12: Using Color A, ch 2, dc in each st to end. Join to first dc with a sl st. Turn to start working in rows. (26(30) sts)
Row 13: Ch 2, dc in the first 20(22) sts. Stop here and turn. (20(22) sts)
Row 14: Ch 2, dc in each s. Turn. 20(22) sts.
Row 15 - ?: Repeat Row 14 until you can just get the last row made to meet at the back of the heal. Remember that as we've already accounted for width, people with very wide and short feet may not need to go as long as their usual shoe size as the width is already accommodated. As an estimate:
- Women's Shoe Size 6/7 - continue to Row 21
- Women's Shoe Size 8/9 - continue to Row 22
- Women's Shoe Size 10/11 - continue to Row 23
To finish the Right Foot Slipper, go to the Finishing Instructions at the bottom of the pattern
LEFT FOOT INSTRUCTIONS:
Round 1: With Color A, make a magic circle and ch 2 (does not count as first st). Dc 12 in the ring and join to the first dc with a sl st. Tighten ring.(12 sts)
Round 2: Ch 2, *dc in next st, 2 dc in next st. Repeat from * to end. Join to first dc with a sl st. (18 sts)
Round 3: Ch 2, *dc in next 2 sts, 2 dc in next st. Repeat from * to end. Join to first dc with a sl st. (24 sts)
Round 4: Ch 2, *dc in next 11(3) sts, 2 dc in next st. Repeat from * to end. Join to first dc with a sl st. (26(30) sts)
Round 5: Ch 2, dc in each st to end. Join to first dc with a sl st, using Color B. (26(30) sts)
Round 6: Using Color B, ch 1, sc in next (25)29 sts, make flower. Sc in last st. Join to first sc with a sl st, using Color A. (26(30) sts)
Round 7: Using Color A, ch 2, dc in each st to end. Join to first dc with a sl st, using Color B. (26(30) sts)
Round 8: Using Color B, ch 1, sc in next 22(26) sts, make flower. Sc in remaining 4 sts. Join to first sc with a sl st, using Color A. (26(30) sts)
Round 9: Using Color A, ch 2, dc in each st to end. Join to first dc with a sl st, using Color B. (26(30) sts)
Round 10: Using Color B, ch 1, sc in next 19(23) sts, make flower. Sc in remaining 7 sts. Join to first sc with a sl st, using Color A. Break Color B. (26(30) sts)
Round 11: Using Color A, ch 2, dc in each st to end. Join to first dc with a sl st. (26(30) sts)
Round 12: Using Color A, ch 2, dc in each st to end. Join to first dc with a sl st. (Do not turn for left foot.) (26(30) sts)
Row 13: Ch 2, dc in the first 20(22) sts. Stop here and turn. (20(22) sts)
Row 14: Ch 2, dc in each st. Turn. 20(22) sts. Repeat as for Right Foot to matching length, then go to Finishing Instructions below.
FINISHING INSTRUCTIONS FOR ALL SLIPPERS:
- Fold the last row in half, WS together. Ch 1 and sl st through both layers, so that the last sl st is in what were the middle two sts. (10(11) sl sts). Try the slipper on again before breaking the yarn so you can adjust if necessary. Then break yarn and weave in ends.
- Rejoin Color A with a sl st at the back of the heel. Ch 1 and sc evenly around the foot opening, working 2 sc in the side of each row and 1 sc in each sc. Join with a sl st using Color B. Break Color A.
- Using Color B, sc in each sc around. Break yarn and use seamless join to finish off. Weave in ends.

The Fine Print
With the Posy Toes Crochet Slippers you'll be ready to pad around the house in style, with a tiny little garden on your toes. You could also whip up a pair to stash in your purse for those times when heels get to be too much (and you can get away with slippers). If you wish to make your crochet slippers non-slip, check out these 7 Great Ways to Make Handmade Slippers Non Slip!
I hope you enjoy your new crochet slippers as much as I do! I love the "make flower" technique I came up with for these, and hope to use it in other projects in the future. What colors will you use for your Posy Toes?
Be sure to Like the moogly Facebook page for the latest updates and have some fun with us! Written pattern copyright Tamara Kelly 2013. Please do not reprint, or repost this pattern, but please do link to this page to share this pattern with others. You may sell items made from this pattern, but please include a link to www.mooglyblog.com on the online listing or sale tag if selling at a craft fair, storefront, or other in person sales.

The Dragonfly Dutchess
I can't wait to make these! As soon as I make a scoodie for a friend 🙂
moogly
😀 Thanks!
rhiannon
Hi, i love this pattern its so cute, but I'm having a bit of trouble. The right foot went without a hitch, but I've tried the left three times and every time the flowers and up way too close together and far off to the side, looking nothing like the right foot. I can't figure out what I'm doing wrong, help!
Rhiannon
Tamara Kelly
Hi Rhiannon! It's super hard to say without being there... essentially the left foot and the right foot are just opposites.
Lisa
Had the same issue so I just repositioned them. I also used slip stitches in place of the sc stitches the flowers, and I had to do a few sc2tog on the last color A row to make it not be too sloppy around the ankle. I have made three pairs so far and had to do this each time. I downsized one pair to fit a child as well.
Viola
Thanks for the slipper pattern. It is hard to find pretty crochet patterns for slippers. I'm looking for patterns for children slippers or bedroom slippers.
Laura
Hi there! I have a quick question about the Pozy Toes slipper pattern. I'm at round 4 and am a little confused. You say Ch2 *dc in next (11) 3 sts, 2dc in next. Repeat from * to end. Is the (11) the stitch count for how many times this repeats? Or is it dc in next 3 sts, 2dc in next st, repeat to end?
Thank you so much for you input on this and for your great patterns!!
Laura
moogly
Hi Laura! You caught a typo, which I've fixed, but let me explain what the two numbers mean.
This pattern is written for both Average and Wide width feet, so the numbers refer to the different sizes.
If you are making the Average width, you'll read the instructions as: Ch2 *dc in next 11 sts, 2dc in next st. Repeat from * to end.
If you are making the Wide width, you'll read the instructions as: Ch2 *dc in next 3 sts, 2dc in next st. Repeat from * to end.
Does that help?
Laura
That helps!! Thank you!
Clare
I am making these as a birthday gift for my mom (she lives in Iowa and I live in Australia - they are the perfect lightweight gift to send through the mail!) But I have a couple of questions about the "Finishing Instructions": What do you mean by "Ch 1 and sc evenly around the foot opening, working 2 sc in the side of each row and 1 sc in each sc" - I don't understand where the 2 sc are meant to go - 2 sc in the same space in the side of each row? Or 2 sc per row side? Also, should step 3 start with: "Using Color B" rather than Color A?
Thanks so much for sharing this pattern!
moogly
Hi Clare! I'm in Iowa too! 😀 Ok, so the ch 1 and sc evenly with 2sc in the side of each row and 1 sc in each sc means that if you and I have the same approximate gauge, you'll want to put two single crochets in the side of the last/first st of each row - since they're dc rows there should be room to put them separately along the side of the sts. Then at the front of the ankle you're working into the top of Round 12, so you can just work one stitch in each st. And you're right about step 3... oops! Thanks for letting me know, I'll fix that!
Clare
Thanks for explaining that. It makes sense now!
I really enjoy your website. I always look forward to your new patterns (I have made a few and have several on my "to-do" list) and have so much fun browsing through your pattern roundups! And even though I live in Sydney, I will always be an Iowa girl at heart 🙂
Thanks again for your help!
moogly
I'm so glad it helped! Thanks again for letting me know about the error!
Sheryl
I did this and it made the opening too large, so had to pull it out 🙂 I just added one sc all the way around and they came out perfect.
Tamara Kelly
I'm glad you were able to make them work! 😀
Rebecca Flores
I had been searching for a slipper pattern that wouldn't be too complicated but still look like a slipper all winter long! Looking at the basic pattern, I don't know why I didn't think of this myself! Thank you so much! I love it!
Martha Gaston
Two of my question were answered above. I am so excited. I love the look of the slippers. But look at Row 14 Ch 2 dc in each s ???. Thanks a million for cute slippers.
Tamara Kelly
Oops! 2 dc in each st (stitch). I'll fix that now - thanks for the heads up!
Shannon
They were easy and fast to make! I made it in dark green and light green, the flowers look like four leaf clovers ^__^
Tamara Kelly
Sounds pretty! Glad you like the pattern Shannon! 😀
Dot
i first noticed this pattern because they are the only crocheted slippers I've seen that stand up by themselves and don't flop over. Also, the design is artistic, not just utilitarian. I found the pattern is very easy to make. They're comfortable and fit well. I made a pair for myself (photo on my website listed above), and am now making two pairs for a friend who begged me for them. After that, another pair for me. Thank you so much for designing these and making the pattern available!
Tamara Kelly
I'm so glad you like them, Dot! And what a good friend you are!
Guadalupe Swensen, M.
I have enjoy you site very much. Yes, I am a beginner of crochet so I am studying the art of crochet and Kniting. That is why I enjoy your program so much because it helps me in so many ways. Thank you, sincerely
Tamara Kelly
I'm so glad you do Guadalupe!
Frinder
MIRACULOUS!....♥♥..Tamara..well done!
Frinder
I can't understand that what no.s are written in the end of every sentence!
i know that those are the number of total st. but where there are written (--(--)..i can't understand that one!..please solve this problem ASAP! 🙁
please answer me now because i am trying to make
Tamara Kelly
Hi Frinder! This pattern is written for both average and wide width. When the stitch counts are different, they will be written as Average(Wide).
frinder
oh!..thanks!
Tamara Kelly
Sure thing! Let me know if you have any other questions! 🙂
marrie
hahaha!
Frinder
please explain this to me!..i can't understand this too!~...
FINISHING INSTRUCTIONS FOR ALL SLIPPERS:
Fold the last row in half, WS together. Ch 1 and sl st through both layers, so that the last sl st is in what were the middle two sts. (10(11) sl sts). Try the slipper on again before breaking the yarn so you can adjust if necessary. Then break yarn and weave in ends.
Rejoin Color A with a sl st at the back of the heel. Ch 1 and sc evenly around the foot opening, working 2 sc in the side of each row and 1 sc in each sc. Join with a sl st using Color B. Break Color A.
Using Color B, sc in each sc around. Break yarn and use seamless join to finish off. Weave in ends...
harry
join the the last 2 ends with each other!..SIMPLE 😛 🙂
harry
this is beautiful ♥
molly
WOW
carely
Hi Molly, may I know what is WC im the finishing instructions ?
Thank you.
Tamara Kelly
WS is Wrong Side. 🙂
Tamara Kelly
Basically, you finish your last row, then fold the slipper, like a taco, lengthwise, so that the first stitch of the last row is touching the last stitch of the last row. Then insert the hook through the stitch you just made and the first stitch of the last row, so that it's through both layers. From here work a sc, which starts a seam on the back of the heel. Continue with a second sc that goes through the second st of the last row and the penultimate st of the last row, etc, until you've closed up the back of the slipper. This finds you in the middle of the previous row, at what is now the bottom of the heel. Try the slipper on at this point so you can make sure you have the right length before you cut the yarn. Then cut your yarn and weave in the ends.
The rest is just working that decorative edge (shown in red) around the foot opening. I hope this helps! 🙂
frinder
thanks!...soo much!..this is very nice and chute slipper..READY! THANKS
marie
I have tried this!..it was just ready in 15 minutes!..that's pretty cool!..thanks for an adorable tutorial!♥
Tamara Kelly
😀 Thanks marie!
marrie
you are welcome!..actually..you don't have o say thanks!..I love your tutorials!..keep helping my! ♥
Amanda
Hi there
Is there a way to modify it for kiddos? My nieces would love a matching pair to their mamas.i have just started to crochet things other than blankets and I love these slippers!
Thanks,
Amanda
Tamara Kelly
Hi Amanda!
Thanks! It depends on the size of the feet, but essentially you'd want to stop increasing after round 2 or 3. Then skip to round 6, skip row 12, and shorten the rest as needed. I hope that helps!
Amanda
Thank you !
Eleonora
Love the slippers, made 2 sets already, Put loose soles in and they are comfortable in the winter
Jess
I just got done making the right foot! Starting on the left 🙂 Super easy to follow! Thanks for the pattern.
Tamara Kelly
😀 Glad you like it!
Grace
Are these made with cotton yarn? Thanks!
Tamara Kelly
Hi Grace! These particular ones were indeed made with cotton, but you can use the fiber of your choice. 🙂
leno9rejohnston
I think I will enjoy making these slippers BUT on page 3 of instructions there are adds for things right over the printing of instructions. WHY? cant the adds wait for the instructions of slippers to be over????????????????????
Tamara Kelly
Have you tried the green Print Friendly button on the bottom of the post? That will create ad free copy for printing. 🙂
manya
Thank you for all of your tips . I've added them into the instructions in case I have a problem. Now I've got to copy and paste your non-slip tips to the page of instructions before printing it all out. And I have in my stash the perfect yarn for lots of those!
Tamara Kelly
😀 Thank you Manya!
Rose
Does the slip stitch count as a double crochet. I seem to be short of stitches in some rows.
Tamara Kelly
Can you tell me which rows?
Rose
I think I figured it out. It is rows 2-7. Thanks for responding! I made one and it is adorable.
anita
just made these slippers...fast, easy and adorable! thank you for sharing the pattern
Tamara Kelly
Thank you so much Anita! 😀
Daphne
Do you have a video tutorial for this pattern? (Visual learner! : )
Tamara Kelly
No, I'm afraid I don't at this time.
Daphne
OOPs! Disregard my last question. 4/7/15 ;}
Daphne
Please help! Do you have a tutorial video for this pattern?
Carmen
Buen día. Le agradecería si es posible, pusiera el gráfico o vídeo de estas pantuflas.
Un saludo,
Carmen
masz
tamara... tq for this pattern.
Tamara Kelly
🙂 Thank you!
Birdie
Thank you. I made one pair and I am excited to make a bunch more for presents.
Tamara Kelly
😀 I'm so glad you like them, thank you!
Radiya
these are so cute and with slight variatons, I made a pair for self
Tamara Kelly
Thank you! 😀 I'm so glad you like them!
Tara L Neumayer
I'm a beginner and I'm trying to make these as a gift for my husband's aunt. I'm struggling with the flower. When you say to work in the ring, am I going through the chain sts or directly in the center of the ring of chain sts?
Tamara Kelly
Directly into the center of the ring of ch sts. 🙂
Aubrey F
Hi Tamara! These are absolutely adorable. Slowly working my way through your website still; these were made for my mama. Main color in Red Heart with Love Metallic Royal, with Big Twist Twinkle Red for the posies. Thanks again for another great pattern! <3
Tamara Kelly
♥ Thank you so much!