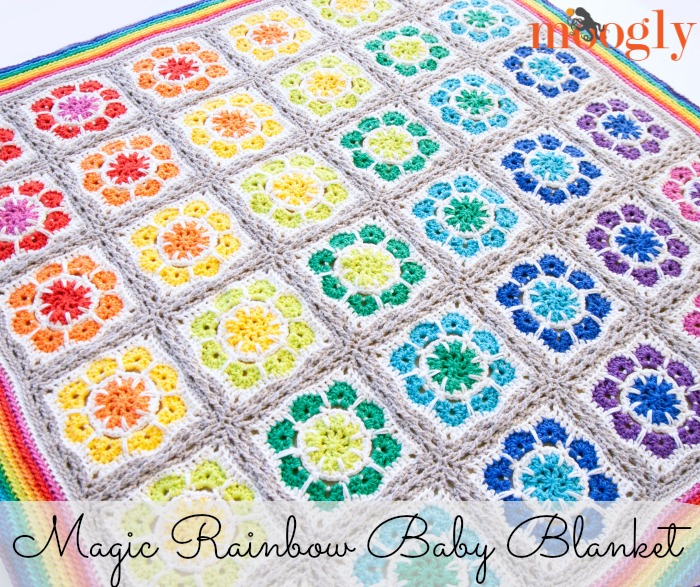
Last week I shared my pattern for the Mini Magic Mandala Squares - a great 6" afghan block pattern made in worsted weight yarn. This week, I take that pattern, change the yarn size, add an easy join as you go technique, and a big bold border... and present the Magic Rainbow Baby Blanket free crochet pattern!
 Disclaimer: This post contains affiliate links.

Lion Brand Modern Baby yarn is the bright bold star of the show here. Isn't it gorgeous? It's a DK weight acrylic/nylon blend made with "chainette" construction. This means that the yarn itself seems to be "woven" rather than twisted - and doesn't split while you crochet it! And it's super soft, and bright, and I just love it. It comes in 12 color, and I used every one of them except the black.
Magic Rainbow Baby Blanket
Click here to add this pattern to your Ravelry Queue and Favorites!
- US - H, 5.0 mm hook (Furls Fiberarts Tulipwood used)
- 1552 yds Lion Brand Modern Baby (DK weight, yarn symbol "3", 50% acrylic/50% nylon, 173 yds per skein; see below for specifics)
- Yarn needle (Susan Bates Finishing Needles used)
- For stitch definitions with linked tutorials go to the Crochet Abbreviations Page
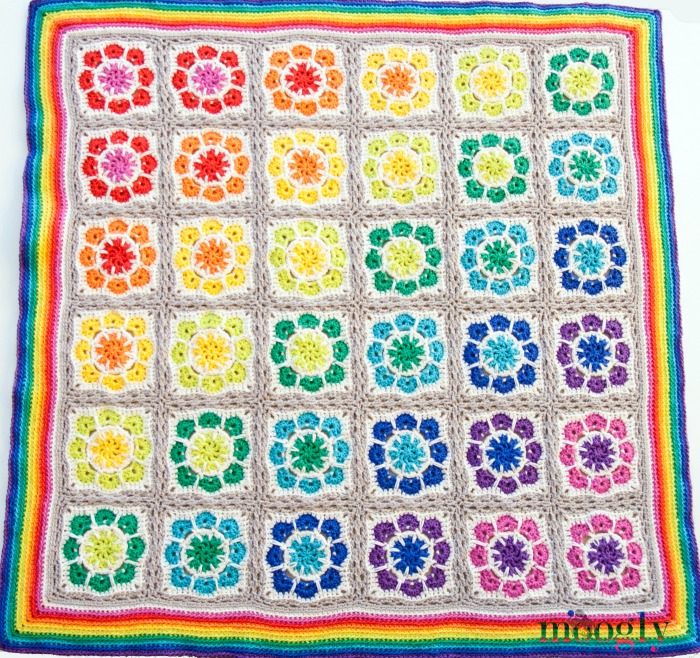
- Finished size: 36" x 36"
- CLICK HERE for a video tutorial for the squares
- CLICK HERE for a video tutorial for the joining
To make this pattern, you'll make 36 squares using 10 colors, and finish and join them with an 11th color. The Lion Brand Modern Baby colors and amounts used here are:
- Color A: Cream - 426 yds (3 skeins)
- Color B: Pink - 75 yds (1 skein)
- Color C: Red - 75 yds (1 skein)
- Color D: Orange - 75 yds (1 skein)
- Color E: Yellow - 90 yds (1 skein)
- Color F: Chartreuse - 100 yds (1 skein)
- Color G: Green - 110 yds (1 skein)
- Color H: Turquoise - 90 yds (1 skein)
- Color I: Blue - 90 yds (1 skein)
- Color J: Purple - 75 yds (1 skein)
- Color K: Gray - 346 yds (2 skeins - note: some people have found they needed 3)

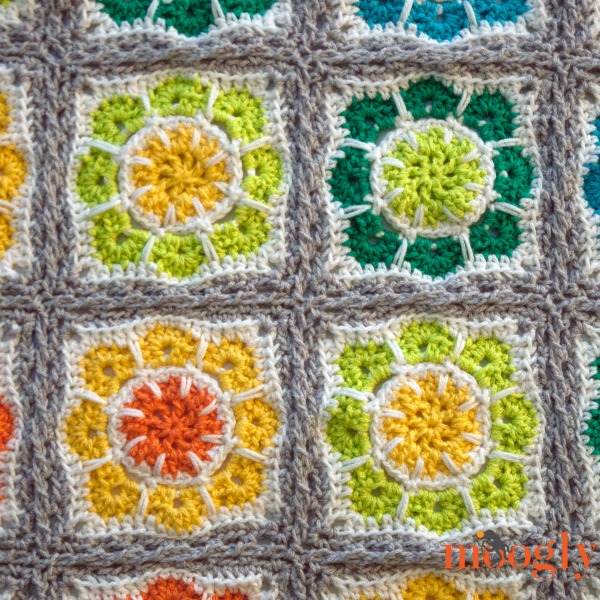
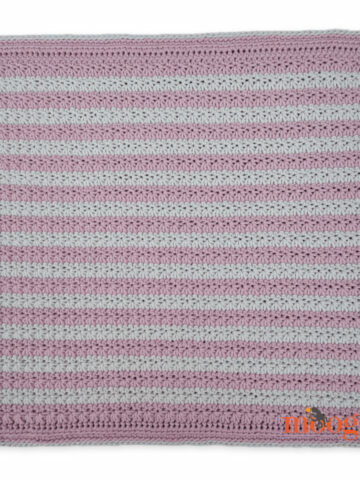
Each of the squares in DK weight yarn are 5" x 5" - after Round 8. Above, the squares are finished through Round 7. To join them, you'll work Rounds 8 and 9 on the first square, then work Rounds 8 and join during Round 9 on the second and each subsequent square. So you can make and join the squares as you go, or make them all through Round 7 and then do the last round and join afterwards.
Below are the instructions for Rounds 1 - 7. You can refer to the photo above for layout, or see the table below the rounds instructions for how many to make using the colors above.
Round 1: With first color, make a magic circle. Working into the ring, ch 4 (counts as first dc and ch 1). [Dc, ch 1] into the ring 7 more times. Join to 3rd ch with sl st . (8 dc, 8 ch)
Round 2: Ch 3 (counts as first dc), 2dc in next ch sp. *Dc in next dc, 2 dc in next ch sp. Repeat from * to end. Break yarn and seamless join to second dc. (24 sts)
Round 3: With next color, join with a sl st to top of one of the dc sts that is worked into a dc (not a dc that’s worked into the ch sp). Work a spike st into the top of the dc from Round 1 directly below. Sc in the next st, sc between posts of previous st and next st, sc in next st. *Work a spike st into the top of the dc from Round 1 directly below the next st. Sc in the next st, sc between posts of previous st and next st, sc in next st. Repeat from * to end. Join with a sl st to top of first spike st. (32 sts)
Round 4: Ch 1, sc in first st. Ch 4, skip next 3 sts. *Sc in next st, ch 4, skip next 3 sts. Repeat from * to end. Break yarn and seamless join to first sc of round. (40 sts)
Round 5: With next color, join with a sl st to the top of a sc st from previous round. Ch 1, sc in same st. [2 hdc, ch 1, 2 hdc] in ch sp. *Sc in next st, [2 hdc, ch 1, 2 hdc] in ch sp. Repeat from * to end. Join with a sl st to first sc of round. (48 sts)
Round 6: Ch 1, sc in first st. Skip next 2 sts, work 6 hdc in ch sp. Skip next 2 sts. *Sc in next st, skip next 2 sts, work 6 hdc in ch sp. Skip next 2 sts. Repeat from * to end. Break yarn and seamless join to top of first sc of round. (56 sts)
Round 7: With next color, join with sl st to the top of a sc st from previous round. Ch 1, *dc spike st into the top of the sc from Round 4 directly below, hdc in the next 3 sts, (dc, ch 2, dc, hdc) in next st, hdc in the next 2 sts, dc spike st into to top of the sc from Round 4 directly below, hdc in the next st, sc in the next 4 sts, hdc in the next st; repeat from * 3 times, break yarn and join. (64 sts)
Squares to Make:
| Make: | Rnd 1-2 | Rnd 3-4 | Rnd 5-6 | Rnd 7 |
| 3.... | Color B | Color A | Color C | Color A |
| 3.... | Color C | Color A | Color D | Color A |
| 4.... | Color D | Color A | Color E | Color A |
| 5.... | Color E | Color A | Color F | Color A |
| 6.... | Color F | Color A | Color G | Color A |
| 5.... | Color G | Color A | Color H | Color A |
| 4.... | Color H | Color A | Color I | Color A |
| 3.... | Color I | Color A | Color J | Color A |
| 3.... | Color J | Color A | Color B | Color A |
When you're ready to start connecting your squares (again, see photos or layout), with Color K, work Round 8 and 9 on the first square as follows:
Round 8: With next color, join with sl st to any corner ch-2 sp. *(Sc, ch 2, sc) in ch sp, working in BLO sc in the next 6 sts, sl st loosely in the next 4 sts, sc in the next 6 sts; repeat from * 3 times, break yarn and join.
Round 9: Sl st to corner ch sp, ch 1, (sc, ch 2, sc) in ch sp, *[ch 2, skip 2 sts, sc in next st] 3 times, sc in next st, [ch 2, skip 2 sts, sc in next st] 3 times, finishing last repeat in ch sp, ch 2, sc in same ch sp; repeat from *3 times, break yarn and join.
Now to add the other squares, work Round 8 as above, then work Round 9 as above EXCEPT where the blocks need to join together, work as follows:
At adjoining corner, ch 1, remove hook from working loop of working square, insert in matching corner ch sp of square you're joining to, re-insert hook in working loop, ch 1, sc in ch sp of working square; *ch 1, remove hook from working loop of working square, insert in next ch-2 sp of square you're joining to, re-insert hook in working loop, ch 1, skip 2 sts on working square, sc in next st of working square; repeat from * twice; sc in next st of working square, then repeat from * 3 times, and rejoin same way at the corner as at the first corner. Then finish the rest of the Round 9 as above.
I recommend adding square in rows - all the way across the top, then go to row 2 and work left to right, etc. When you get to the second square in the second row, you'll need to join to two sides. Do just as above, turning the corner and joining from corner to corner on the second side. At the corner where 4 squares meet, sc into the working square, ch 1, remove the hook and insert the hook into the ch-2 corner of the first joining square, ch 1, remove the hook and insert the hook into the ch-2 corner of the second joining square, ch 1, and sc in the corner sp of the working square, continuing along the second joining square as before. Be sure to work the ch-2 sps on the non joining sides of all squares so they can be joined to later. Do not break the yarn after the very last right bottom square has been joined.
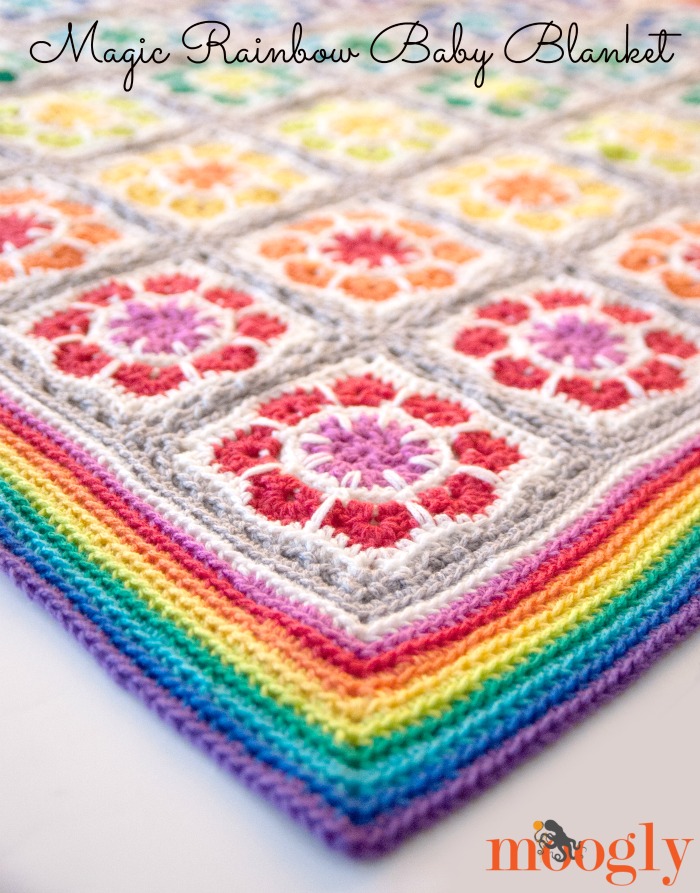
Add the Border, continuing with Color K:
Ch 1, sc in around entire blanket, working 3 sc in each corner of the 4 final ch-2 sps and a sc in each sc, 2 sc in each ch-2 sp along the sides, and 1 sc in the ch-2 loop of each joined corner. Join and break yarn.
With Colors A - J, join with a sl st to BLO of any st in the previous round, ch 1, and sc around in BLO of each st, working 3 sc in each corner st.

And that's it! I know it looks like a lot, but the squares in Rounds 1-7 work up pretty fast, and the joining is super fast! I plan on adding a video tutorial for the joining in the next couple of weeks, and will add a link to the pattern when it's done. So if you need the tutorial for the joining, don't let that stop you - get started on the squares and you'll be ready when the tutorial is ready!
Remember too, that while this pattern is written for a baby sized blanket in DK weight yarn, it's easy to upsize! Use a worsted weight yarn like Lion Brand Vanna's Choice, and you'll have a 42" x 42" + blanket as written - or add more squares for your own custom size! I can't wait to see your Magic Rainbow Blankets and Throws!

Written pattern copyright Tamara Kelly 2014. Please do not reprint or repost this pattern, but please do link to this page to share this pattern with others. If you wish to make items for sale from this pattern, please visit the About page for details. To print this pattern for personal use, please use the Print Friendly button below – tutorial HERE. Thank you to Lion Brand Yarn for providing the yarn for this pattern!

Loredana
Just beautiful,wow,i will make one of these for sure!Thanks,your work is inspirational!Greetings from Germany!
Tamara Kelly
Thank you so much Loredana! 😀 Greetings from Iowa!
Pat Pelton
You are so talented!! Love the colors!!!
Tamara Kelly
😀 Thank you so much Pat!
Cheryl
Perfect! I'm expecting a granddaughter in January, and her name is Flora.
Tamara Kelly
😀 Thank you Cheryl, and congratulations! What a gorgeous name!
Sarah
This is beautiful. I don't normally 'do' bright colours but I think this could just be the one that changes my mind 🙂
Tamara Kelly
😀 Thank you Sarah! Of course you can use any colors you like lol.
loulou
Wow, this is so pretty! I just love the colours and the way you've artfully arranged them. You're good!
Tamara Kelly
😀 Thank you so much Loulou!
alison willcocks
Very pretty colours and I like the way you have joined the squares together.
Tamara Kelly
Thank you so much Alison!
Andrea Wolf
Hi Tamara,
Is this the flat braid join method? It looks like it. Gee I hope so! I would LOOOVVEE a tutorial on it. so I'm crossing my fingers that it is. I have the sides figured out but when it comes to the corners, I'm perplexed as to how to navigate joining more than one.
Thanks for being your awesome self.
Andrea
Tamara Kelly
It's very very close - if you can do one, you can do the other. 😀 I eliminated one chain from each join, basically, and I do the corners just a bit differently I think. 😀 Thanks Andrea!
Monica Stumbo
muy bueno la hoja los felicitos
Hannah
If I wanted to make this in an adult size would just quadrupling the pattern and joining the pink and violet corners at center work?
Tamara Kelly
Yes! 😀
Chickie
This is gorgeous! I'm afraid I'll have to wait for the video because I'm just not understanding row 3...in particular the sc between "previous" stitch etc. It's turning out wavy for me which means I have too many stitches.
TEM
I, too, will need to wait for a video regarding row 3. I understand "beween the posts of the previous stitch"... it's the "and the next stitch, sc in next st" that's confusing me. Beautiful, though, and your posting it for all of us is much appreciated.
Rachel
I'm curious.. If I were to size yarn up to a light worsted like Simply Soft do you think that would get me close to a throw blanket size?
Tamara Kelly
Working the squares in Vanna's Choice make them about 6" each, and Simply Soft is somewhere in between. You can always just add more squares though! 🙂
Deborah m
This is beautiful. I will definitely need the video tutorial for joining.
Tamara Kelly
🙂 Thank you Deborah!
Annie
This is a beautiful afghan! The mini mandala square is absolutely perfect and the border pulls it all together. I can't wait to try this pattern....its okay to push all my UFO's aside and begin it now, right? Once again, a spectacular pattern from a truly talented lady. Thank you so much for sharing!
Tamara Kelly
😀 Thank you so much Annie!
Jean
Your afghan is so bright and cheerful. Absolutely darling. you are an inspiration to all of us hookers!
Tamara Kelly
Thank you so much Jean!
Cyndee
This is beautiful! I really enjoy your work. If I were to make each square the same colors, say 2 shades of pink, and use the cream and the gray just as you have, how many skeins each of the two pinks would I need? I took the 6 green squares and multiplied that by 6, but I think that's too much yarn... Can you help me with that? Thanks for sharing!
Tamara Kelly
Thank you Cyndee! You'd need approximately 780 yds total of pink and red - how that's split between the two will affect how much of each.
Kathleen
I just found out my daughter is pregnant for the first time. Obviously, I don't know the sex yet, but am excited to start crocheting for him/her. And this will be perfect! Love it! 🙂
Peggy Griffith
I found a pattern for a men's crocheted cap, but could not find it on your blog. It is shown as an orange cap.
Tamara Kelly
Perhaps the Leaping Stripes and Blocks Beanie? There's a children's in orange, but it's available in adult size as well.
Marcie Lane
Do you have a facebook page that you also post your patterns to? I'm just curious because I don't normally surf the web except for facebook or news. Love this blanket!! Will definitely have to try it. How big do you think it will be if it is all cotton? I'm allergic to acrylic, that's why I'm asking. Thanks in advance!!
Tamara Kelly
Hi Marcie! I do have a facebook page: https://www.facebook.com/mooglystore and while I don't post the full length patterns there, I do post links! 😀
Marcie Lane
Thank you so much!!
sheree
When will you have your video tutorial for this? It such a lively blanket but im no good at reading patterns!
Tamara Kelly
I have a tutorial for the joins, but not for the squares. I do hope to create some how to read patterns tutorials this year!
Jill pyne
Youngest son and partner are expecting their first child in June and do not want to know the sex, so when saw your pattern, they thought it ideal.......must say I am impressed and keen to get going. However, do not know how to purchase the yarn without paying horrendous import tax etc.
Not being too au fait with computers, I wonder if you could help.
Is there a supplier here in the UK.
I think you now have got me as a dedicated follower. Jill
Tamara Kelly
Hello Jill, thank you so much! And congratulations on the new grandchild!! ♥ You can use any DK weight yarn you like - this is the same weight, and I know DK is plentiful in the UK! 😀
Theresa
I fell in love with and printed this as soon as you posted it. I ordered yarn and had it all in a project bag with pattern and hook to be picked up next. Unfortunately, I broke my arm and was in a cast, unable to crochet. Then, I ended up in the hospital for something else and was facing 4-6 weeks in a long-term facility for extended treatments. I knew my cast was about to come off and knew a project would help me keep my sanity during this long time away from home. I couldn't get home and remembered I had this all ready to go so my husband brought it to me. I jumped right in to make all the squares, coming back to the blog frequently for a look at the pictures, etc. I made all 36 squares and started to join them only to find the stitch count was off somewhere. I came back to the blog and see that Rnd 7 has been changed. What do I do? I have even sewn in all of my ends on the squares, so just taking out the last round is going to be a real pain. Would I have enough cream yarn to complete the blanket (I will probably need to use new yarn since my ends are already clipped)? Any suggestions?
Tamara Kelly
Oh no! Sorry about that Theresa! I would recommend just adjusting the joins - take out the 2nd sc in the middle of each side, or add an extra loop, whatever works best. 🙂
Theresa
Thank you for your suggestion. After playing with it, I let the OCD go and skipped one stitch near the corner in the round below. You can't see it, so it works. It is going together very nicely and I am about to start the border - can't wait to show it off 🙂
Rachel Reed
I am in love with this pattern I am just getting really confused when you say in row 3 to crochet b tween the post of the previous stitch? Any clarifications would be greatly appreciated thanks in advance!
Tamara Kelly
Hi Rachel, and thank you! If you look at the dc stitches in the previous row, you can see there is the top 'V' we usually crochet into, and then below that are the posts - which you would crochet around if you were making a post stitch. To crochet between the posts, you insert the hook between the posts of the previous and next stitch, straight through to the back of the fabric. Does that make sense?
Stef
Hi, I'm halfway through this project and absolutely loving it!
The pattern was brilliant to follow and I can't wait to complete the blanket!
Thank you very much for your creative ideas and awesome patterns!!
Tamara Kelly
😀 Thank you so much Stef!
Kathleen Bruner
I'm almost finished making this using the same yarn you did. My recommendation would be to change it to say you need 3 skeins of grey instead of 2. I had enough to finish joining squares, but not for the first round around the outside.. I had to start with the cream, which is fine, but I would have liked it even better with first round in grey. I would have even run out to get more but this yarn Isn't available locally and I didn't want to have to order just one skein. I'll post a picture when I'm done. Love this yarn, and this pattern! 🙂
Tamara Kelly
Oh dear! I'm sorry you ran out of yarn, I'll make a note that some people need 3. 🙂
Carmen
Me cuesta entender lo escrito. ¿podría poner un vídeo de como se hace la unión entre cuadrados? Muchas gracias y un saludo de Carmen.
Tamara Kelly
Yes, there is a video at https://www.mooglyblog.com/tight-braid-join/
Destiny
Hi there, I am extremely new to crochet, just beginning actually! Would this be doable for a newbie? Because I really love it! I also think it would be great to add a name, are the patterns of letters out there somewhere?
Thanks!
Tamara Kelly
Hi Destiny! I think if you're determined and willing to learn new stitches as you go, it's doable! 🙂 You can CLICK HERE for free uppercase letter patterns, and there are lowercase letters here on Moogly as well! 🙂
Penny shirk
How do I be sure to get the instructions for finishing this rainbow blanket?
Tamara Kelly
Hi Penny! All the instructions are there. Are you looking for the joining video tutorial? It's at https://www.mooglyblog.com/tight-braid-join/ 🙂
Theresa
Hi. Tamara this is a beautiful blanket. I am visually impaired and am trying to teach myself how to crochet I can knit anything so hopefully will learn to crochet. Any help would be appreciated
Tamara Kelly
Hi Theresa! Best of luck, let me know if there's anything I can help you with!
Samantha
Hi! I absolutely love this pattern and am about to start joining my squares together. My question is for round 8 do you HAVE to break the yarn and then join again and do row 9? I have made all the squares to the White edge, and then was doing row 8 and going straight into row 9 and joining it to the blanket but I'm wondering if I am missing a way to join more squares without breaking the yarn?
Thankyou for posting free awesome patterns!
Tamara Kelly
Thank you so much Samantha. I've been pondering, and I think it might work if you started Round 8 before the corner space, so that you can sl st into the corner on Round 9?
Michelle
Hi! I love your patterns! Can you tell me approximately how many hours this took you? I just realized I have a baby shower to go to next weekend. LOL
Tamara Kelly
Hi Michelle! Thank you! I didn't track the hours, but if you set up a sort of assembly line for the squares, weaving the ends in as you go, it's relatively quick, and then joining them is quite speedy!
Olga
Hi! Thank you for this beautiful pattern. I started yesterday and I made four of the squares but they look a lot more like stars than the slightly star-shaped ones that I see in the photo. What can I possibly be doing wrong?
Tamara Kelly
Hi Olga! It's so hard to say without being there, but as long as you end up with 4 sides I think you're okay?
Olga
I am doing something wrong I know but I can't figure out what exactly. I don't have four sides, ha ha ha ha.
I'll just start over.
Thanks anyway!! 🙂
Olga
Tamara hi! I think I know! I figured it out checking your mandala squares post! Yay! I'm making this for my best friend's first baby. It has taken her forever to get pregnant so I wanted to give her something special.
It's gonna be SPECTACULAR thanks to you! <3
Tamara Kelly
😀 Thank you!
racHel
Gorgeous pattern! Could you possibly tell me how many squares total are needed to make an afghan sized blanket? I'm doing all the squares in white and turquoise and planning to join with gray but I'd like a bigger blanket. Thanks!
~ Rachel
Tamara Kelly
Thank you Rachel! "Afghan size" tends to be the most variable of the sizes, but a good throw is about 55" x 70", so that would be 11 squares x 14 squares, or 154 squares total. 🙂
Rachel
Thanks!
Upasana
Hi, i wanted to know the finished size of each of the squares. I am using Alize Bella 100% cotton yarn with a size 3 hook the squares are coming to 3 x 3. Do i need to make more squares in that case?
Tamara Kelly
The size of the individual squares is listed in the pattern as 5" x 5" - you'll need more squares since yours are smaller.
nurit philip
Thank you, I love it!
Tamara Kelly
😀 Thank you, I'm so glad!
Kim
Hi Tamara,
I am a new 'hooker' starting December 2015. I am almost done with my blocks and have a have a question about blocking. Do you recommend blocking the squares prior to joining or blocking the entire blanket once completed?
Thank you so much for the videos! I doubt I would have been able to complete this blanket for my grandson who is due in June without them.
Tamara Kelly
Thank you Kim, I'm so glad they helped, and congrats on learning to crochet!! For this blanket, I blocked the whole thing when it was done. If you ever make a bigger blanket, with 12" blocks, that's when I recommend blocking them before joining - mostly just because of the space issues! Baby blankets are usually small enough to block after they're finished though. 🙂
Rachael
I've watched the video on joining a few times and I'm still very lost. How would I go about joining the whole blanket? Do you have a picture of the squares numbered for the join?
Tamara Kelly
Hi Rachael! The squares can be joined in any order, really, since the yarn is broken after each square is joined.
Amy
This is beautiful! Is there any way to make it a little bigger for my 3 year old?
Tamara Kelly
Holding two strands together and using a bigger hook would work well!
Amy
Thank you! ❤️
Pat Robinson
I love this pattern and really would love to make this blanket as I do a lot of baby blankets for a NICU where my 2nd granddaughter was for her 1st week. However, I am confused as to how to do a spike stitch. I didn't see an explanation, but possibly I just overlooked it. Thanks again for sharing such a stunning blanket with us!
Tamara Kelly
Hi Pat! There is a video tutorial for the squares linked above, and a video tutorial for the spike stitch here. 🙂
Pat Robinson
Thanks so much for the spike stitch tutorial~
Catherine Williams
OOH! The colours! I love colour and textiles Just taken up crochet and umpteen other crafts again after many years of caring for my wonderful mother. I have been wondering about making a colourful jacket/coat to lift my spirits on dreary days. Your beautiful blanket has filled me with inspiration thank you for sharing. I will probably use black to join my squares as it is for a coat thank you again.
Tamara Kelly
😀 Thank you Catherine! I hope you enjoy it!!
Cindy
Such a beautiful baby blanket! Thank you so much for sharing your pattern with us all.
Tamara Kelly
Thank you so much! 🙂
Loretta
Hi I have been trying to print a pattern and for some reason it keeps telling me -Cannot find file///C:/users/midge/App Data/Local/Tem. is there something wrong with the web page? I have printed from here before and now I cant why?
Tamara Kelly
Hi Loretta! I'm afraid I don't know what that means, I haven't seen it before. It is working for me now, perhaps it was a temporary issue?
Piper
Hello! I am In LOVE with this blanket and it would be for a "rainbow baby" (child born after 2 miscarriages)I know this is a LONG shot but I am wondering if you make blankets to sell...I don't think I can tackle a project that big for a gift, it has been 40 years since I croqueted...Please let me know how much, if you would even consider it. I will cover all shipping etc. Thank you for your consideration.
Tamara Kelly
Hello Piper! I'm so sorry, but I cannot take commissions anymore, and had to stop several years ago. But if you go to the Moogly Makers page at https://www.mooglyblog.com/vendor-page/ you'll find people who do!
Maira Faizan
Hello Tamara. i really love this beautiful blanket. i have started making one for my nephew. i have made the squares and am starting to join with tight braid. after round 8 i have to break yarn and then start round 9 so is that a good idea to do round 8 on all the squares before i start to joing by doing round 9?
is there any way to keep going without breaking the yarn after round 8 and round 9?
Frances Morey
And when the baby outgrows it you can fold it in half like a rectangle, sew up two sides leaving space at the fold for arms/wrists and make a lovely shrug to wear to the movies as a shrug. I've made several of these out of square baby blankets.
Frances Morey
I love this blanket pattern but I await the video tutorial as I see better than read when it comes to comprehending crochet patterns. I also don't quite understand the spike stitch and need to see it to completely understand it. Please let me know when the video tutorial is ready as I'll need to download it. Thanks, ever so much!
Tamara Kelly
Hi Frances! There are two video tutorials already up for this pattern - they are linked above, in the list with the hook and yarn info. 🙂
Lisa
Completly new to crochet and this is the first thing ive ever made. An excelent and really clear tutorial with both paper and video formats. Couldn't be happier with the result. Thank you so much!
Tamara Kelly
Thank you so much Lisa! I'm super impressed! ♥
Louise MacClanahan
I have finished all the squares for the baby blanket to round 8 using your amazingly helpful tutorial. I am rather new to crocheting and am lost and intimidated with the joining. I have watched the joining tutorial many times and am not finding it as helpful. After finishing row 8 is there another round 9 that I need to do before joining? The tutorial doesn't show the round 8 edges but something different. After round 8 with the 6 single crochet--4 slip stitch--6 single crochet, The joining tutorial doesn't show solid edges. Is there a tutorial that continues after row 8. Sorry I am struggling with this as I am so near to having it completed.
Tamara Kelly
Hi Louise! This is the tutorial for Rnd 9 - https://www.mooglyblog.com/tight-braid-join/ I'm sorry I'm not sure where specifically you are having trouble?
Cathy Henry
I'm so sad the yarn is discontinued. I'm terrible at picking out my own yarn. Although I still want to try this, your pattern is beautiful!
Tamara Kelly
Thank you so much Cathy! Feel free to use any yarn you like - it's a pretty flexible pattern!