The Loopy Love Baby Blanket, Beanies, Newborn Booties and Big Baby Booties inspired requests for one more Loopy Love pattern - the Loopy Love Baby Sweater!

Disclaimer: This post includes affiliate links.

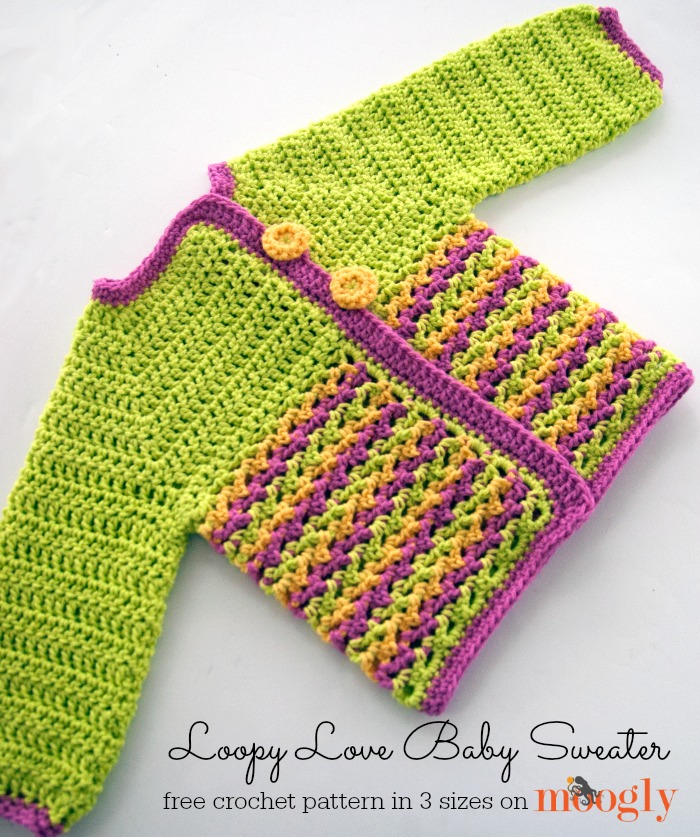
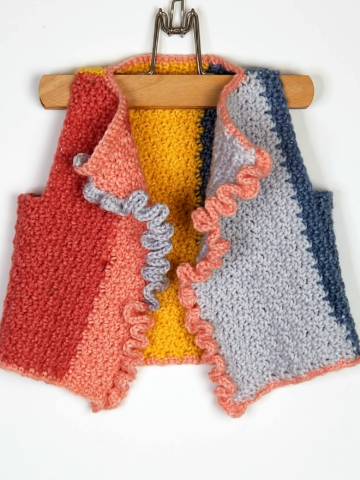
The Loopy Love Baby Sweater is available in 3 sizes, and while I've switched up the yarn used rather than using the same yarn as the other Loopy Love items, the weight and hook size is the same, so they all coordinate.
The sizes are based on the standard measurements from the Craft Yarn Council, found HERE, and the sweater is designed to have some positive ease - meaning it's loose enough to wear over other clothing.. and grow into for a little bit!
Loopy Love Baby Sweater
Click here to add this pattern to your Ravelry Queue and Favorites
- US - I, 5.5 mm hook (Furls Fiberarts)
- 350-400 total yds Lion Brand Modern Baby (DK/8 ply; 173 yds/158m; 75 g/2.65 oz)
Color A: Chartreuse (2 skeins)
Color B: Yellow (1 skein)
Color C: Pink (1 skein) - 4 Stitch Markers
- 2 buttons or as many as desired - click link below for button tutorial
- Gauge: 13 sts x 10 rows = 4" in dc
- Sizes: 0-3mths; 3-6mths; 6-12mths (shown)
Helpful Links:
- Click here for Crochet Abbreviations
- Click here for Loopy Love Stitch Tutorial
- Click here for Top Down Yokes Tutorial
- Click here for Crochet Buttons Tutorial
Special Stitch: Make Corner - Work 3 dc into the next stitch, place marker in center of these 3 sts. (Move markers up in subsequent rows)
0-3 Months Size Instructions:
Row 1: (With Color A) Ch 46, skip the 2 ch closest to the hook, dc 6, make corner, dc 6, make corner, dc 12, make corner, dc 6, make corner, dc 10; turn. (52 sts)
Row 2: Ch 2 (does not count as a st), dc 11, make corner, dc 8, make corner, dc 14, make corner, dc 8, make corner, dc 7; turn. (60 sts)
Row 3: Ch 2, dc 8, make corner, dc 10, make corner, dc 16, make corner, dc 10, make corner, dc 12; turn. (68 sts)
Row 4: Ch 2, dc 13, make corner, dc 12, make corner, dc 18, make corner, dc 12, make corner, dc 9; turn. (76 sts)
Row 5: Ch 2, dc 10, make corner, dc 14, make corner, dc 20, make corner, dc 14, make corner, dc 14; turn. (84 sts)
Row 6: Ch 2, dc 15, make corner, dc 16, make corner, dc 22, make corner, dc 16, make corner, dc 11; turn. (92 sts)
Row 7: (underarm row) Ch 2, dc 13, ch 7, skip 18 sts, dc 26, ch 7, skip 18 sts, dc 17; turn. (56 sts and 14 chs)
Row 8: Ch 1, sc in each st and ch to end; turn. (70 sts)
Row 9: (begin loopy section) Ch 1, sc in the 1st st, *ch 3, dc in the same st as previous st, skip 2 sts, sc in the next st; repeat from * to end, turn. (23 ch-3 loops)
Row 10: With Color B, ch 3, sc in the next ch-3 loop, *ch 3, dc in the same ch-3 loop, sc in the next ch-3 loop; repeat from * to end, finishing last repeat with a ch 2, dc in the last sc, turn. (22 ch-3 loops, 1 ch-2 loop)
Row 11: With Color C, ch 1, sc in first st, ch 3, dc in ch-2 loop, *[sc, ch 3, dc] in next loop, repeat from * to end, finishing last repeat with a sc in the top of the turning ch, turn. (23 ch-3 loops)
Row 12 - 21: Repeat Rows 10 - 11, cycling through all 3 colors. Row 21 should be a Row 12 repeat in Color A. Break Colors B and C, but continue with Color A.
Round 22 (edging): (Note: Work 3 sc in corners) Ch 1, sc along front flap loopy section, sl st along yoke/Color A section, continuing along neckline and onto other flap, sc along next loopy section, work 3 sc in each ch-3 loop across bottom of sweater; join to first sc and break yarn.
Round 23 (edging): (Note: Work 3 sc in corners) With Color C, join to any st of previous round, ch 1, sc in each st of previous round; join to first sc.
Round 24 (edging): Ch 1, sc around as previous rnd excepting front left (larger) flap - at corner approaching flap edge, (sc, dc) in one st, 2 dc in next st, dc in each st along front flap edge, working a ch 4 (or as needed for chosen buttons) between dc sts where the buttons line up, then 2 dc in last flap edge stitch, (dc, sc) in next st, continue with sc around to end; join and break yarn.
0-3 Mth Sleeve Instructions:
NOTE: Use a stitch marker to keep track of the last st of each row, to make it easier to find when you turn.
Round 1: Join with Color A to center st of underarm, from Right Side; sc in first 4 underarm sts, hdc 2 in side of Row 7, dc in next 18 sts, hdc 2 in side of Row 7, sc in remaining 3 underarm sts; join to 1st sc with sl st, turn. (29 sts)
Round 2: (Working from Wrong Side) Ch 1, hdc 5, dc 18, hdc 6; join with sl st, turn. (29 sts)
Round 3: Ch 1, hdc 4, dc 22, hdc 3; join with sl st, turn. (29 sts)
Round 4: Ch 2, dc 29; join with sl st, turn. (29 sts)
Round 5 - 11: Repeat Round 4.
Round 12: Ch 2, *dc, dc2tog; repeat from * around, dc in last 2 sts; join with sl st, break yarn. (20 sts)
Round 13: With Color C, join to any st of previous row, ch 1, sc in each st around; join with sl st. (20 sts)
Round 14: Ch 1, sc in each st around; join with sl st, break yarn. (20 sts)

3-6 Months Size Instructions:
Row 1: (With Color A) Ch 46, skip the 2 ch closest to the hook, dc 6, make corner, dc 6, make corner, dc 12, make corner, dc 6, make corner, dc 10; turn. (52 sts)
Row 2: Ch 2 (does not count as a st), dc 11, make corner, dc 8, make corner, dc 14, make corner, dc 8, make corner, dc 7; turn. (60 sts)
Row 3: Ch 2, dc 8, make corner, dc 10, make corner, dc 16, make corner, dc 10, make corner, dc 12; turn. (68 sts)
Row 4: Ch 2, dc 13, make corner, dc 12, make corner, dc 18, make corner, dc 12, make corner, dc 9; turn. (76 sts)
Row 5: Ch 2, dc 10, make corner, dc 14, make corner, dc 20, make corner, dc 14, make corner, dc 14; turn. (84 sts)
Row 6: Ch 2, dc 15, make corner, dc 16, make corner, dc 22, make corner, dc 16, make corner, dc 11; turn. (92 sts)
Row 7: Ch 2, dc 12, make corner, dc 18, make corner, dc 24, make corner, dc 18, make corner, dc 16; turn. (100 sts)
Row 8: (underarm row) Ch 2, dc 18, ch 7, skip 20 sts, dc 28, ch 7, skip 20 sts, dc 14; turn. (60 sts and 14 chs)
Row 9: Ch 1, 2 sc in 1st st, sc in each st and ch to last st, 2 sc in last st; turn. (76 sts)
Row 10: (begin loopy section) Ch 1, sc in the 1st st, *ch 3, dc in the same st as previous st, skip 2 sts, sc in the next st; repeat from * to end, turn. (25 ch-3 loops)
Row 11: With Color B, ch 3, sc in the next ch-3 loop, *ch 3, dc in the same ch-3 loop, sc in the next ch-3 loop; repeat from * to end, finishing last repeat with a ch 2, dc in the last sc, turn. (24 ch-3 loops, 1 ch-2 loop)
Row 12: With Color C, ch 1, sc in first st, ch 3, dc in ch-2 loop, *[sc, ch 3, dc] in next loop, repeat from * to end, finishing last repeat with a sc in the top of the turning ch, turn. (25 ch-3 loops)
Row 13 - 25: Repeat Rows 11 - 12, cycling through all 3 colors. Row 25 should be a Row 12 repeat in Color A. Break Colors B and C, but continue with Color A.
Round 26 (edging): (Note: Work 3 sc in corners) Ch 1, sc along front flap loopy section, sl st along yoke/Color A section, continuing along neckline and onto other flap, sc along next loopy section, work 3 sc in each ch-3 loop across bottom of sweater; join to first sc and break yarn.
Round 27 (edging): (Note: Work 3 sc in corners) With Color C, join to any st of previous round, ch 1, sc in each st of previous round; join to first sc.
Round 28 (edging): Ch 1, sc around as previous rnd excepting front left (larger) flap - at corner approaching flap edge, (sc, dc) in one st, 2 dc in next st, dc in each st along front flap edge, working a ch 4 (or as needed for chosen buttons) between dc sts where the buttons line up, then 2 dc in last flap edge stitch, (dc, sc) in next st, continue with sc around to end; join and break yarn.
3-6 Mth Sleeve Instructions:
NOTE: Use a stitch marker to keep track of the last st of each row, to make it easier to find when you turn.
Round 1: Join with Color A to center st of underarm, from Right Side; sc in first 4 underarm sts, hdc 2 in side of Row 8, dc in next 20 sts, hdc 2 in side of Row 8, sc in remaining 3 underarm sts; join to 1st sc with sl st, turn. (31 sts)
Round 2: (Working from Wrong Side) Ch 1, hdc 5, dc 20, hdc 6; join with sl st, turn. (31 sts)
Round 3: Ch 1, hdc 4, dc 24, hdc 3; join with sl st, turn. (31 sts)
Round 4: Ch 2, dc 31; join with sl st, turn. (31 sts)
Round 5 - 12: Repeat Round 4.
Round 13: Ch 2, *dc, dc2tog; repeat from * around; join with sl st, break yarn. (21 sts)
Round 14: With Color C, join to any st of previous row, ch 1, sc in each st around; join with sl st. (21 sts)
Round 15: Ch 1, sc in each st around; join with sl st, break yarn. (21 sts)
6-12 Months Size Instructions:
Row 1: (With Color A) Ch 46, skip the 2 ch closest to the hook, dc 6, make corner, dc 6, make corner, dc 12, make corner, dc 6, make corner, dc 10; turn. (52 sts)
Row 2: Ch 2 (does not count as a st), dc 11, make corner, dc 8, make corner, dc 14, make corner, dc 8, make corner, dc 7; turn. (60 sts)
Row 3: Ch 2, dc 8, make corner, dc 10, make corner, dc 16, make corner, dc 10, make corner, dc 12; turn. (68 sts)
Row 4: Ch 2, dc 13, make corner, dc 12, make corner, dc 18, make corner, dc 12, make corner, dc 9; turn. (76 sts)
Row 5: Ch 2, dc 10, make corner, dc 14, make corner, dc 20, make corner, dc 14, make corner, dc 14; turn. (84 sts)
Row 6: Ch 2, dc 15, make corner, dc 16, make corner, dc 22, make corner, dc 16, make corner, dc 11; turn. (92 sts)
Row 7: Ch 2, dc 12, make corner, dc 18, make corner, dc 24, make corner, dc 18, make corner, dc 16; turn. (100 sts)
Row 8: Ch 2, dc 17, make corner, dc 20, make corner, dc 26, make corner, dc 20, make corner, dc 13; turn. (108 sts)
Row 9: (underarm row) Ch 2, dc 15, ch 7, skip 22 sts, dc 30, ch 7, skip 22 sts, dc 19; turn. (64 sts and 14 chs)
Row 10: Ch 1, sc in each st and ch to last st, 2 sc in last st; turn. (79 sts)
Row 11: (begin loopy section) Ch 1, sc in the 1st st, *ch 3, dc in the same st as previous st, skip 2 sts, sc in the next st; repeat from * to end, turn. (26 ch-3 loops)
Row 12: With Color B, ch 3, sc in the next ch-3 loop, *ch 3, dc in the same ch-3 loop, sc in the next ch-3 loop; repeat from * to end, finishing last repeat with a ch 2, dc in the last sc, turn. (25 ch-3 loops, 1 ch-2 loop)
Row 13: With Color C, ch 1, sc in first st, ch 3, dc in ch-2 loop, *[sc, ch 3, dc] in next loop, repeat from * to end, finishing last repeat with a sc in the top of the turning ch, turn. (26 ch-3 loops)
Row 14 - 26: Repeat Rows 12 - 13, cycling through all 3 colors. Row 26 should be a Row 12 repeat in Color A. Break Colors B and C, but continue with Color A.
Round 27 (edging): (Note: Work 3 sc in corners) Ch 1, work 3 sc in each ch-3 loop across bottom of sweater, sc along front flap loopy section, sl st along yoke/Color A section, continuing along neckline and onto other flap, sc along next loopy section; join to first sc and break yarn.
Round 28 (edging): (Note: Work 3 sc in corners) With Color C, join to any st of previous round, ch 1, sc in each st of previous round; join to first sc.
Round 29 (edging): Ch 1, sc around as previous rnd excepting front left (larger) flap - at corner approaching flap edge, (sc, dc) in one st, 2 dc in next st, dc in each st along front flap edge, working a ch 4 (or as needed for chosen buttons) between dc sts where the buttons line up, then 2 dc in last flap edge stitch, (dc, sc) in next st, continue with sc around to end; join and break yarn.
6-12 Mths Sleeve Instructions
NOTE: Use a stitch marker to keep track of the last st of each row, to make it easier to find when you turn.
Round 1: Join with Color A to center st of underarm, from Right Side; sc in first 4 underarm sts, hdc 2 in side of Row 9, dc in next 22 sts, hdc 2 in side of Row 9, sc in remaining 3 underarm sts; join to 1st sc with sl st, turn. (33 sts)
Round 2: (Working from Wrong Side) Ch 1, hdc 5, dc 22, hdc 6; join with sl st, turn. (33 sts)
Round 3: Ch 1, hdc 4, dc 26, hdc 3; join with sl st, turn. (33 sts)
Round 4: Ch 2, dc 33; join with sl st, turn. (33 sts)
Round 5 - 14: Repeat Round 4.
Round 15: Ch 2, *dc, dc2tog; repeat from * around; join with sl st, break yarn. (22 sts)
Round 16: With Color C, join to any st of previous row, ch 1, sc in each st around; join with sl st. (22 sts)
Round 17: Ch 1, sc in each st around; join with sl st, break yarn. (22 sts)
Finally, add the buttons opposite your edging ch-2 loops, and done! This is a simple sweater with lots of color and life. I hope you enjoy the pattern!

Written pattern copyright Tamara Kelly 2015. Please do not reprint or repost this pattern, but please do link to this page to share this pattern with others. If you wish to make items for sale from this pattern, please visit the About page for details. Thank you to Lion Brand Yarn for providing the yarn for this pattern!

Carmen
Buen día. Podría mostrar como se hace este sweater en vídeo, pues me
es muy dificil de entender en tutorial.
Gracias por todo .
Un saludo,
Carmen
Jane C
I am making this sweater, size 0-3 months. I have counted ripped, etc. Still only have 23 loops in my first row of loops? Have 70 sc on previous rows and think the 26 loops must be for next size? I hesitate to continue and have to rip too many rows. Help, thanks.
Tamara Kelly
My apologies Jane, that was a typo, 23 is correct. I'll update the pattern.
CIndy
I'm confused, no instruction for making the corner. Please clarify. Thanks
CIndy
Never mind, I found it. Sorry for the bother
Tamara Kelly
🙂 Glad you found it!
val smart
Hi how do you do the corner
Tamara Kelly
Hi Val! That info is under "Special Stitch" above. 🙂
susan
I am making this for me new great niece and was just wondering if you have a legging pattern to go with the sweater ?
Thanks
susan
Tamara Kelly
Hi Susan! I'm afraid I do not!
Ella
I'm making this for my daughter and following the 6-12mos pattern..i'm lost on row 10 🙁
"Row 10: Ch 1, sc in each st and ch to last st, 2 sc in last st; turn. (79 sts)"
how do I chain to last stitch then 2 sc in last st?
Thank you!
Tamara Kelly
Hi Ella! You don't chain to the last stitch you work a sc in each stitch and a sc in each chain - until you come to the last stitch, where you sc twice. 🙂 Is that clearer?
anna
Hi Tamara, I absolutely loved making the blanket, booties, and hat. I am so glad that there is a sweater to match the other pieces. Thank you for sharing your designs with all of us other crochet fanatics. God bless.
Tamara Kelly
Thank you so much Anna! ♥
Roxanne
i feel like such an idiot. i cannot figure out the sleeves for the life of me. i have taken it out so many times i am beginning to stretch the stitches out. Do you have the instructions on a video tutorial?
Tamara Kelly
Hi Roxanne, I'm afraid I don't. For the sleeves it's crocheting in the round around the arm opening. What part is tripping you up?
ROXANNE
I am not completely sure. I used to crochet many years ago and just picked it back up. Would you just explain a few of the stitches to me. When you start the sleeve you say to join..i assume you mean by a slip stitch?? Also, I have gotten a few different explanations of hdc2 (4)..etc..and dc24.. I tried what i figured it was and I wont even tell you how weird it looked. I was obviously wrong. Going to try again tonight, just concerned i will ruin the arm hole by stretching it out.
Thank you
Tamara Kelly
Hi Roxanne - you can CLICK HERE for all the abbreviation definitions and tutorials. 🙂 And yes, you can join with a slip stitch. 🙂
Judy garcia
Hi Tamara.
I recently left you a comment/question regarding this Loopy Love set. Do you think that you will ever create a pattern for a matching diaper cover? I would be very interested in one. Thank you!
Tamara Kelly
Hi Judy! I haven't made a diaper cover before, but it's a fun idea! 😀 I'll see if I can work it into the schedule, thank you!
Sheila Fontenot
Tamara
I think this is the cutest sweater I have seen in a really long time. I have 3 granddaughters aged 4-6 and would love to make this for them--I have no clue how to make this larger for them or even what the dimensions on this one are--is there anyway you can tell me how to "size up" this incredible pattern?
Thanks so much
Sheila Fontenot
Tamara Kelly
Hi Sheila! Thank you so much! I'll try to get some bigger sizes up, but in the meantime, I'd recommend following the directions for the largest size while using thicker yarn and a larger hook. 🙂
Anisha
Hi Tamara,
I love this little sweater! I'm working on making one for my two-month-old, and was wondering if by the loopy part you break your colours and weave in the ends after every row? It doesn't really work to carry them up to the next row of that color since they always end on opposite sides, but it seems to leave a lot of (awkward) weaving in to do at the end...do you have a trick for weaving in ends on chain bits? Or do you carry them up somehow?
Thanks in advance!
Anisha
Tamara Kelly
Hi Anisha! You can carry the colors along the side if you use 3 colors. If you have 2 or 4, you will need to break them. To make it easier to weave the ends in, I would crochet the edging first, and use that space to help weave the ends in. 🙂
Anisha
Ah yes, now I see, thank you! 😀 I guess the yarn that stays at the ends of the rows (from carrying up) can also be crocheted into the border, eh.
Tamara Kelly
It covers it right up! 😀
loretta young
Dear Ella,
I love the sweater. My great neice wears a size 3. Do you have number of stitches for a size 3?
Hopefully?
Loretta
Tamara Kelly
Hi Loretta! I'm afraid I don't. However, I would recommend making the largest size using thicker yarn and a larger hook, then just work the yoke increase rows until it fits around the chest, and go from there. 🙂
loretta young
Tamara,
There was a reference to lap blanket pattern. Is there a pattern for this same design for a lap blanket?
Loretta
Tamara Kelly
Hi Loretta! That's here, and it has a wide variety of sizes! https://www.mooglyblog.com/loopy-love-blanket/
Erna Pelgrim
Tamara, as lovely all your patterns, thanks for sharing.
Erna
Tamara Kelly
Thank you so much Erna!
Judy Garcia
I absolutely LOVE this Loopy Love set. The only thing that would complete it would be a diaper cover. Have you considered a pattern for one? I'd love to have it to add to the collection. Thanks!
Tamara Kelly
Ooo, I haven't done one of those before, I'll have to look into it! Thanks so much Judy!
Carmen
Buen día. Me gusta mucho esta chaqueta y me gustaría hacérsela a mi nieto de cuatro años. Los tutoriales no los entiendo bien, por eso le agradecería pusiera un vídeo de como se hace.
Muchas gracias y un saludo.
Carmen
Michaelle
Hi Tamara, I'm new to crocheting..I love this little jacket and would like to give it a go.
Can you please explain how to make a corner.
Also on the photo where does the first row start.
Thank you Michaelle
Tamara Kelly
Hi Michaelle! Thank you! I think this video tutorial might help: Click here
Aliya Cheskis-Cotel
I love this pattern, but my grandson is 8 months in the 99th percentile of height and weight. I think I need this for an 18 month old. You had said you would post instructions for bigger children, or that we should just use a bigger hook and thicker yarn. Please give recommendations for an 18 month old. 4-ply worsted I assume rather than baby yarn, but what size hook. I made the hexagon granny square sweater for him with worsted and an I hook, and it came out the size for a 3 year old. Help! Thank you for your creativity and all that you do for the world of crocheters.
Tamara Kelly
Hi Aliya! I haven't had a chance to upsize this sweater just yet. I would recommend whatever hook gives you a slightly larger gauge than the one listed.
Rena Bradbury
I am in love with this pattern. I have made three so far. I have noticed that when I do the edging over the dc's there are holes. I don't see any 'holes' in the photo. Am I doing something wrong? Also, I see questions on making larger sizes. What about just doubling the stitch count? Thank you.
Tamara Kelly
Thank you so much Rena! You could try doubling the sts, I just can't vouch for the outcome. 🙂 As for the edging, I minimized the look of holes by doing a green edge before the contrast edge. Other than that it's hard to say without being there.
Rena bradbury
Hi Tamara,
I am having so much fun with this pattern. I have been doing a dc all the way down and putting different things on, like owls, flowers and so forth.
Just wanted to let you know that if you do double the stitch count it will be big enough for a man.
Thank you for your time,
Rena.
Tamara Kelly
Oh wow, good to know! 😀 Thank you Rena!
Joy
I would love this sweater in toddler sizes. Any prospect of enlarging it to at 3T or 4T?
Tamara Kelly
It's on my to-do list for fall! 🙂
Lisa
i love this cardigan... how big did the 0-3 measure from top to bottom? thank you.
Tamara Kelly
Thank you Lisa! I don't have length measurements available, but you can add extra rows if you want it longer (or take them out to make them shorter)! 🙂
Erika
hi, I am making the 0-3 mo size and I am on the first loopy row and I keep getting 24. I have pulled out 3 times and counted the row beneath and there are 70 stitches. Any suggestions on what I am doing wrong?
Tamara Kelly
Hi Erika! It's always hard to "diagnose" without being there in person, but my best guess is that you might be putting a loop on the last one of those 70 sts. The last one of the 70 should get just a sc. Did that help?
Madeline
Hi there! I've made about 3 of these sweaters so far, but could really use one in a 4T. I'm thinking of playing with the number of stitches......that is, unless you have a larger size worked up yet????? Hint, hint!
Tamara Kelly
Not yet I'm afraid. 🙂
Madeline
TAMARA,
I'VE WORKED UP YOUR LOOPY LOVE SWEATER IN A 3T-4T SIZE BY ADAPTING YOUR PATTERN. I AM INCLUDING IT HERE SO YOU CAN TRY IT WHEN YOU GET THE CHANCE. I MADE ONE UP AND IT SEEMS TO WORK!
2T-3T Toddler sweater
500 yards hook size I, 5.5
Row 1: (With Color A) Ch 52, skip the 2 ch closest to the hook, dc 7, make corner, dc 7, make corner, dc 14, make corner, dc 7, make corner, dc 11; turn. (58 sts)
Row 2: Ch 2 (does not count as a st), dc 12, make corner, dc 9, make corner, dc 16, make corner, dc 9, make corner, dc 8; turn. (66 sts)
Row 3: Ch 2, dc 9, make corner, dc 11, make corner, dc 18, make corner, dc 11, make corner, dc 13; turn. (74 sts)
Row 4: Ch 2, dc 14, make corner, dc 13, make corner, dc 20, make corner, dc 13, make corner, dc 10; turn. (82 sts)
Row 5: Ch 2, dc 11, make corner, dc 15, make corner, dc 22, make corner, dc 15, make corner, dc 15; turn. (90 sts)
Row 6: Ch 2, dc 16, make corner, dc 17, make corner, dc 24, make corner, dc 17, make corner, dc 12; turn. (98 sts)
Row 7: Ch 2, dc 13, make corner, dc 19, make corner, dc 26, make corner, dc 19, make corner, dc 17; turn. (106 sts)
Row 8: Ch 2, dc 18, make corner, dc 21, make corner, dc 28, make corner, dc 21, make corner, dc 14; turn. (114 sts)
Row 9: Ch 2, dc 15, make corner, dc 23, make corner, dc 30, make corner, dc 23, make corner, dc 19; turn. (122 sts)
Row 10: (underarm row) Ch 2, dc 21, ch 8, skip 25 sts, dc 34, ch 8, skip 25 sts, dc 17; turn. (88 sts and 16 chs)
Row 11: Ch 1, sc in each st and ch to last st, 2 sc in last st; turn. (88 sts)
Row 12: (begin loopy section) Ch 1, sc in the 1st st, *ch 3, dc in the same st as previous st, skip 2 sts, sc in the next st; repeat from * to end, turn. (29 ch-3 loops)
Row 13: With Color B, ch 3, sc in the next ch-3 loop, *ch 3, dc in the same ch-3 loop, sc in the next ch-3 loop; repeat from * to end, finishing last repeat with a ch 2, dc in the last sc, turn. (28 ch-3 loops, 1 ch-2 loop)
Row 14: With Color C, ch 1, sc in first st, ch 3, dc in ch-2 loop, *[sc, ch 3, dc] in next loop, repeat from * to end, finishing last repeat with a sc in the top of the turning ch, turn. (29 ch-3 loops)
Row 15 – 29: Repeat Rows 13 – 14, cycling through all 3 colors. Break colors B & C. Continue with Color A.
Round 30 (edging): (Note: Work 3 sc in corners) Ch 1, work 3 sc in each ch-3 loop across bottom of sweater, sc along front flap loopy section, sl st along yoke/Color A section, continuing along neckline and onto other flap, sc along next loopy section; join to first sc and break yarn.
Round 31 (edging): (Note: Work 3 sc in corners) With Color C, join to any st of previous round, ch 1, sc in each st of previous round; join to first sc.
Round 32 (edging): Ch 1, sc around as previous rnd excepting front left (larger) flap – at corner approaching flap edge, (sc, dc) in one st, 2 dc in next st, dc in each st along front flap edge, working a ch 4 (or as needed for chosen buttons) between dc sts where the buttons line up, then 2 dc in last flap edge stitch, (dc, sc) in next st, continue with sc around to end; join and break yarn.
3T-4T Sleeve Instructions
NOTE: Use a stitch marker to keep track of the last st of each row, to make it easier to find when you turn.
Round 1: Join with Color A to center st of underarm, from Right Side; sc in first 4 underarm sts, hdc 2 in side of Row 10, dc in next 25 sts, hdc 2 in side of Row 10, sc in remaining 4 underarm sts; join to 1st sc with sl st, turn. (37 sts)
Round 2: (Working from Wrong Side) Ch 1, hdc 5, dc 22, hdc 6; join with sl st, turn. (37 sts)
Round 3: Ch 1, hdc 4, dc 26, hdc 3; join with sl st, turn. (37 sts)
Round 4: Ch 2, dc 33; join with sl st, turn. (37 sts)
Round 5 – 14: Repeat Round 4.
Round 15: Ch 2, *dc, dc2tog; repeat from * around, ending in a dc; join with sl st, break yarn. (29 sts)
Round 16: With Color C, join to any st of previous row, ch 1, sc in each st around; join with sl st. (29 sts)
Round 17: Ch 1, sc in each st around; join with sl st, break yarn. (29 sts)
Finally, add the buttons opposite your edging ch-2 loops, and done!
Tamara Kelly
Thank you so much for sharing it Madeline! 🙂
Jennifer
Hi. I'm at the sleeve portion and it says it's a 'round' but then it says I need to turn at the end. Is this wrong?
Tamara Kelly
No, it's right! 🙂 Turning keeps the seam straight, eliminating that leaning seam that you usually get when you don't turn.
Madeline
Yes, you complete the round with a slip atitch, chain and then turn, comping the following round in the reverse direction. Hope that helps.
Louise
Hi.
Baby Sweater is adorable. I am busy with the new born version and starting the edging with a couple of undoing rounds. Firstly as per the pattern it is a direct start on the wrong side. Is that correct? Then on completing the first round there is no turn instruction and neither on the next round. Is that correct? I found that it just does not look right on the right side of the garment. I gather it is to straighten the garment and give it a straighter edge or am I being to fussy. So all the edging rounds there are no turns and all done on wrong side?
Thank you for sharing the pattern.
Kind regards
Louise
Tamara Kelly
Hello Louise! I'm afraid I'm confused - what are undoing rounds? The edging should be worked from the right side.
Louise
Hi Tamara,
I think I may be confused haha.
I meant unravelling my work. Sorry
When ending with final loopy section, to start the edging. I end up on the corner of the left side of Sweater. Now you don't say turn, so I start with the sc along the front on the wrong side. But I just realised I added rows to make the body a little longer. Perhaps that's why I'm on the wrong side. I have finished and still looks strange but I am going to have a look at the additional 3 rows I added to the body this evening. Perhaps that's why I start off on the wrong side with the edging.
Question: perhaps just clarity: do you turn after each round of the edging around the garment?
I am making two as expecting twin grandchildren, boy and girl. So best I do the first one right, as they say, "double trouble"
Tamara Kelly
Hello Louise! I think it's the extra rows that put you on the wrong side. During the edging, you don't turn, so that those rounds are all on the RS. 🙂 Congratulations on the twins!!
Louise
Hi Tamara,
Thank you, we are all very excited.
I do agree. I am about to unravel the edging and take another look at what I had done. The wrong side edging just did not sit well with me.
I do appreciate your prompt response. Thank you
Tamara Kelly
I'm so glad I was able to help! 🙂
Jane
Cute! Thank you for the pattern.
Tamara Kelly
🙂 You are very welcome, I'm glad you like it!
Vicki O
Hi, Tamara, I m making this loopy sweater in 3-6 month size, I have turned out a skirt-like one accidentally,i'ss
still so cute, but mine is wider than yours, like a skirt!!!! what did I do different, maybe I added stitches somehow?
thanks for the pattern it's so nice. 🙂
Tamara Kelly
Hi Vicki! Thank you! It sounds like either your gauge was different than mine, or stitches were added - it's hard to say for sure from here!
Vicki O
Thank you, everyone at knitting class love this pattern /and sweater it's pretty
Tamara Kelly
Thank you so much Vicki!
Darlene
Do you have pattern size for a 3 year old?
Tamara Kelly
No, I'm afraid this one is just in baby sizes.
Aadila
Hi Tamara I'm following your pattern but the following makes no sense join to center under arm stitch sc in 4 stitch hdc 2 inside of row 7 then the rest and back to row 7 You can't 2 hdc in bottom then reverse and go back so please could you explain the last part also in the button tutorial you have a typo it's sc 2tog and not slst 2 together. Thank you.
Tamara Kelly
Hi Aadila! I'm sorry you are having trouble. Are you adding the sleeves? You work all the way around the arm opening, then join and turn to work from the "inside" of the sleeve for Round 2.
Slst2tog is correct for the last round of the button.
Lori
I would love to make this sweater but stitch counts are wayyyyy off what to do?
Tamara Kelly
Hi Lori! I'd love to try to help but need more info. Can you tell me where you're having trouble?
Carline Darby
I'm having problem with Row 1. Not sure how to do the row. I did the 46 chs., & dc into the second ch on hook. Not sure if I put 6dc in one stitch or in each ch. Can someone help me please. Thanks
Carline
Tamara Kelly
Hi Carline! You would put 1 dc in each of the next 5 chains. 🙂 It's the "make corner" that had you working multiple stitches in one chain. This video might help you visualize what you're doing here: https://www.mooglyblog.com/tutorial-armholes-top-down-crochet-baby-sweater/
Sheila crebbs
I would love make a pair of pants to match this sweater. Do you have a pattern of loopy love pants?
Tamara Kelly
No, but you could add a few rows to the bottom of a solid pair! I think making the whole pantlegs out of this would mean a frustrating time dressing the little one! ♥
Charlie
Hi there
I was wondering if you are planning on doing this pattern in larger sizes? I’d like to make 1-2 years and 7-8 years. It’s absolutely beautiful. Thank you so much for sharing your beautiful work with us 😊❤️
Tamara Kelly
Not at this time, but perhaps in the future! 🙂