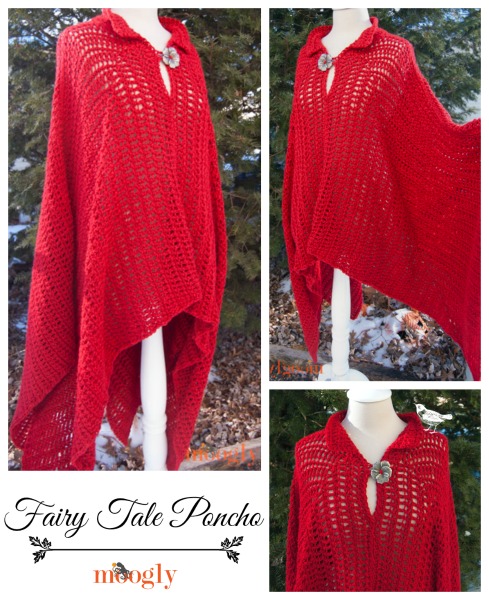
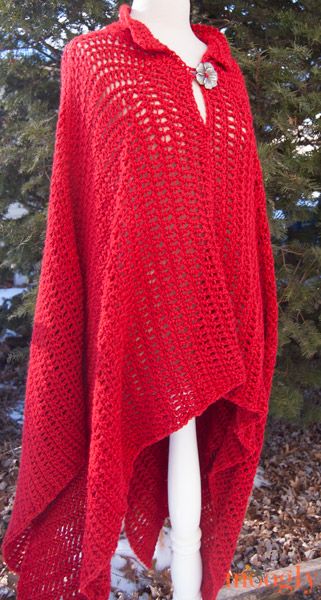
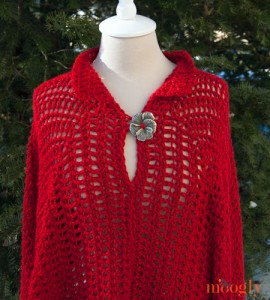
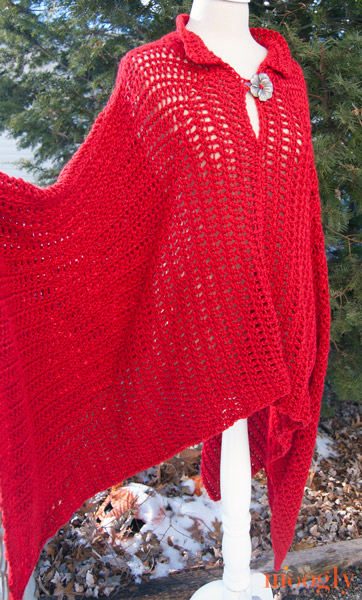
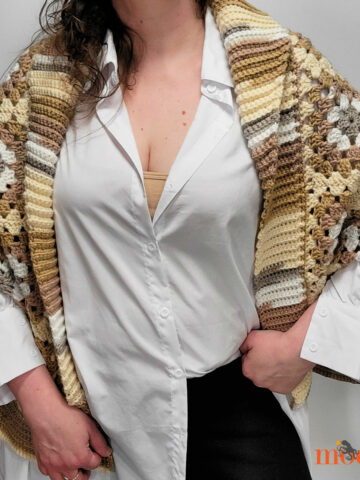
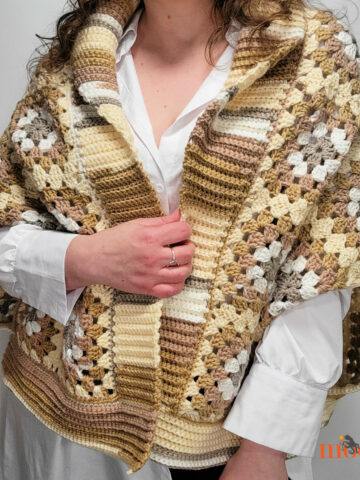
The Fairy Tale Poncho is my first adult garment design! It's easier to make than it looks, and with it's asymmetrical hem and mitered stitching, it's designed to flatter larger bodies as well as smaller ones - and look as good with jeans and boots as it does with a crown and glass slippers!
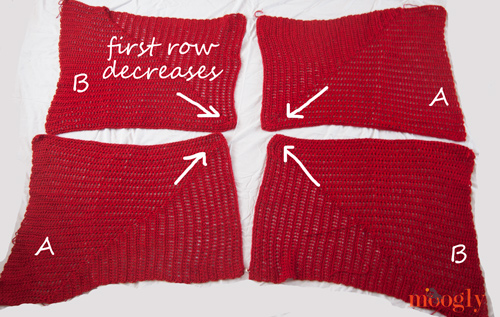
The Fairy Tale Poncho is made in four "rectangl-ish" shapes that are sewn together. It could be made seamlessly, but I chose to use these 4 seams specifically to add structure to the garment. The seams are made using the Mattress Stitch in the tops of stitches, not the sides, so you'll have the whole thing sewn up as fast as can be. The rectangles are reversible, but the sides are slightly different, so use the photo below to help you lay it out. If you find you prefer the look of the other side of the fabric, switch the As and Bs.

Fairy Tale Poncho
Add this pattern to your Ravelry Queue and Favorites
- US - M/N, 9.00mm hook
- 1250 - 1500 yds Worsted or Aran weight yarn (Lion Brand Heartland in Redwood shown)
- 1 button
- 3 stitch markers
- tapestry/yarn needle
- Gauge (laid flat - will hang larger): 7 rows x 10 sts = 4" in pattern
- Sizes: Small/Medium (Large/XL, 2X/3X, 4X/5X)
- Video tutorial: Seamless Join; Mattress Stitch
MAKE TWO OF EACH RECTANGLE
 RECTANGLE A: (Tip: Add a stitch marker to each of these pieces to help you remember which ones are A vs B)
Row 1: Ch 104 (106, 108, 110), sc in the 2nd ch from the hook. Sc in the next 55 (57, 59, 61) ch, sc2tog skipping 1 st in the middle, place marker in the sc2tog. Sc in the remaining 44 sts. Turn. (101 (103, 105, 107) sts)
Row 2: Ch 2 (does not count as a st), dc in the 1st 43 sts. Dc2tog skipping the marked st in the middle (move marker to dc2tog, continue to move up into decrease of each new row), dc in the remaining 55 (57, 59, 61) sts. Turn. (99 (101, 103, 105) sts)
Row 3: Ch 1, sc in the 1st 54 (56, 58, 60) sts, sc2tog skipping 1 st in the middle, sc in the remaining 42 sts. Turn. (97 (99, 101, 103) sts)
Row 4: Ch 2, dc in the 1st 41 sts. Dc2tog skipping 1 st in the middle, dc in the remaining 53 (55, 57, 59) sts. Turn. (95 (97, 99, 101) sts)
Row 5: Ch 1, sc in the 1st 52 (54, 56, 58) sts, sc2tog skipping 1 st in the middle, sc in the remaining 40 sts. Turn. (93 (95, 97, 99) sts)
Row 6 - 44: Continue in established pattern, reducing by 2 sts total on each row, until you are left with 15 (17, 19, 21) dc sts in the last row. Turn.
Row 45: Ch 1, sc in the 1st 13 (15, 17, 19) sts. Skip the marked "middle" st, break yarn and seamless join to last st.
RECTANGLE B:
Row 1: Ch 104 (106, 108, 110), sc in the 2nd ch from the hook. Sc in the next 43 ch, sc2tog skipping 1 st in the middle, sc in the remaining 56 (58, 60, 62) sts. Turn. (101 (103, 105, 107) sts)
Row 2: Ch 2 (does not count as a st), dc in the 1st 55 (57, 59, 61) sts. Dc2tog skipping 1 st in the middle, dc in the remaining 43 sts. Turn. (99 (101, 103, 105) sts)
Row 3: Ch 1, sc in the 1st 42 sts, sc2tog skipping 1 st in the middle, sc in the remaining 54 (56, 58, 60) sts. Turn. (97 (99, 101, 103) sts)
Row 4: Ch 2, dc in the 1st 53 (55, 57, 59) sts. Dc2tog skipping 1 st in the middle, dc in the remaining 41 sts. Turn. (95 (97, 99, 101) sts)
Row 5: Ch 1, sc in the 1st 40 sts, sc2tog skipping 1 st in the middle, sc in the remaining 52 (54, 56, 58) sts. Turn. (93 (95, 97, 99) sts)
Row 6 - 44: Continue in established pattern, reducing by 2 sts total on each row, until you are left with 15 (17, 19, 21) dc sts in the last row. Turn.
Row 45 (45, 47, 47): Do not ch. Skip the first st and the marked st, sc in the remaining 13 (15, 17, 19) sts. Break yarn and finish off.
ASSEMBLY:
Lay out the rectangles as shown below (note that these are NOT perfect rectangles, but they have a wobbly winged shape - don't panic!). Make sure the first row of each rectangle is pointing toward the center. The two furthest away will be the back of the poncho, and the ones closest to you will be the front.
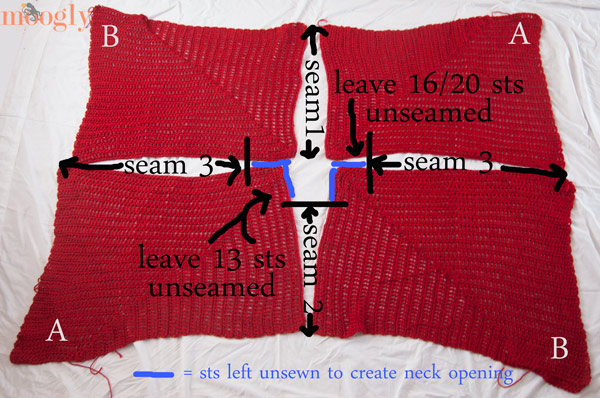
Seam 1: Use the mattress stitch to sew the center seam of the A and B furthest away to create one piece for the back of the poncho.
Seam 2: Use the mattress stitch to sew the center seam of front set, EXCEPT for the top 13 sts (approx 6").
Seam 3: Use the mattress stitch to sew the shoulder seams, leaving 16 (16, 20, 20) sts in the center unsewn for the neck. (Note that this is 16 or 20 sts TOTAL - so 8 or 10 per half.)
 COLLAR AND BUTTON LOOP:
Row 1: From RS join to left side (as worn) of top neck opening with sl st. Ch 1 and sc around the top (leave the V of the opening unworked). Turn. (32 (32, 40, 40) sts)
Row 2: Ch 2, dc in each st across. Turn. (32 (32, 40, 40) sts)
Row 3: Ch 1, sc in each st across. Turn. (32 (32, 40, 40) sts)
Row 4: Ch 2, dc in 1st 15 (15, 19, 19) sts, [2dc in the next st] twice, dc in the remaining 15 (15, 19, 19) sts. Turn. (34 (34, 42, 42) sts)
Neck edging and Button loop: Ch 1, sc in each st across top, work 3 sc into the corner, sc along the left (as worn) edge of the V, and then up along the right (as worn) side of the V, creating a ch button loop big enough to go around the button of your choice, opposite where you want the button to be located. (See photos). Continue to sc to the first sc of the neck edging, break yarn and seamless join.
EDGING
Time to try it on! If you're busty and the front is too short for your preference, now is the time to add some length in front by working a few rows of dc and sc across the front hem before adding the edging. To add the final edge, sc all around bottom/arm opening. Weave in all ends.
And that's all there is to it! I think the Fairy Tale Poncho would look amazing in an emerald green, deep blue, winter white - any color really! Change it up by adding a hood in place of the collar, cinching it in with a skinny belt, or adding a fancy edging around the hem - I can't wait to see what you make of this pattern!
 Written pattern copyright Tamara Kelly 2013. Please do not reprint or repost this pattern, but please do link to this page to share this pattern with others. If you wish to make items for sale from this pattern, please visit the About page for details.

Brenda Lively
Quick clarification, please. On the materials list, that is 1250-1500 "grams" for the yarn, yes?
Tamara Kelly
Oops, no that's yards! Sorry!
Brenda Lively
Wow, that a lot of yarn! Thanks.
Tamara Kelly
About 5-6 skeins, depending on size. 🙂
Darci
This is the info I needed! How many skeins??? Thank you! I'm going to have to start by making 3 of these, one for each of my daughters, but I'm sure my mom, sisters and friends are going to want one for themselves too! Love this piece! Also, could you add a link to website so we could print the pattern without the advertisements?
Tamara Kelly
Hi Darci! Thank you! To print the pattern, just use the green Print Friendly button at the bottom of the pattern post. 🙂
Brenda Lively
OK, actually did the math. :/ Not so bad after all. 😉
Kelly
I love love love this pattern! I just told my husband I need a jacket poncho or something. In Texas we have Sumer, spring, fall and winter all in one week or day! So this will cover all of above thank you for the share! You are so talented!
Angel
It's beautiful! Putting this on my must make list for after the holidays!
Melissa
Oh, this is absolutely beautiful! After my Christmas crocheting extravaganza for others' presents, this can be my present to myself. I love it!
Tamara Kelly
😀 Thank you Melissa! Just what I had in mind!
Amy Davis
Love this! Is rectangle A numbered wrong or did row 4 get omitted accidentally? Thanks, can't wait to make this!
Tamara Kelly
Whoops, just forgot to hit enter after Row 3! 🙂 I'll fix it now.
Melissa
Love this! And since I work for our local school district I am on a fabulous 17 day Christmas break with my kids!! Buying yarn today to make myself a little Christmas gift!! And one for my sis too!!
Beth Smarr
I can't wait to try this pattern, but I am interested in doing it as one piece. I will tyr to figure that out, but I am interested in how you did it.
Claudia Marley
Thank you for the beautiful pattern!
Mardie
I'm a 4 xl how long is the poncho. Can't wait to get started.
Tamara Kelly
Hi Mardi! Neck to hem it's about 20 inches long laid flat, a bit longer worn (due to gravity). I'm a 3X and it's about 2-3 inches below my natural waist, but I'm not very busty. I would definitely recommend trying it on after assembly and before you do the edging to see if you need to add more length as described in the pattern.
Lacey
Hi. I just finished up my pieces and am seaming them together. I am a 3x and am going to have to add another 8 inches or so to the front and back of the poncho to make it long enough for my taste. I may end up adding a bit more than that simply because I want it to be somewhere around my hips instead of just below my waist. So, I've noticed that I'm going to have to buy more yarn to finish it. I've used 2 of the Big skeins of Michael's Impeccable yarn and will probably need at least one small skein to finish. All in all I"m really happy with the way the poncho has turned out, and will be glad to get it finished so I can wear it.
Vilmøy gaustad
I've been scrolling over your plage the last week, and i've found so much i want to crochet! Im just a beginner, only ever made hats, but im now wanting to more on to bigger projects. I also just found the page im enclosing, emmaoclothing. Have you seen those beautiful dresses? I would love to make one like that, and im guessing im not the only one. Maybe you can take a look and see if you can make a simular pattern?
http://shop.textalk.se/en/shop.php?id=21273
Tamara Kelly
Thank you Vilmoy! Those dresses are say Russian crochet to me - check out some Russian crochet sites, I think you'll find what you're looking for! 🙂
Linda D.
Hi Tamara,
I found you via a link on another website and I can't wait to make this poncho for myself. It is so refreshing to see someone who designs a pattern for full size women. I'm signing up for weekly newsletter and look forwarding to trying your patterns.
Tamara Kelly
😀 As a full size woman myself I understand exactly where you're coming from! Glad you like it, and thank you for signing up!
Tamara Kelly
😀 Thank you Linda!
Kathy s
Hi Tamara, First let me say that I love this poncho! I can't wait to finish it and try it on. I am stuck on the collar and button loop. I don't think that the instructions are complete for the collar part. At least they are not making sense to me. Could you look that over please? I have enjoyed making several of your patterns and love your posts. Thank you for all that you share with us.
Tamara Kelly
Oh my gosh, you're right! Some weird publishing snafu there. I'll get on that right away, should be fixed very soon!
Sandra
Gauge? Or how long is you 104 chain?
Ishtar T
Is that pattern for size small? I'm 5ft and don't want to make one too big
Tamara Kelly
There are several sizes in the pattern. 🙂
Rebecca
I was wondering if there was anyway to add like a flowey hood to it, like Little Red Riding hood? And if so could you tell me how to make it please? i am a beginner crocheter. :]
Tamara Kelly
Hi Rebecca! To do that you'd want to continue the collar to the height of your head, then fold it in half and seam. You can get a better idea of how this works on the Cuddly Cat Scoodie: https://www.mooglyblog.com/cuddly-cat-crochet-scoodie/ 🙂
Jane
I have sewed all my life - but is this "mattress stitch" a crochet term? How do you do it?
Tamara Kelly
Hi Jane! The mattress stitch is the same as the hand sewing stitch. 🙂 There is a tutorial video linked in the pattern.
Jane
Thanks so much. I missed the note about the tutorial video. Thanks again.
Nina Gambrel
Can you explain how to do the sc2tog skipping 1 st in the middle? I know how to sc2tog but Im confused on the skipping 1st In the middle.
Tamara Kelly
I can try! Ok, so when you have a sc2tog, you could say that there are two "legs" - one goes into the first stitch, and the other goes into the next stitch, and then you yo and pull through to pull them together into one stitch. Follow me so far? So to skip 1 in the middle, you put the first leg in the first stitch, as usual, then instead of putting the second leg in the next stitch, you skip that stitch and go into the stitch after that. Then yo and pull through to finish as usual. Does that help?
NINA GAMBREL
Yes it does. Thank you much. I can't wait to start a new project.
Jodi
I couldn't figure out the stitches so I used your pattern as a guide. I also constructed a hood. I had wanted to put a pic on here so you could see it. Please email me for the pic. Thank you for the awesome pattern
Tamara Kelly
Thanks Jodi! You're welcome to post photos on the Moogly Facebook page! 🙂
Erin
Incredible! I hope to get the skills to one day make this!
Tamara Kelly
Thank you so much Erin!
Farah hani
If I may ask does crochet hook size 2.5mm and 2.55mm make difference in crocheting? Because I left my crochet hook size 2.55 mm in school and at home the only closest size I have is 2.5 mm. Can I use my 2.5 mm to continue with my project that was done by 2.55 mm crochet hook?
Tamara Kelly
Hi Farah! That's a tiny difference, but it's also a very small hook... it may make a difference, but you might be able to "correct" for it with tension, by working ever so slightly looser. But .05mm is not a huge difference, so I think it might just be doable. 🙂
Farah hani
Thank you so much!
Jane
I've wanted a red cape forever & this one looked good & it looked simple, so I got busy. Normally I wear a size 12-14 or XL so I made the L/XL. It's probably me but it seems short front & back, while the arms are almost too long. I have belted it & this helps a little. What did I do wrong? Any ideas on how I could fix this one or correct the problem if I decide to make another one? I really would consider making another one.
Tamara Kelly
Hi Jane! This poncho has a unique fit, with short front back and longer arms. It's not really a cape I'm afraid.
freespiritczs/cindyzs
i LOVE this!!!i wish i had the yarn to make it!! 🙂 tfs
kelly
I have made this poncho but i actually works like to double it in length, keeping the front shorter than the back. I was wondering if I were to make 4 more rectangles and sew them on would that work? Or do you have some suggestions?
Tamara Kelly
That sounds like it might be the easiest way!
Kim
I've been looking for a gorgeous shawl wrap for the longest time now, and it seems every single time I find a pattern I absolutely LOVE, it comes from Moogly....I see that name on a pattern, and I get all giddy, because I know I'm going to love making it as well as wearing it...thank you so much for sharing your amazing talent and all of your stunning patterns. xo
Tamara Kelly
Wow, thank you so much Kim! I really appreciate you saying so!! ♥
Danielle Drown
If one were to make this worth shock yarn, how much would be needed and what hook size would you use?
Danielle Drown
With sock yarn I mean
Tamara Kelly
You would need a much smaller hook - probably a G or an H. As for how much yarn, it's impossible to say without making a swatch in your gauge with your chosen yarn and then doing a whole lot of math and redesign of the piece.
michelle
Hi I love this poncho but I am just wondering if you could explain please, at end of side A it says break yarn and seamless join, how do I do this please? Am I not just weaving in the end?
Many thanks michelle
Tamara Kelly
Hi Michelle! The seamless join tutorial is at https://www.mooglyblog.com/crochet-video-tutorial-seamless-finishing-when-working-in-the-round/ - it gives a more polished edge. 🙂
Deborah
SITUATION--ROW 6-44 SAYS CONTINUE ESTABLISHED PATTERN..REDUCING BY, TWO STITCHES..ALL OTHER ROWS I WAS REDUCING ONE STICHE ONE TIME EACH ROW IN THE SAME SPOT...AM I REDUCING BY TWO STICHES EACH ROW NOW AND IN WHAT STITCHES?
Tamara Kelly
Hi Deborah! When you "sc2tog skipping 1 st in the middle" that reduced the stitch count by 2 on each row - the one that is skipped in the middle, and the 2tog.
SILVIA
I AGREE WITH ALL THE PERSON RECOGNIZING YOUR TALENT AND GOOD HEART SHARING YOUR BEAUTIFUL CREATIONS.
THANK YOU VERY MUCH.
Tamara Kelly
Thank you Silvia!
Dianna
Hi Tamara. I really want to make this for myself but was wondering if I could do it in sc to make it more closed? Or maybe hdc... I realize I would need to add rows....
Lesie
I'm not a "poncho person," but this pattern has converted me! I enjoy so many of your patterns; thanks for sharing this one!
Tamara Kelly
Thank you so much Lesie!
amy mclarty
Thank You so much for sharing this wonderful piece. HappyY Holidays!
Tamara Kelly
🙂 Thank you so much Amy!
crochet
wow lovely poncho i will try this for my daughter....
Tamara Kelly
🙂 Thank you so much!
Nicole
I am absolutely thrilled that I found this pattern. I have been looking for a poncho to make for myself and a friend. I love that this pattern works for all body types. I think I may add a hood to the ones I make. If I can figure it out. I'm somewhat new to crochet but fingers crossed. I hope I can pull it off. Thank you for everything you do. Keep up the amazing work.
Tamara Kelly
Thank you so much Nicole! 🙂
Lucy Caitlyn UK
As well as with boots & glass slippers it's excellent in a wheelchair!
It can be so hard finding a top part cover up that is pretty and doesn't
give so much extra bulk because you're sitting down.
Going to try this in pastel colours as it is hot here at present (a rare change)
though even in heat I need some cover up.
Tamara Kelly
Thank you, I hope you enjoy making it!
SAVANNAH
I'm definitely going to try this sometime soon! I'm probably going to leave the front open, though, so it's more like a cloak than a poncho. This one looks stylish enough that I might not get made fun of at school for wearing it, lol.
Maria
My gauge is off: 7 rows is 3 inches and 10 DCs across is 4 inches (sometimes 10.5 stitches depending where I gauge from). Can you provide measurements for each rectangle for a size S/M? For example, rectangle A is 20x25 and rectangle B is 30x40 (just making up numbers here). Don't have access to the person to measure and want to provide as a gift. Or is my gauge close enough?
Tamara Kelly
Hi Maria! This is an old pattern and I no longer have access to the piece so I cannot give measurements. But I would recommend using extended dc sts in this case, as a super easy way to get a bit closer to gauge! (And at a certain point, it's definitely close enough, especially with this pattern) 🙂 There is a tutorial at https://www.mooglyblog.com/extended-double-crochet-exdc/
Maria
Oh! What a great tip! I'll give it a go.
Loreen Haydu
Hi Tamara - thank you so much for this fantastic pattern! I have used this pattern to make several ponchos and it looks amazing every time. I have switched up the fibres I use (from lace to DK) and love the result everytime. I am attempting to make the collar for th first time and I am not understanding the row 1 instruction in terms of where I am starting. Can you please help?
Tamara Kelly
Thank you so much Loreen! If you look at the image above with the parts labeled A and B that show how they get sewn together, look at the blue lines that make the 7 shape, but at a right angle - where you don't sew. That corner is where you join for the collar. Does that make sense? 🙂
Loreen Haydu
That helps! Just want to be clear that I am joining the front to the back piece starting on the right side of the garment as worn. Is that correct?
Tamara Kelly
If I understand you correctly, yes. 🙂
Valerie
I would like to increase the height of the collar on this pattern without messing up the pattern. What would you recommend.
Tamara Kelly
You should be able just add more rows. 🙂
Lyz
I made this pattern in the L/XL using redheart supersaver and the recommended hook size- I checked my gauge and everything... it looks like it would better fit my 8 yr old niece rather than me! What did I do wrong??
Tamara Kelly
I really don't know, did the squares come out the right size?
Lyz
So as an update, I frogged the one I'd made and started over with some adjustments to the starting chain and my hook size and it came out much better! I'm a very busty 5'9" so I used 3 skeins of lion brand pound of love and a size K with a starting chain of 161 per piece. Following the rest of your instructions as they were written, it came out beautifully! Can I send you pictures?
Tamara Kelly
I would love to see it, Lyz! tamarakelly@mooglyblog.com 🙂
Lana
Started on this but I don’t care for how it looks. It just doesn’t do it for me. I’m concerned nobody has posted pictures for living it so much, it seems easy enough to do I’m just not liking the whole wobbly wobbly pieces and shape.
Tamara Kelly
It was my first attempt at designing an adult garment, and a little experimental too. 🙂
Lana
I think I figured it out. I couldn’t figure out how it went together. Haha. Now it makes sense. I like it. I was making it too hard or complicated. It’s a neat design. I shall press on.
Tamara Kelly
Oh I'm so glad! I do hope you enjoy it!
Az
Do I have to do the decrease stitches?? Will it make a difference if I don't
Tamara Kelly
Without the decreases I think you're just making a blanket!
megan
Hello! I am working on this pattern now. If I wanted to add arm holes, where would be a good place to leave a gap in the pattern? I don't think leaving gaps in the seaming will work bc the holes will need to be further forward to sit right on the body. so between which two rows would you recommend leaving a gap to achieve this? Thank you!
Tamara Kelly
Hi Megan! That really depends on how you want it to fit. I'd recommend making the two back piece, and using those to figure out where you'd like the holes in the front.