What's better than a great big ball of yarn, and a trip to the big city?! Making a set to wear there - the City Lights Hat and Mitts Set! Both free patterns, right here on Moogly!


Disclaimer: This post includes affiliate links. Pattern support provided by Lion Brand Yarns.
I'm heading to New York for a fun/business trip next month, so I wanted to make a new crochet hat and matching mitts - and when I saw Lion Brand Wool-Ease Thick & Quick Bonus Bundles in the City Lights colorway, it was practically fate! But you don't have to travel to New York for this yarn - you can get it at over 800 Michaels stores, Michaels.com, and Lion Brand.com!
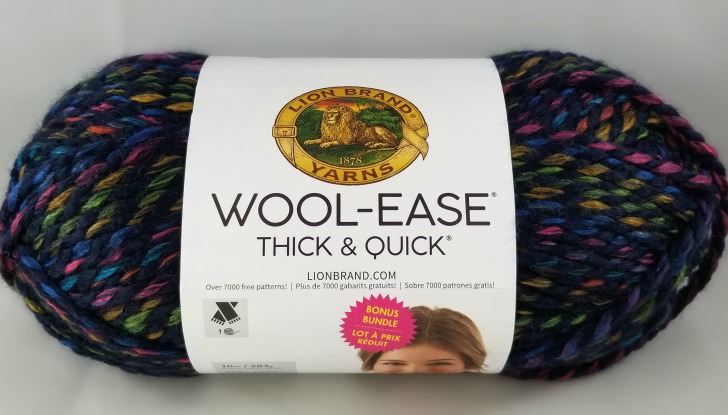
With the Wool-Ease Thick & Quick Bonus Bundle, you get enough yarn to make this hat and mitts set with just one ball - or you can use two balls of the standard size! Either way, this super bulky set will work up super fast. The hat has some fun loops to add texture and keep it interesting, while the mitts are quick, easy, and cozy!

City Lights Hat and Mitts Set
Add this pattern to your Ravelry Queue and Favorites
US - N, 9mm hook - Furls Crochet
Lion Brand Wool-Ease Thick & Quick Bonus Bundle (Super Bulky/6/UK: 14-16 ply; 174-212 yds/157-194 m; 10-12 oz)
Colorway Shown: City Lights (1 ball per set)
OR
Lion Brand Wool-Ease Thick & Quick (Super Bulky/6/UK: 14-16 ply; 87-106 yds/80-97 m; 5-6 oz)
(Would require 2 balls to make both the hat and mitts)
Stitch Markers - Clover
Pom Pom Maker - Clover (optional)
Gauge: 7 sts x 4 rows = 4" / 10 cm in dc
Sizes:
Small Adult (21" head circumference and 6.5" wrist circumference)
Large Adult (23" head circumference and 7.25" wrist circumference)
Helpful Links & Tutorials:
Foundation Double Crochet (FDC)
Joining Foundation Stitches to Work in the Round
Front Post Double Crochet (FPDC)
Chainless Starting Double Crochet
Double Crochet Decreases (dc2tog)
Gathering Hat Crowns with Long Tails
NOTE:
Hold all ch-10 loops to the front and work tr sts behind them.
If desired, substitute a Chainless Starting Double Crochet for the "ch 3 (counts as first dc)" when indicated.

CITY LIGHTS HAT INSTRUCTIONS:
SIZE SMALL
Rnd 1: FDC 34; join to work in the round (see linked tutorials above). (34 sts)
Rnd 2: Ch 1, hdc in blo of first st, fpdc in next st, *hdc in blo of next st, fpdc in next st; rep from * around, join. (34 sts)
Rnd 3: Ch 1, hdc in blo of first st, [fpdc in next st, hdc in blo of next st] 3 times, ch 10, skip next st, [hdc in blo of next st, fpdc in next st] 4 times, ch 10, skip next st, [fpdc in next st, hdc in blo of next st] 3 times, fpdc in next st, ch 10, skip next st, [fpdc in next st, hdc in blo of next st] 4 times, ch 10, skip next st; join. (4 ch-10 loops, 30 sts)
Rnd 4: Ch 3 (counts as first dc here and throughout), *ch 10, skip next st, dc in next 5 sts, tr in next skipped st 2 rows below, dc in next st, ch 10, skip next st, dc in next 6 sts, tr in skipped st 2 rows below,** dc in next st; rep from * finishing last rep at **, join. (4 ch-10 loops, 30 sts)
Rnd 5: Ch 3, *tr in next skipped st 2 rows below, dc in next st, ch 10, skip next st, dc in next 5 sts, tr in next skipped st 2 rows below, dc in next st, ch 10, skip next st,** dc in next 6 sts, rep from * finishing last rep at ** with 5 sts rem, dc in last 5 sts, join. (4 ch-10 loops, 30 sts)
Rnd 6: Ch 3, dc in next 2 sts, *tr in next skipped st 2 rows below, dc in next st, ch 10, skip next st, dc in next 5 sts, tr in next skipped st 2 rows below, dc in next st, ch 10, skip next st,** dc in next 6 sts; rep from * finishing last rep at ** with 3 sts rem, dc in last 3 sts, join. (4 ch-10 loops, 30 sts)
Rnd 7: Ch 3, dc in next 4 sts, *tr in next skipped st 2 rows below, dc in next st, ch 10, skip next st, dc in next 5 sts, tr in next skipped st 2 rows below, dc in next st, ch 10, skip next st,** dc in next 6 sts; rep from * finishing last rep at ** with 1 st rem, dc in last st; join. (4 ch-10 loops, 30 sts)
Rnd 8: Sl st in next st, ch 3, dc in next st, *dc2tog, dc in next 2 sts, tr in next skipped st 2 rows below, dc in next st, ch 10, skip next st, dc in next 5 sts, tr in next skipped st 2 rows below, dc in next st, ch 10, skip next st,** dc in next 2 sts; rep from * finishing last rep at **, join. (4 ch-10 loops, 28 sts)
Rnd 9: Ch 3, *ch 10, skip next st, dc in next st, dc2tog, dc in next 2 sts, tr in next skipped st 2 rows below,** dc in next st; rep from * finishing last rep at **, join. (4 ch-10 loops, 24 sts)
Rnd 10: Ch 3, *tr in next skipped st 2 rows below, dc in next st, ch 8, skip next st, dc in next st, dc2tog,** dc in next st, rep from * finishing last rep at **, join. (4 ch-10 loops, 20 sts)
Rnd 11: Braid the loops (see linked tutorial above) and use stitch markers to secure the loops from Rnd 10 in place, then ch 2 and dc in next st (counts as first dc2tog), *sc in next ch-10 loop, tr in next skipped st 2 rows below,** dc2tog twice; rep from * finishing last rep at ** with 2 sts rem, dc2tog, join. (16 sts)
Rnd 12: Ch 2 and dc in next st (counts as first dc2tog), dc2tog around; join and break yarn leaving a long tail. Use the tail to gather the crown closed (see linked tutorial above). (8 sts) Add pom pom if desired.
SIZE LARGE
Rnd 1: FDC 38; join to work in the round (see linked tutorials above). (38 sts)
Rnd 2 and 3: Ch 1, hdc in blo of first st, fpdc in next st, *hdc in blo of next st, fpdc in next st; rep from * around, join. (38 sts)
Rnd 4: Ch 1, hdc in blo of first st, [fpdc in next st, hdc in blo of next st] 3 times, fpdc in next st, ch 10, skip next st, [fpdc in next st, hdc in blo of next st] 4 times, fpdc in next st, ch 10, skip next st, [fpdc in next st, hdc in blo of next st] 4 times, ch 10, skip next st, [hdc in blo of next st, fpdc in next st] 4 times, hdc in blo of next st, ch 10, skip next st; join. (4 ch-10 loops, 34 sts)
Rnd 5: Ch 3 (counts as first dc here and throughout), *ch 10, skip next st, dc in next 6 sts, tr in next skipped st 2 rows below, dc in next st, ch 10, skip next st, dc in next 7 sts, tr in skipped st 2 rows below,** dc in next st; rep from * finishing last rep at **, join. (4 ch-10 loops, 34 sts)
Rnd 6: Ch 3, *tr in next skipped st 2 rows below, dc in next st, ch 10, skip next st, dc in next 6 sts, tr in next skipped st 2 rows below, dc in next st, ch 10, skip next st,** dc in next 7 sts, rep from * finishing last rep at ** with 6 sts rem, dc in last 6 sts, join. (4 ch-10 loops, 34 sts)
Rnd 7: Ch 3, dc in next 3 sts, *tr in next skipped st 2 rows below, dc in next st, ch 10, skip next st, dc in next 6 sts, tr in next skipped st 2 rows below, dc in next st, ch 10, skip next st,** dc in next 7 sts; rep from * finishing last rep at ** with 4 sts rem, dc in last 4 sts, join. (4 ch-10 loops, 34 sts)
Rnd 8: Ch 3, dc in next 5 sts, *tr in next skipped st 2 rows below, dc in next st, ch 10, skip next st, dc in next 6 sts, tr in next skipped st 2 rows below, dc in next st, ch 10, skip next st,** dc in next 7 sts; rep from * finishing last rep at ** with 2 sts rem, dc in last 2 sts; join. (4 ch-10 loops, 34 sts)
Rnd 9: Sl st in next st, ch 3, dc in next st, *dc2tog, dc in next 3 sts, tr in next skipped st 2 rows below, dc in next st, ch 10, skip next st, dc in next 6 sts, tr in next skipped st 2 rows below, dc in next st, ch 10, skip next st,** dc in next 2 sts; rep from * finishing last rep at **, join. (4 ch-10 loops, 32 sts)
Rnd 10: Ch 3, *ch 10, skip next st, dc in next st, dc2tog, dc in next 3 sts, tr in next skipped st 2 rows below,** dc in next st; rep from * finishing last rep at **, join. (4 ch-10 loops, 28 sts)
Rnd 11: Ch 3, *tr in next skipped st 2 rows below, dc in next st, ch 8, skip next st, dc in next 2 sts, dc2tog,** dc in next st, rep from * finishing last rep at **, join. (4 ch-10 loops, 24 sts)
Rnd 12: Braid the loops (see linked tutorial above) and use stitch markers to secure the loops from Rnd 11 in place, then ch 2 and dc in next st (counts as first dc2tog), *sc in next ch-10 loop, tr in next skipped st 2 rows below, dc in the next st,** dc2tog twice; rep from * finishing last rep at ** with 2 sts rem, dc2tog, join. (20 sts)
Rnd 13: Ch 2 and dc in next st (counts as first dc2tog), dc2tog around; join and break yarn leaving a long tail. Use the tail to gather the crown closed (see linked tutorial above). (10 sts) Add pom pom if desired.

CITY LIGHTS MITTS INSTRUCTIONS:
INSTRUCTIONS WRITTEN AS SIZE SMALL(LARGE) WHERE DIFFERENT STITCH AND ROW COUNTS ARE USED - MAKE 2
Rnd 1: FDC 12(14); join to work in the round (see linked tutorials above). (12(14) sts)
Rnd 2 and 3(4): Ch 1, hdc in blo of first st, fpdc in next st, *hdc in blo of next st, fpdc in next st; rep from * around, join. (12(14) sts)
Rnd 4(5): Ch 3 (counts as first st here and throughout), dc in each rem st around; join. (12(14) sts)
Rnd 5(6): Ch 3, dc in first (same) st, dc in each rem st until 1 st rem, 2 dc in last st; join. (14(16) sts)
Rnd 6(7): Ch 3, dc in next 4(5) sts, 2 dc in next st, skip 2 sts, 2 dc in next st, dc in last 5(6) sts; join. (14(16) sts)
Rnd 7(8): Repeat Row 4(5). (14(16) sts)
Rnd 8(9): Repeat Row 4(5), break yarn. (14(16) sts)
I just love the colors of the City Lights Set - such a fun colorway! And I also love that it took just one Bonus Bundle to make the entire set!
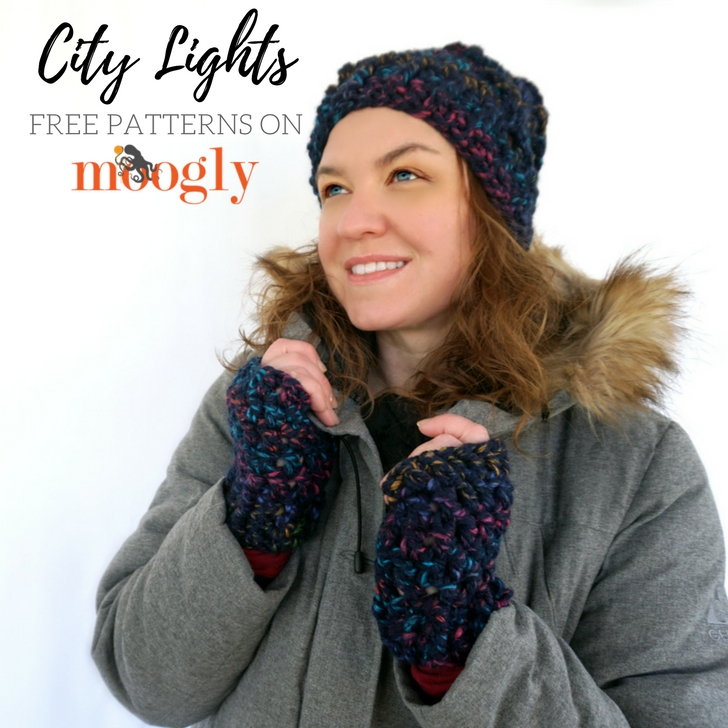
I hope you enjoy making it too - if you share photos, please tag me on Instagram or Twitter @mooglyblog so I can see them too! I love seeing what you make with Moogly patterns. ♥
The Fine Print
Written pattern copyright Tamara Kelly 2017, all rights reserved. Please do not reprint or repost this pattern, but please do link to this page to share this pattern with others. If you wish to make items for sale from this pattern or translate it to another language, please visit the About page for details. Thank you to Lion Brand Yarn for providing the yarn for this pattern.


Steph
Tamara,
Thank you! This is exactly what I was hoping to find today! My kids walked to the store by themselves and spent their own money to buy me some yarn for Christmas❤️. I needed a special pattern for this special yarn! You never disappoint!
Steph
Tamara Kelly
♥ How wonderful! What great kids - happy new year Steph (and family)!
Katy
Oh no Tamara! I just cut myself off from yarn yesterday and then opened up instagram and saw this. 😠 😉 😂
Tamara Kelly
Mwahahahaha! 😉
Selina
Hi! I'm working up this pattern right now. I have a question about rnd 4 on the small hat size. Can I post my question here??
Tamara Kelly
Hi Selina! Please do! 🙂 I'd be happy to try to help!
Selina
I'm just not sure if I'm going in to the right stitch for the dc after the tr in the row below.
Tamara Kelly
You would skip the stitch behind the tr and go to the next st for the dc - does that make sense?
Selina Gutierrez
I think I got it! I put a faux fur pom on it and have gotten so many compliments. Thank you for this pattern and yarn suggestion!
Tamara Kelly
😀 I'm so glad to hear it, thank you Selina!
Charlie
Hi. Question... in round 3, do you hdc blo and fp hdc around the same stitch, or is it opposite stitch below that you go through? So, hdc blo round the fp stitch, or around the hdc blo below? I am not sure i have it right.
Tamara Kelly
They are consecutive, not the same. You fphdc around the next stitch, not the same one you worked the blo hdc into. 🙂
Jana
If I wanted to make the hat just a smidge bigger would 42 be an ok number to do? I noticed the small was 34 and the large was 38 so I went with 42. The 38 won’t go around my head even stretched out. Will it mess up the pattern?
Tamara Kelly
You might need to do another decrease round before gathering the crown, but I think it will be okay!
Jana
Thank you!!!